Visitors to Date:

blog counter

Building a House in Kala Point, Port Townsend, WA

Building a House in Kala Point, Port Townsend, WA
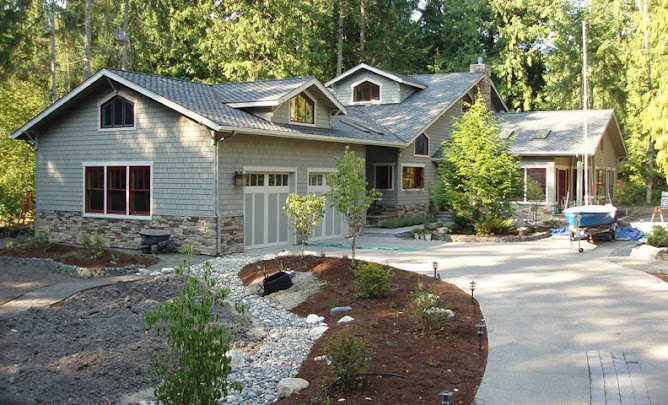
A running narrative of first-time builders of their retirement home in Port Townsend, WA (NE corner of the Olympic Pennisula, 60 miles NW of Seattle). Follow us as this adventure unfolds in late 2008 and beyond. 18 months under construction, we moved in on May 25th, 2010. Photo taken August 15, 2010.

Search This Blog

Tuesday, December 30, 2008

And It did . . . (Day 70 of 273)

So on Dec. 17th we left for 10 days in California and it snowed three more times here, setting some sort of record for Port Townsend. More importantly, it didn't get above freezing so we came back to 7 inches of snow and frozen wood. By Colorado standards it was a moderate frost, nevertheless Gary Ellis and crew had a much-deserved Christmas vacation (at no pay).

On Monday (first-day back), the temps were in the 40s, the generator was a chugging, and the nail guns were a firing. The power company still hasn't shown up to connect the temporary power; something about being over in Seattle dealing with all the downed trees and power outages (none over here). Gary and crew put most of the 45 floor joists in place, and finished them off this morning. Our soon-to-retire inspector (one-eyed Frank) spent 0.5 minutes inspecting the subfloor framing (all was well), and the Warmboard arrived at 9:30 am as requested (thanks again Mr. Carl). I made two trips to Carl's for more nails, some miscellaneous hardware, and various fittings. Did you know that a galvanized 1/2" x 7" bolt costs $4.25?; no, neither did I. Then I needed 6 torx screws (3/16" x 7"), which are sold in boxes of 50 for $70 (1.40 each), but I didn't need 50, just 6. So off to McHenerys (the McGuckins of Port Townsend), who sell them by the piece ($2.00). No big deal, just another bargain-searching expedition. I suspect that I spend 50% of my time looking to save $2 on some trival parts and 10% of my time accepting subcontracts for tens of thousands of dollars.

By the early afternoon, Ellis and crew had about 40 sheets of the Warmboard down, with 24 to go. They are being very careful, aligning the grooves and keeping them all in a row (Bruce Hull and Barry LaDuke of Warmboard would be pleased). We have four types of patterns: S (straight), L (left), R (right), and D (double). The Warmboard Co. does the design work and makes a layout sheet for us and the guys lay them down like gigantic Legos. It it all comes out right we'll use up all the sheets and have 7 loops (in 2 zones) to lay Pex pipe in.

Levi our hydronics expert recently went rogue and formed his own company (Levi's Energy Services LLC. We'll still deal with him as a subcontractor thru Sunshine Propane, but he's getting out there on his own for greater fame and profit (can't blame him in this business environment). Levi is a great guy: today he delivered the 2300 ft of Pex, all the manifold fittings and assorted pieces, and loaned us a tubing handler (roller contraption), heat gun, and electric caulk gun (no squeezing needed, Nancy

Tomorrow I’ll do all the custom routering of the Warmboard. This means using their templates to route connecting lines where neeed, and using a 1" drill to penetrate the plywood where the Pex needs to go into the basement. If it all works out as planned, we'll have 2300 ft of Pex in place and Gary and crew can proceed with vertical framing. If not, they're be a lot of discussion and some scurrying about.

Since the temps will be in the 40s when we lay the pipe this weekend, we'll need to heat it up a bit to bend it into the corners and to make the dives into the subflooring. Snow and freezing temps are the last thing we need now. It should be an interesting process. We’ll vacuum and wipe out the channels in the Warmboard, then I’ll roll out the tubing (ca. 300 ft for each loop). Nancy will put a 1/8" bead of Silicon caulk in the channel and I'll follow with the tubing, hammering it in place as we go. The bitter ends of the tubing need to extend into the basement far enough to attach to the manifolds, which is the heart of the radiant heat distribution system.
Friday, December 19, 2008

Let it snow, let it snow . . . (Day 59 of 273)

Well, Colleen of Denver wanted to know how and where the house sits on the lot. The lot is 200-240 ft deep and about 100 ft wide (0.6 acres), or about 4 x larger than the one that we had our house on in Denver. Its heavily treed on the back (E) left (N) side, but open to the right (S) and street side (W). We only left a few trees on the lot since most of it is occupied by something (house, garage, driveway, septic fields (front and rear-reserve), buried propane, and septic tanks. We build some low mounds in the front that will provide a visual break from the street, when vegetated.

We'll get good south sunlight from about 10 am to 6 pm in the summer, but just a bit in mid day in the winter because the sun only rises to about 20° above the horizon at noon. Makes you feel like you're living way north. The latitude here is about 47.5°, or 8 degrees north of Denver. Conversely, its still dusk at 10 pm in the summer, a great time to go down to our beach and poke around.

The house is 58 ft x 48 ft (N and E sides) and the garage is 30 ft x 26 ft. So the depth of the house is pretty long at 88 ft. The garage is set back about 75 ft from the street, with a long curving driveway. Those weird inclined lines on the image are the septic drains (5) in the front yard. We'll probably plant some type of ground covers in this area, since we're not interested in mowing or maintaining a lawn (sound familar Mackey).

Its still snowy and cold (26°F) today (Friday), so the framers are contemplating a Hawaiian vacation (or at least the sauna and hot tub at the rec center. Its not supposed to warm up until Christmas Day, so we won't miss any good weather while we're in the Bay Area. Merry Christmas.

Tuesday, December 16, 2008

Saw's sawing, hammer's nailing (Day 56 of 173)

On the heels of a terrible snow storm (2 inches, 28°F), Gary Ellis and his son Troy started the framing. They were there promptly at 7:30 am (daybreak here) and we off loaded my newly acquired Dewalt 7000W generator and fired it up. I bought this puppy over the weekend from a guy in Mt. Vernon, which is north of Everett and east of the Sound. Found it on Craigslist (no it isn't stolen) for $950, about 1/3 of the new price. He used it for 4 hours for backup power, then decided he didn't really need it. We have enough voltage to power all the Christmas lights in Kala Point.

About 8 am, Carls delivery truck arrived with $12000 of lumber for the subfloor framing, beams, sill plates and floor joists. He skidded the load off next the house and promptly got stuck. Troy pulled him out with their 4x truck and all was well. By lunchtime Gary and Troy had all the sill plates cut, drilled and bolted down and were starting on the Versalam beams, which run across the basement and crawl spaces. Next comes the 3" Versalam rim joists around the perimeter of the house, and then the floor joists, 2" x 11 7/8" BCI 5000s (these details are for Steve T).

Overkill you say— no just solid to resist Mother Nature's impending M8 earthquake Cascadia subduction zone earthquake (thanks Steve, Alan, Bob, and Sam, all USGS EQ research guys).

I managed to do some minor jobs (nuts on bolts) and chase down missing parts and lumber. By the end of the day everyone was pretty cold, but its starting to look like a house will rise from this spot. I've included some representative pictures of the subfloor framing and sill plates, and that cute little generator that is bound to drive my neighbor crazy in the morning. Notice the picture of a sill plate riddled with bolts. This is the "Ode to Mikael" at the front entrance, where we planted a Geo Washington dollar for good luck (see the Putzmeister, Day 42).

By Tuesday pm, Gary and Troy had all the sill plates bolted down, all six 5 1/4" Versalam beams in place, and were working on the rim joists (3" Versalam). These will take a while since they need to be attached to the sill plats with a Simpson A23 bracket (L-shaped angle bracket), about 150 in total. Thank god for nail guns.

The left photo shows a 12' long beam under the sauna, a header (beam) in the crawl space opening, and a 26' beam over the basement and under the main living area. The photo on right shows the whole 48 ft of the main beam. It came in 2 pieces, probably about 300 pounds each! Gary and Troy horsed in into place by themselves.

It looks like we're down for a while. It snowed again on Wednesday and Thursday and is staying cold. So I suspect the framers will lay off a while. I'd like to be back from Christmas break (Bay area for a week) when the cold Warmboard goes down. In addition, the installation notes say that the Pex piping needs to be laid at 40°F or higher, which is isn't even close to right now. Gary has another framing job behind ours, so he's motivated to finish, whereas we'd like to get a better weather window to lay the Pex done.

Thursday, December 11, 2008

Almost ready to frame (Day 51 of 273)

Its Thursday, and we're getting ready to backfill around the basement and crawl spaces on Friday. The inspector threw me a curve ball on Wednesday and said I needed a perimeter drain around the crawl space footers, as well as the basement. So off I went to Carls to buy 200 ft of 4" perforated flexible pipe with a sock on it (woven mesh to keep the fines out). This was way easier to install than the 4" sewer pipe (PVC), but you have to be careful to lay it on a gradually declining grade (no hills or humps). I ran this pipe down into the basement drain and into the sump. This afternoon we shot 12 tons (about 9 yds) of pea gravel onto the drainage pipes then Jason (a hired hand) and I will shovelled it around and raked it out into a 6"-12" thick layer. Any water around the foundation will settle here, move into the perforated pipe, and flow into the sump basin (we hope). I don't ever expect to see water in the sump basin but we have that base (and code requirement) covered now. Once the backfilling is finished, Gary Ellis and his crew of 2 will start the framing, it we'll have timber in the air before you can blink. He's thinking it will be 6-8 weeks to dry the house in, which means we'll try to roof this sucker in early February (burrr). All is well, for now.

Business is turning tough up here (and everywhere else). K&D Concrete, which did the foundation, had a couple of jobs lined up for December then had them canceled at the last minute. So Don had to lay off his staff until the first of the year, pending work. Subs that I called for estimates are calling me back looking for work. Gary the framer has one job following ours, but nothing else on the horizon. I suspect we won't have any trouble getting reasonable bids on the roof and drywall, which are the next two jobs I have to address. We'll start the plumbing and electrical (with a little help) when the house is dried in.

Thursday, December 4, 2008

Shooter trucks and the mag float (Day 44 of 273)

Sounds like a Clint Eastwood movie, right? The forms are off the walls, so Don is hot to trot and get the basement and garage slabs (floors) in. Yesterday we brought in clean 3/4" gravel for fill below the slabs. We needed about 25 yds in the garage, and Friday we'll order another 25 yds for the basement. Normally you'd just tip the dump truck up and pour the gravel in. However, our basement sits way back on the lot, so we're using an ingenious piece of machinery called a shooter truck (see photo). Basically its a 9-yd dump truck with a shoot and 25-ft-long conveyor belt. You rev up the conveyor belt, open the shoot and gravel goes a flying. It can be swung from side to side and elevated for distance throwing. The operators say the can shoot it 50-60 ft, so we'll see because its at least 40 ft. across the diagonal dimension of the basement, and no way to approach it from the rear. Should be exciting, especially the part where I (as in me) hold 4x8 sheet of plywood on the outside of the basement to act as a backstop for the flying gravel. Actually, you make a stand for the plywood and place it at the target, then skidaddle away.

This morning, the crew raked out the gravel, compacted it, covered it all with 6 mil plastic, and laid in the rebar on a 2' spacing. At about 9 am the concrete arrived and they poured the garage slab, about 10 yards. Since it was in the low 30s this morning, Don had them add hot water at the batch plant (warms the cold gravel), as well as accelerator (a chemical used to hasten setting up of the concrete), and it was poured on the dry side. All of these little tricks are intended to make the concrete set up quicker in the cool weather, otherwise they'd be there at midnight finishing it off. Don worked the concrete over with a "mag float" (photo to right), which has a light weight magnesium handle that extends to 30 ft in length. Then the young guys got on their knees and worked it over with hand trowels, all 780 square feet. Everything turned out fine and the troweling was done around 4 pm, about 8 hours after the concrete was mixed. It looks pretty good and will be hard enough to walk on in the morning.

While all this was going on I put in the 3" ABS drain pipe, floor drains and sump basin in the basement. All of this will be covered by gravel, then the slab will be poured over the pipe and up to the floor drains and sump basin. The perimeter drain for the outside of the basement comes through a 6"PVC pipe we cast in the footer, then enters the sump basin. Inside water (on the floor) and outside water will flow in the basin and be pumped up and out of the house through a 1.5 " pipe.

Tomorrow (Friday), they'll shoot gravel into the basement, so we're ready for inspection on Monday and the slab on Tuesday. There are sill a bunch of forms to be removed, but they'll do that in their spare time. So, we are almost done with the foundation. Framing should start in about a week, when all the concrete has cured for a 7 days (ca. 50% of full strength, which = 3000 psi).

Tuesday, December 2, 2008

The Putzmeister

The Putzmeister you say; probably some sort of golf term that Bob Fleming invented in the 60's. No, its the $880,000 concrete pumper we rented today. Probably German for "Pourmaster". Read on if you'd like to learn more about concrete prices and what it really costs to get it on the ground (especially for Richard and Darlene). Otherwise, go back to your cocktails and say a prayer for us.

The Putzmeister BRF 36 is a boom-mounted concrete pumper (see Day 17, but I digress). I found out a bit more about it, the process and prices in case you ever need to have concrete pumped on your building site. This Putzmeister is about 10 years old and cost $800,000 new, probably worth $400,000 or less in the current market. It has a 90-100 ft reach, Brundage-Bond owns it, and it comes out of Poulsbo, that cute little Norwhoovian town across the Hood Canal. (With this baby, you could fill your neighbor's pool full of whatever and leave no sign of entry.) The current rate for this intermediate-size model is $140/hr plus $2.5/yd of concrete pumped (the wear factor). So today, the Putzmeister left Poulsbo at 10:30 am, drove for an hour (at the $140 rate), pumped until about 4:00 pm (47 cubic yards), and made it back to Poulbo at 5 pm, just in time for the Simpsons (seems appropriate).

To make my business friends Ken O & Colleen happy, here is daily accounting:

Putzmeister @ $140 x 6.5 hrs plus 47 x $2.50/yd = $1027.50 (+ 8.4% tax) = $1113

Concrete @ 47 yds x $92/yr (delivered) = $4324 (+ 8.4% tax) = $4687

Add these together (~$5800) and the net cost for a yard of concrete on our lot is $123. $125/yd sound like a nice round figure if you plan to enter into such a folly in the Port Townsend area. By the time we're done pouring the foundation, we'll have laid 90 yards of concrete for about $11,250. However, don't forget the additional $25k for a half-mile of rebar, about 100 anchors, hundreds of 2x4 braces and concrete forms (2'x8' panels), and our concrete guys skill and hard labor (3 guys for about 45 total days). PS, Washington taxes everything, even labor.

Since this was such a blessed occasion, Nancy and I placed a 2008 Washington dollar coin in the foundation. Where you ask? Well at the entrance of course. It will be under a 2x8 sill plate, some BCI 5000 joists, Warmboard, and the front-door threshold, but that's only 15" so maybe the good luck will exude upward into each and every visitors feet. The second reason we put it here is because this is a little tribute to Mikael Brostrom, our structural engineer. It turns out that in this 8 ft section of the concrete wall there at 12 (yes TWELVE) hold downs. Four Simpson SBBTs and eight regular sill plate anchors. That is one anchor per 8", the highest concentration anywhere in the house and maybe the state of Washington.

When the building inspector asked me "How many SBBTs (Simpson tie-down anchors, in photo) there are in the foundation walls, I proudly said 42!" He countered with "I think that's a record for me as an inspector". He's retiring from the Jefferson Co. Building Dept. in two months, so I think this record will remain intact.

Forms are in, ready to pour (Day 42 of 273)

The forms for the basement and stem (short) walls are all in and squared up. In addition, long battens have been added to the inside of the forms to indicate the top of the poured concrete. On Monday (Dec. 1), Don (concrete), Gary (framer), and I met at the site to map out all the Simpson tie downs. In addition to the regular sill-plate tie downs, there are 42 Simpson hold down rods (SSTB) and brackets (HDU). The rods are hooked at the end (see photo) to engage horizontal rebar in the walls. The upper part is angled a bit to offset from center, and the upper 5" extends about the concrete (3.5" are threaded for coupling). The stack of materials we're holding down to the concrete consists of a 4x pressure treated sill plate (3.5"), BCI engineered joists (11 7/8"), Warmboard (1 1/8"), and a 2x sole plate (1.5"), so the threaded rod has to go through 15" of subfloor materials. So, in addition to the SSTB anchors, we'll have to use a coupler and an extension rod that is at least 12" long. I just priced the components, for yucks. The SSTB rods are $20-30 each (depending on length) and the HDU hold downs are $15-20 each, and the extension rods and couplers are another $5. So it looks like we'll use about $1500-$2200 of Simpson equipment just on the basement/first floor. The HDU brackets also are used to hold the upper plate, second floor joists, and second floor sole plate together. Then there are tie downs for all the roof joists, and a variety of others that I haven't even tumbled to. I suspect we'll be into the Simpson Strong Tie company by about $5000 before this sucker is screwed down to the Earth's crust. However, I've stopped thinking about the M8 earthquake Cascadia subduction zone that Alan Nelson and Brian Atwater have been teasing the pubic with. Its 200 km west and >50 km below us, so what is there to worry about?

In addition to the regular walls, we'll have two pads that support . The large pad in the basement (first photo) supports an overhead Versalam beam (3" x12 ") and the basement staircase. The second pad is in the adjacent crawl space and it supports the same beam under the bedroom. The beam is 48 ft long and runs N-S across the entire width of the house. In these photos (Jason, light-colored shirt) is putting the SSTB rods in place along the south (bedroom) exterior wall, whereas David (gray shirt ) is preparing to cut into the forms to place a metal beam support that gets poured in place. Its Tuesday am, and we're waiting for the second foundation inspection. Assuming he shows up this morning, we'll pour all the vertical walls and two pads this afternoon. No rain in the forecast, so all is well.

Finally, Gary Estes of Craighead Electric showed up at lunchtime on Monday to install the temporary power pole. This is a separate story in itself, but after getting approval from Puget Sound Energy (3 weeks), we were allowed to trench the three feet from the high-voltage transformer on our neighbor Kathy's property (formerly the Wallin house). Gary placed the power pole in the hole I dug, braced it up and laid about 10 ft of cable in the trench for PSE to connect to. After inspection, I'll call PSE for a temp hookup and we'll have 2 20 amp circuits available to the lot, just in time for Gary Ellis Construction to start the framing. He's pencilled in to start on about Dec. 11th, just 9 days from now. In the mean time, I need to get the first lumber and tie down package ordered from Carls. This will consist of sill plates and bolts, BCI floor joints, the Warmboard, and the basement egress window.

Wednesday, November 26, 2008

Speaking of logs

Here is a little logging humor:

A REDNECK DECIDES TO TRAVEL ACROSS THE SOUTH TO SEE GOD'S COUNTRY.

WHEN HE GETS TO VIRGINIA, HE LIKES IT SO MUCH HE DECIDES TO STAY... BUT FIRST HE HAS TO FIND A JOB.

SO HE WALKS INTO THE INTERNATIONAL PAPER COMPANY OFFICE, AND FILLS OUT AN APPLICATION AS AN 'EXPERIENCED LOG INSPECTOR'.

IT'S HIS LUCKY DAY, AS THEY JUST HAPPEN TO BE LOOKING FOR SOMEONE ... BUT FIRST, THE LOG FOREMAN TAKES HIM FOR A RIDE INTO THE FOREST TO SEE HOW MUCH HE KNOWS.

THE FOREMAN STOPS THE TRUCK ON THE SIDE OF THE ROAD, AND POINTS AT A TREE. 'SEE THAT TREE OVER THERE? TELL ME WHAT SPECIES IT IS, AND HOW MANY BOARD FEET OF LUMBER IT CONTAINS.'

THE REDNECK PROMPTLY ANSWERS, 'THAT THAR'S A WHITE PINE, WITH 383 BOARD FEET OF LUMBER IN HER.'

THE FOREMAN IS IMPRESSED! BUT HE STOPS ABOUT A MILE DOWN THE ROAD, AND POINTS AT ANOTHER TREE, AND ASKS THE SAME QUESTION. THIS TIME IT'S A TREE OF A DIFFERENT CLASS. 'THAT'S A LOBLOLLY PINE, AND SHE'S GOT ABOUT 456 CLEAR BOARD FEET,' THE REDNECK REPLIES.

THE FOREMAN IS REALLY IMPRESSED WITH THE GOOD OL' BOY! HE'S BEEN QUICK, AND HAS GOTTEN THE ANSWERS RIGHT WITHOUT USING A CALCULATOR! BUT HE NEEDED ONE MORE TEST TO BE SURE.

THEY DRIVE A LITTLE FURTHER DOWN THE ROAD, AND STOP AGAIN. THIS TIME HE POINTS ACROSS THE ROAD, AND SAYS, 'AND WHAT ABOUT THAT ONE?' THE REDNECK SAYS, 'WHITE OAK, 242 BOARD FEET.'

SO THE FOREMAN HEADS BACK TO THE OFFICE A LITTLE TICKED OFF BECAUSE HE THINKS THE REDNECK IS SMARTER THAN HE IS! AS THEY NEAR THE OFFICE, THE FOREMAN STOPS THE TRUCK, AND ASKS BUBBA TO STEP OUTSIDE. HE HANDS HIM A PIECE OF CHALK, AND SAYS, 'SEE THAT TREE OVER THERE? I WANT YOU TO MARK AN 'X' ON THE FRONT OF THAT TREE.'

THE FOREMAN THINKS TO HIMSELF, 'HOW WOULD HE KNOW WHICH IS THE FRONT OF A TREE?'

BUT WHEN BUBBA REACHES THE TREE, HE GOES AROUND IT IN A CIRCLE,LOOKING AT THE GROUND, AND THEN REACHES UP AND PUTS AN 'X' ON THE TRUNK. THEN HE WALKS BACK TO THE FOREMAN, AND SAYS, 'THAT THAR'S THE FRONT.'

THE FOREMAN LAUGHS TO HIMSELF AND SAYS, SARCASTICALLY, 'HOW THE HELLA DO YOU KNOW THAT'S THE FRONT OF THE TREE?!'

THE GOOD OL' BOY LOOKS DOWN AT HIS FEET (WHILE RUBBING THE TOE OF HIS LEFT BOOT, CLEANING IT OFF IN THE GRAVEL), AND REPLIES,
'CUZ SOMEBODY TOOK A DUMP BEHIND IT!'

HE GOT THE JOB ... AND IS NOW THE FOREMAN!!!

Peelers, Cutters, and Crunchers (Day 36 of 273)

Well, it seems to be easier to sell beets to Russians than timber to mills in the Pacific Northwest right now. Lumber prices have been declining for the past 2 years in parallel with the housing market, but now the Chinese (big-time raw lumber buyers) are cutting back. In late October we sold two loads of logs (30, about 16-24 ft long, mainly fir but a few cedars and alders) to a middle man that remarkets the logs to mills. We got $1230 for the wood, minus $250 for the loading and transport (100 mile roundtrip for Michael Handly trucking). So the net income from the lumber ($980) will defray about 15% of the clearing cost for the lot. Five years ago, our neighbor sold his logs for $3000, which more than paid for the clearing of his slightly smaller lot!

As I mentioned before, there could be three types of logs on our lot : Peelers, cutters and crunchers. Peelers are straight, thick, knotless firs that can be peeled for plywood veneers. Cutters are those knottier and slight crooked trees that will end up as 2x and 4x lumber. Then there are crunchers. These are basically small diameter logs that are headed for firewood or the pulp mill (crunch). We had no peelers, lots of cutters, and a few crunchers--so be it.

The process of selling the logs is interesting and all new to me (a desert guy). The logs ship to a buyers lot and he gets out his "Scribner Log Scale," which is a book of tables used to calculate the amount of board ft of lumber in a lot. Here are a couple of examples. Our biggest best log was 30 ft long and 16" in diameter: this will yield 300 bd ft of lumber. Most of the firs were 20-26 ft long, but ranged from 8-18" in diameter (logs smaller than 6" were left for firewood). Also, logs are prices by diameter and species. Firs >8" in diameter are priced at $375/1000 bd ft. So our biggest fir log came out at $112.50. As you can see, its hard to make money selling timber nowdays. The cedars (western red) are worth $800/1000 bd ft, whereas alders ranged from $100 (<6") to $600/1000 bd ft (>8"). So big cedars and big alders (for furniture) are the trees to have on your house site, if you have a choice.

We sold our better firs for 2x lumber at $375/Mbf, whereas Carls Building Supply in Port Hadlock gets $500-600/Mbf for premium 2x lumber. Not much of a margin considering that our logs still had to get to the mill in Tacoma, be cut and planed, and then shipped to a warehouse and to a lumber yard. The guy we sold our logs to (Tom French, Quilcene, WA) says he may be getting out of the timber business pretty quick. The straw that will probably break his back is the recent decline of the Canadian dollar. With decreasing oil prices, the Canadian dollar is plummeting, partly with the encouragement of the government as a way to increase exports. When I was in Canada racing Hobies last August, the Canadian dollar sold for $1.05 US, but now its around 80 cents. That means Canadian lumber can sell at a 20-25% discount to its price this past summer, when we were exporting lumber north to them. Carls buys most of its wood from Canada (better quality for the price, they say). The bottom line is the global economy effects about everything.

The question for us, as a builder, is how long do these price changes take to make it to the consumer. Inventories at all the lumber yards are high (low sales), so there might be a 3-month supply on hand. We plan to buy a lot of lumber (wood), ABS pipe (oil), PEX tubing (oil), some copper (Cu) tubing, and about 1/2 mile of copper Romex cable (Cu and oil), just to start. We'll just have to wait and see what goes up and what goes down. At least gas prices have come down, currently $1.99/gal in PT and a bit cheaper in Seattle.

Sunday, November 23, 2008

And they say that lumber is cheap now (Day 33 of 273)

The newspapers say that lumber prices are down about 15% and I believe it. The only problem is we need to buy a lot of it for this little house. We put the building plans out for estimates with two local lumber yards about 3 weeks ago and got the last of them back on Friday. Our favorite yard (Carls) came in pretty high ($58k), whereas the other local yard (which will go unnamed) was way lower at $30k. You have to take a close look to see what happened and you won't believe it, but the higher estimate was the better one (what are you nuts ? Machette).

Here's what happened. Carls uses a take-off company called "Estimates NW" in Vancouver, WA, whereas the other company didn't specify who prepared the materials list (I suspect they may have done it inhouse). Carls came back first, and after the shock, a couple bourbons, and a few days of ignoring it, I took a close look at their proposal. Their take off list is organized from bottom (basement) up. For example, the "Under Floor" listing included plastic for the crawl space, pressure treated hemlock/fir for the sill plates, some hardware, a Versalam post, and misc. large-dimension wood. So it went for each floor, the exterior, and the roof sheathing. (That's where the framers stop, and the roofers start.) Seven pages of materials, probably about 450 items althogether. From this materials list, Mike at Carls priced each item in the same order for their estimate. So, for example, you could see that the sheathing for the sides of the house (line 340) was going to be $1890 (140 sheets of 19/32" 4x8 OSB). Upgrading to plywood would be an extra $315 (ca. 20%). Pretty easy to understand with a few minutes of study. In addition, since each floor and each type of material (wood, hardware, siding, etc) was broken out you could identify where all the big bucks were going. They even included adhesive for gluing down the plywood flooring. Pretty darn complete.

By comparison, company B split out the estimate by floor but lumped similar lumber items together. Seventy items in all. No Simpson tiedown hardware was listed, nor any of the exterior trim or soffit materials. The truss estimate came as a separate item ($4500). Pretty hard to use, but I managed to identify some functionally equivalent items to compare the two estimates.

In general company B was 5-10% cheaper on some items. However, for studs and joists they would specify 2x and 4x lumber as KD Std&Btr (Kiln dried, standard and better quality). So by this bid they can supply standard lumber and that is what you get. Carls specified KD select (premium), which is better, straighter and less knotty wood. So you get apples and oranges for comparison. Even the floor joists are hard to compare. Our architect prefers Boise Cascade engineered lumber which Carls bid (BCI 5000, 2" x 11 7/8"), whereas the other lumber company bid Georgia Pacific (11 7/8"). The price was comparable, but I have to believe that Richard Berg has a reason to favor the BCI joists.

Terry at Carls re-bid the other lumber company's material list and Carls came out about $500 less (2%), which is surprising since Carls will supply a better quality of lumber. So this analysis is done (thanks Terry). Carls is comparible (or better) for price, quality, and delivery. In the end I may cherry pick a few generic items that are cheaper at the other local yard (like Hardiplank and house wrap) but buy the bulk of the framing package from Carls. Interestingly, the sawn cedar shingles for our siding were $70 a bundle at the other yard (est. 28 bundles), $56 a bundle at Carls (est. 100 bundles), but I can get them delivered from a mill in Forks, WA, for about $45 (a bundle). I figure I need about 95 bundles. There are 4 bundles in a square, which covers 100 square feet (just like roofing materials). So, by using the mill we might save about a $1000.

I normally would have got a third bid, probably from Kingston Lumber, which is about 30 miles away. However, they don't like to deliver in small lots and we don't want all the lumber on site at once (theft, weather, no place to park trucks, etc). I asked a dozen locals and 80% of them preferred Carls, so that's who is going to get the bulk of our lumber purchase.

You know what they say: You get what you pay for, sometimes less.

PS (Nov. 24th) The 64 sheets of Warmboard arrived in perfect condition this morning. They came from Willits, CA (near Redding) by flatbed truck. I was impressed with Carls' yardman (Kevin?) who unloaded the 3 packages. He told everyone that only he and another yardman were allowed to touch or move the Warmboard, and don't even think about getting another forklift near them. At $200 a sheet, they don't want to do any damage to our little radiant-heat bundle while they store it (then deliver it, all for free).

Sunday, November 16, 2008

Forms going up (Day 26 of 273)

The wall forms are going up. This process should take about 10 days, only because there are so many panels involved. I've never watched this carefully before, so its been a learning process. First, they nail a 10" wide metal bracket in the footer, centered under the vertical wall. Then 2' x 8' plywood panels (1" thick) are stacked on top of each other to reach the appropriate height (7' 10" for us). The forms are held together by wire stays that have spacers weled in at 8" and 10". After the concrete sets up, the stays are broken off and the forms come off.


We've had to decide where through-wall penetrations will go. That means where does the electrical, phone/cable, and propane come into the crawl spaces, and where does the sh__ (sewer line) get out. All but the sewer were easy. To predict the elevation of the exiting 4" sewer pipe, you have to design the drainage system upstream. Code requires 1/4" of fall per foot, so you need to add up all the linear feet of line for the longest line to the point where it goes into the subfloor joists. This turns out to be in the guest bathroom (The Hart Room for now, but naming rights are up for bid), about 70 ft upstream from the exit point. Simple math shows you need 18" inches of drop, so the blockout for the sewer line as placed at 22" below the joists (18" + 4" extra for safety). If the line falls too little, turds get stranded. If the line falls to much, turds get stranded by the loss of the mobilizing fluid. However, any extra vertical can be accommodated by a short section of 45° drop, which is beyond the angle of repose for a turd (all of this technical jargon is for Tony; enjoy it?). In addition, this drain line crosses two crawl space walls, so they needed to have blockouts marked.


So, Don (the big dog at K&D) left Friday for the Baja 1000 (km) off road race, which is a 24-hour drive to the south. He's in charge of the pit crew for the second of the three legs of the race. If the driver crashes, he'll be back early. If the driver scores well, then he'll have to celebrate for a day and who knows when he'll arrive back in PT. He left the two boys in charge, but they are AOL. My job is to make sure they get the blockouts, window frame (egress from basement), and two crawl access frames in the right places. Hopefully Don won't injure himself and will make it back in time to place all the Simpson tie downs (ca. 60) and other bolts in just the right spots. Concrete will go in at this point, immediately after the County's inspection. Target for the next pour is about Dec. 5th, a week later than I hoped but not too bad. Then again, everything depends on having relatively dry weather, which this area is not know for.

P.S. If you want a hot stock tip, buy Simpson (fasteners, tie downs, joist supports). All the new earthquake codes for the Western U.S. and other EQ prone areas require lots of this expensive stuff. The stock is currently $22.50 (SSD on NYSE), down 40% in the past 6 months, so watch this if the U.S. ever starts building houses again.


Just returned from a trip to Leavenworth (the Bavarian town east of the Cascades, not the prison). Pretty interesting little German-looking town, although no one appars to be from Bavaria. Its just a tourist hook--got us. Also came across Roslyn, a little Alaskan look-alike town that you'll remember from Northern Exposure (1990-1995). Its next to Suncadia, an upscale golf-retirement community that is just starting to build out (3-18 hole courses, Ken). Designed as a weekend getaway for Seattle golfers, but sales are slow and they have lots of unsold, expensive houses.

Wednesday, November 12, 2008

Warming the boards (Day 22 of 273)

Warmboard, that is. Its an expensive but eloquent radiant floor product (http://warmboard.com). They take 1 1/8" thick, high quality plywood sheets (4' x 8') and route a series of parallel 5/8" channels in it. Then, they place an aluminum sheet with adhesive on the plywood and push the aluminum into all the channels. The result is a giant lego-like radiant heating panel that goes down as a rigid subfloor (see photo below). The sheets have tonque and groove on the narrow ends and get laid out in a hop scotch pattern. The company does the design work ($300 refunded on purchase) for the architect and builder (us). The panels come in three forms: Straight, single-end returns, and double-end returns. We've ordered 64 panels (110 pounds each. ouch!) to be shipped by flatbed truck from Portland: they are about 2/3rd straight and 1/3rd return type.

Yesterday we finalized the heating plan for the Warmboard. We're using Sunshine Propane (http://www.sunshinepropane.com/index.htm), and specifically Levi Ross, because he has done several similar projects in this area. In fact, he just finished up a large home on the bluff above the Port Townsend marina. In addition, we're following the path of Tom & Dinese Christopher's house (see tomanddinesehouse.blogspot.com). They started construction about 3 months in front of us. Their house was designed by Richard Berg (http://richardbergarchitects.com/) and they used the same concrete guy (Don McNees, K&D), and framer (Gary Ellis, Ellis Construction), all by coincidence but encouraging.

We're using a 50 gal Polaris stainless-steel, high-efficiency hot water heater (propane, natural gas isn't available here). This will supply both domestic hot water and radiant hot water. The plan is to have 7 loops (300 ft maximum length) in two, thermostatically controlled zones. There are manifolds that distribute and collect the water and pumps to move it around. One thing I like about Levi's philosophy is to design as simple a system as possible to solve the problem. After being flummoxed for 3 weeks by the security system in our rental house, I'm taking the Warren Buffet approach -- if we don't understand how it works, then we're not going to buy and install it (and eventually fix it).

The piping is 1/2" (ID) Wisbo Aquapex, which is what we'll also use for the domestic hot (red pipe) and cold (blue pipe) water. This way, you'll always know what PEX you've accidentally cut through with the sawsall or punctured with the nail gun.

Levi is doing most of the heating and manifold installation, but encouraging us to take on anything within our skills. That means laying and caulking the PEX in place, doing the custom routering (about a dozen places), and doing some venting, construction, and wiring. Overall, if we do our job we'll save about $2500 (1/2 of the labor) and will be better prepared to tackle the PEX plumbing in a couple of months. Looks like I'll have to buy a few tools--no pain, no gain.

Saturday, November 8, 2008

Footers Poured (Day 17 of 273)

Well, it all came together on Friday even though we had a bit of wet weather. The forms for the footers (about 370 linear feet) and rebar were finished up on Friday morning, so the County inspector showed up at 9 am. We passed muster, and the pumper truck (see photos) was on the site by 9:30. Don ordered the concrete in three batches: 9 yds, 9 yds, and a final 4 yards to finish up.


The pour went smoothly with Scotty (on the right in back part of right photo) running the overhead boom by remote control, Don (red hat) directing the pour, and his two slaves (son David) using the vibrator (easy ladies) and Jason doing the finish work. A vibrating probe was used to remote air pockets, especially on the deeper pours (the vertical footers). It took about 3 hours to pour and place 22 yds of concrete, which seems pretty fast but Don has been doing this for 25+ years.

The concrete will set up over the weekend, then on Monday the cement-slaves will strip off all the forms and get ready to lay the wall panels and remaining rebar. They won't finish next week, so we'll have a week off when Don goes to Baja to support the local offroad racing team. Seems like everyone out here as an expensive recreational endeavor--I wonder what mine will be.

Wednesday, November 5, 2008

Learning from others (Day 14 of 273)

Our radiant heat guy (Levi Ross, Sunshine Propane) introduced us to one of his clients that recently built a house in the Cape George Colony, which is on the west side of the Quimper Pennisula and on the outshirts of metropolitan Port Townsend. They used Warmboard and did a lot of their own work, so Levi thought we'd have lots in common with them (yes, thanks Levi).

Anyway, last night Roger and Kyanne Anderson invited us over for dessert and a little "house talk." Well, that was quite an experience: good apple cobbler and more info on housebuilding than we could absorb. Nevertheless, the most important thing we learned is that everyday people can be their own general contractor and builder.

Roger was a lawyer and law professor; Kyanne is an occupational therapist, and they both are working part time after retiring and moving from Toledo. What was so interesting was the level of involvement that they had with their new house. They hired a local contractor (Little and Little, PT) to build the shell, and then they took over with most of the finishing work and remaining subcontracting (drywall, roof, interior wall painting). They installed cabinets and flooring, the staircase and hand railing (with returns), laid the tile and wood flooring, put up all the molding for the doors and windows, and are currently doing the landscaping. I was blown away to learn that Kyanne, a diminutive women in her 50s, did all the electrical work herself. She was tutored by a local electrican (Gary Estes, Craighead Electric, PT) who then looked in on her periodically. Her wiring passed inspection on the first try, which is better than some "professionals" manage to do. No dollar savings for their project were discussed, but it is obvious that they got way more house than they paid for and were able to upgrade certain features they wouldn't have been able to afford. They said that, in retrospect, they only made two mistakes. I deem that a Complete Success.

We borrowed a few books on electrical and tiling, and threatened to pester them with trival questions during our build out. We learned buckets full and even got dessert. How good can that be.

Tuesday, November 4, 2008

First Forms In (Day 13 of 273)

On Monday morning, Don and his crew (son David and Jason) started laying the footer forms. The foundation footers carry and distribute the load from the verticals and everything they support, and thus are the real foundation of the house. They must be placed on undisturbed ground, so no settlement occurs. No problem, they are on highly compacted glacial till which is mainly silty sand (verging on a poorly consolidated sandstone). In fact, they needed a sledge hammer to drive the form stakes into the ground. The bigger the load, the wider and thicker the footer. For example, the 8 ft high basement walls are supported by 1' thick footers, from 2' 6" to 16" wide depending on the what is above them. Where the footers step up from the basement (-9 ft) to the crawl space (-5 ft) there are vertical footers to accomodate the change in elevation.


Once the footer forms are in place, they'll start on the rebar. They place vertical rebar every couple of feet, and three layers of horizontal rebar. These are all tied together to create a strong matrix. In addition, the vertical walls are keyed into a 2"x4" slot in each footer.


If the weather holds, they may pour the footers on Friday (Nov. 7th), then start on the vertical walls next week. Notice the little quicky shed they built in the middle of the garage. This is where they'll keep the building plans dry (yeah, sure) during our occasionally moist days (read all day drizzle). Actually, we haven't lost any time to weather, but fully expect too. They got 8" of rain in the Olympic Mountains on Tuesday, but none made it to the infamous blue hole (http://www.komonews.com/weather/faq/4306627.html).

Saturday, November 1, 2008

The hole is done (Day 10 of 273)

Because our excavator's schedule freed up last week, Mark Stewart (Stewart Excavating, Port Hadlock) was able to start the foundation excavation on Friday morning. By Saturday noon, he had the basement, one crawl space, and the garage pad ready for footers, and will finish the second crawl space on Monday. It drizzled most of the time, but that just kept the dust down. One problem we have is finding space for all the extra dirt to be retained for backfilling. We moved about 80 yds to the front for a berm, and have mounds scattered around the lot everywhere we can. Once the backfilling is completed (Thanksgiving±), we'll get same space back to maneuver.

The county requires erosion control in the form of silt fences. So we used a row of hay bales and a 30" high plastic mesh screen to hold back any sediment from the berm. (Nancy is standing on the berm in one photo.) We'll place another silt fence just below the garage, when we get some of the dirt repositioned. Sacred ground in this whole exercise is the drain field, which must be placed in undisturbed soil. So there is a patch about 60 ft wide and 30 feet deep between the berm and the garage that is no-mans land.


The basement is rather large, now that we have a hole in the ground. It measures 32 ft by 26 ft. It will have a staircase in one corner, wine cellar (?) in another, a utility room for the radiant heat boiler and tank, whole house vacuum, and electrical panel, and a bunch of storage space for all the extra junk we dragged up from Denver. I can't imagine how much more stuff we would have had if not for 4 garage sales and offloading stuff to neighbors and friends.

The concrete guy, Don (K&D Concrete, Port Townsend), will use a pumper to place most of the concrete. That way the pumper can park near the garage and pump from the delivery truck to the forms. The long (E-W) dimension of the house and garage is 88 ft, so there was no other way to get the concrete in place.

All told, we'll need something like 70 cubic yds of concrete: 12 yds for the footers, 10 yards each for the basement and garage floors, and 38 yds for the basement and stem walls. Concrete is going for about $92/yd delivered. You do the math; its about the same price as a used 2005 Hobie 18 (sorry Tom).

Thursday, October 30, 2008

Pythagorean's theorem (Day 8 of 273)

In any right triangle, the area of the square whose side C is the hypotenuse (the side opposite the right angle) is equal to the sum of the areas of the squares whose sides A & B are the two legs (the two sides that meet at a right angle); hence AxA + BxB = CxC.

Knowing just that and with a calculator in hand, you can layout entire house in about an hour. Now I know why I liked algegra and geometry so much.

This morning, Don (the cement guy) and I laid out the foundation outline for the house. We set the garage corner in 74' from the front and 13' from the north edge as per our Architect's plans, and let the rest fall where it may. The 13' setback will allow a 2 ft overhang for the roof and gutter, and a bit of breathing room. As it is, the house will straddle a low ridge in the rear center of the lot (see parcel 965000169 at http://maps.co.jefferson.wa.us/Website/mspub/viewer.htm?mapset=parcels_outside). A little cut here, a little fill there, and all is well.

About the time we had finished, Mark Stewart (Stewart Excavating) called and wanted to know if we could push the job up a day—OK. So Friday am the dirt flies. Tony, want to come out and log the foundation, sort of for good old times sake?

Tuesday, October 28, 2008

Oh boy, a big hole in the ground (Day 3 of 273)

Well, we just committed to putting a big hole in the Vashon Till (ca. 15,000 yrs old, glacial till that was overridden by 1,000 m of ice). Its a gravelly silty sand (USGS analysis) with clasts as much as 30-40 cm (1.2-1.4 ft) in diameter. Light gray, unstratified, and hard to dig owing to all the prior icy overburden. Although there is now sign of it, I have a side bet with the concrete guy about clay--he says we'll hit some, and I don't see any reason why. Should be a interesting if he's right.

Anyway, the excavating is about half the total cost ($6200) and the other half is hauling away 300 cubic yards of material to some unknown destination (another hole, probably). You say, just what is 300 cubic yards? Well, think of a layer 1 ft thick, 10 ft wide, and 900 ft long (a nice long road base).

A large backhoe is supposed to arrive on Monday and have at it. By Monday night, the basement should be dug and the spoils removed. On Tuesday, about 400 cubic yards will come out of the two crawl spaces; half will go out front for a long, wide berm and the other half will be used to backfill around the foundation at the end of November. Hopefully my math will work out; extra haulage is about $10/yd and those yards pile up quickly. Cement guys arrive Wed., Nov. 5 to survey in the footers. Mrs Obama should be measuring for drapes that morning. Oh boy, we're having fun now.

Here are a few pictures of the site after clearing and house layout. Nancy, all 5'2" of her is in both pictures. The second one shows the two cedars and huckleberry bush that we managed to save, near the entrance to the house. Dirt flies tomorrow (Friday).

Sunday, October 26, 2008

Ducks in a row (Day 2 of 273)

Now that the trees are falling, we need to think about all the stuff that has to be purchased in the next few months. First off is the lumber package (framing) and Warmboard radiant subfloor (http://www.warmboard.com/). We choose this heating system for its simplicity and comfort. Warm water (ca. 110-120°F) flows through PEX tubing that is embedded in the top of the 1 1/8" thick subfloor, which is made of plywood with an aluminum top sheet. They look like 4' x 8' logos, and cost about as much per square inch. At 100 pounds each, you don't just move them around willy-nilly. Terry at Carls is willing to take delivery from the factory, then reload them and deliver to the job site. Warmboard did the design layout for the sheets, tubing and controlled zones and sent the CAD drawings to me and our architect last June, so all we need to do now is push the button and write the check (ca. $13,000 with shipping from Portland). Shipment is 7-10 days after payment, so we are scheduled to delivery around November 28th.

One critical element of using this system is to stick to 4 ft nominal dimensions for the floor plan, thereby minimizing waste of the Warmboard sheets. We'll use it for the entire first floor (except sauna), but use electric space heating upstairs (sorry visitors, but this will help keep the nightly rental rates low).

We sent a complete set of drawings (architectural, 18 sheets; structural 14 sheets) to the local lumber yard (Carls) for take offs. They farm this out to a firm that specializes in making a comprehensive materials lists, including trusses and fasteners. Mike at Calrs uses the material list and comes with an estimate, which we hope will come in at about $45k (framers guess). Carls buys a lot of Canadian lumber and their dollar is down big time right now, so maybe we'll make budget on the wood. Carls will deliver the lumber in staged packages, which sure beats getting it all at once and letting much of it sit out in the weather. Melissa (the Window and Door expert at Carls) told me they'd deliver just about anything I need, down to a $5 buck item if it was on the way to a larger job. (see photo: Mike on the left, Melissa in the middle, and Terry on the right).

No problem there, maybe they'd bring Mexican food for lunch with the sill plates. So first we'll get the subfloor joists (engineered 11.5" BCI trusses) and Warmboard delivered after the stem walls have cured (7 days yields ca 50% of max. strength). After the subfloor is constructed, we'll have a flat/level stage to build the house on.

Windows need to arrive by the time the house is dried in (sheathed exterior and roof). This should be in mid January ±, so we have nearly two months to get them to the site. Based on we've chosen Sierra Pacific Windows and Doors of northern Califoria (www.sierrapacificwindows.com) for all exterior applications. We worked with Rob Sorg in Denver during the past year, so all the decisions are made and we just need to push the "buy" buttion and send a check for $20k. Sounds like a lot (it is), but this includes 32 window units and 2 french doors (one double and one single). They are solid wood, mainly fir (for clear finish), clad with aluminum on th outside, and have a Harvest Cranberry powder finish. Works out to about $500 a window on average. Sierra Pacific will come out after installation and inspect for warranty, then return at the end and install all the opening and locking hardware. In addition, I'm working up the skylight order, which is with Velux. They will be nine stationary units and one Solartube (sauna). We might buy these through Home Depot since they have the best prices on standard size units, but they don't have all the ones we want and I've had trouble with damaged units on delivery (in Denver).

Doors come next, and they don't give them away. We'll probably use Simpson solid fir doors (shaker style) for a northwestern look on the main living area. We'll save some bucks by using paint grade (hemlock) doors (same style) in the bedroom, baths, and pantry/laundry, and upstairs (again, the rent issue). Eight of the 23 doors will have full glass panels to let the light bounce around the house. For the exterior, we'll use fiberglass clad doors for ease of maintenance. They can be stained, so they'll look like fir from a distance. We need a couple fire-rated doors for the garage and basement, but hope to stick with the same style that will run through the house. Doors don't need to show up for about 6 months, so no worries here. We'll continue to research options for saving some bucks; Melissa at Carls has been a great help. Looks and sounds for the all world like Amanda Ruleman, a friend of ours in Evergreen, CO (Amanda, are you missing a twin sister?).

Nancy has started on cabinet reconnaissance. We need 24 linear ft of cabinet (full lower and half upper) with refrigerator and double oven cases. The free-standing island will have cabinets below (no real design yet), and it is 3/6 by 6/0. We are looking at shaker-style natural finish cherry. We have 3 bids so far.

1) Jesse Bay cabinets in Port Angeles is owned by a nice 40-yr-old guy we met at the Seattle Home Show last year. Its a small shop, much like the one Bill Hart (Nancy's dad) worked for in the Bay Area back when. They'll make a quality custom cabinet, but are the most expensive so far (ca. $22). Solid plywood boxes, hardwood face frames and doors, and tongue and groove construction on drawers.

2) The second bid was from Bleimeister Cabinets in Sequim. They buy pre-made MDF boxes (maple finish) and solid wood doors, and do all the custom fitting in their shop. They came in at about $15k, but are the lowest grade cabinets of the three.

3) The third bid is by the Kitchen and Bath Store (Shelley Little) in Port Townsend. We like her and her attention to detail; lots of suggestions for efficient usage of space. Their Medallion brand cabinets are between the others in quality, but they have some more attractive door options than the others. Including upgrades for custom door style and plywood boxes, they came in at about $20k, and are willing to discount it a bit to us as "builders". Hopefully, we can drag Bill and June Hart up to see Port Townsend next summer and have him supervise the cabinet installation by the General Contractor.

We'll cast around a bit more, but we're favoring choice #3 for now. Appliances are another story and entirely in Nancy's control, but early estimates are between $12-15k for a 30" Wolf gas (propane) 6-burner rangetop, a 30" electric double oven, stainless steel French (3) door refrigerator, Bosch dishwasher, and 30" high-volume range hood. No one seems to be willing to deal much on the high-end appliances: the manufacturers seem to be able to control any discounting from the MRSP. They don't seem to realize that the US and everyone else in going into an extended recession. PS, rumor has it that GE is getting out of the appliance business. Seems appropriate considering all the trouble we've had with the 4-yr old one in our rental house, but that's another story.


Saturday, October 25, 2008

Timber! Then boom and crash (Day 1 of 273 to build)

Well, the trees started coming down on Thursday (Oct. 23), so that's our official start date for construction. We have 9 months (July 22nd) to get our occupancy permit and tidy up the outsides, so it doesn't look like a construction site. All went well until noon, then a little mistake occurred. The felling process for the medium-size trees (ca. 80') is to dig up their roots, then push the tree over with the backhoe (large Hitachi, 3 ft bucket; just like the kind we used for trenching faults at the USGS). Anyway, on one tree not all the roots were severed and when Bill Snyder (Balco, sub for clearing) pushed the tree it swung around and fell about 30° left of the intended direction. With a large boom, it fell across the property line and onto the neighbors backyard, taking down a fir and cedar and knocking the corner off their wood shed. To make a long story short, he removed a dead tree for them and will repair the shed. Crisis resolved (for now).

On Friday, Joe Thompson (a semiretired, professional logger) came to fell six of the largest trees. What an impressive sight to see this guy climb a tree, chainsaw in hand. He cuts limbs on the way up, marking the trunk in 20 ft intervals, then drops the top 30-40 ft, and works his way down. The remaining 40 ft stump is then pushed over, roots attached. Then a little slicing and dicing, and you have a bunch of nice logs.

The brush is being cleared with the backhoe (overkill), shaking the dirt off and staking it in a big pile to be taken away by truck (3-4 loads, probably). In addition, we placed a culvert (12" corregated plastic, 26 ft long) beneath the intended driveway, and covered it with 1.5" crushed basalt (the local Tertiary bedrock, ca. 15 Ma) to form a mud-free entrance to the street. We'll cover the gravel with asphalt or concrete when the job is done.

So, not to bad for 2 days of de- and re-construction at the site. Hopefully, the clearing will be done by mid week, and we'll get going on a hole (ca. 600 cubic yards of dirt moving). The house plans call for a 32 ft x 26 ft full depth basement, two 26 x 22 ft crawl spaces, and the garage (30 x 26 ft) with slab on grade. All told, this amounts to ca. 600 cubic yards of dirt moving, half of which will stay on site for backfill and building long low berm at the front of the property.

Monday, October 13, 2008

A week off, final move from Denver

We're flying off tomorrow for Denver. We still have a van's worth of left over (keeper) stuff to move, friends to see at a farewell party, and some lingering business (MD, DDS, dinners, etc). We're staying with Zeke (Bob Fleming) in Golden for a few days then Judy and Steve Cooley (Hobie friends) for the weekend. We need to buy a egress style window well (5 ft deep, 4 ft wide), cover and ladder for the basement, which is not common out here. The prices and availability are better in Denver, so we'll throw it in with the other stuff. May buy a portable table saw from Tool King (good prices and selection, just north of the USGS on 6th Ave) in Lakewood. I'll have to rip window and door trim before long, so why not buy it now and do our part to get the economy kickstarted.

The moving van business has evolved over the years. Nowdays, you rent the van (10-26 ft) for a one-way trip based strickly on miles and they give you a week-10 days depending on distance. U-Haul and Budget are common, but we prefer Penske. Their trucks are newer plus he's got a great racing team. The fuel costs are about as much as the move. For example, for this one we have a 16 ft van (two axle) that rents for about $900, and gas (8 mpg) will be about $650 (1500 miles = 185 gals at $3.50). With the 26 ft diesel we used for the main move, we spent about $900 on diesel (6.7 mpg commonly at $4.50+ two months ago) and $1200 for the truck. Because of the expert packing ability of Ren Thompson and Tony Crone (both USGS), not a single item was broken. The few scratches that occurred were the result of 1500 miles of bouncing around. There's nothing like 3 long days behind the wheel of a large truck to remind you what hemorrhoids are all about.

Update (10/23) We're back from our little trip to Colorado, which went well. Perfect weather, did some USGS business, and had a great time at the farewell party. Gas costs were a pleasant surprise, if you can say that. Gas was $2.62 at Rawlins, WY and high at Brigham City, UT ($3.25), but averaged about $3.00/ gal. Plus the truck got 10 mpg, so the return trip was about $450 for gas. The truck ran well, but Penske is in trouble with us for sending the truck out with two low tires (fronts, 20# each, one with a moderate leak), and a flat rear tire (duals). The flat was replaced quickly in Denver, but there office there was negligent in sending truck onto the road. More later as I vent with Penske Corporate.

Ruminations and subs

Well, now we know what it means to be the general contractor on a small (homeowner) job. You are generally the smallest fish in the pool and the subs are beholden to the large contractors and builders. We're having trouble with the concrete subs we've interviewed. The first one came in higher than we anticipated (based on virtually no data), so we were waiting for a second. That one was just a bit less and the sub didn't sound so interested (steadier jobs on the horizon, we think). A third sub hasn't called back after two contacts and the forth guy (local expert) wasn't even interested.

One problem is that this foundation work is complicated, largely the result of our structural engineer's (M. Brostrom) zeal for Simpson fasteners; he likes to make sure nothing is ever going to move, even in a Cascadia M8-9 earthquake. Thus, there are many structural fasteners (tie down bars, multiple courses of rebar), and keyways in the footers that are not usually seen. So this isn't going to be an easy-forms up & concrete-in job. Also, because there is a full depth basement (a Denver thing), we'll need 4-5 pours, three of which will require overhead pumping (separater rig that comes from 50 miles away). The bottom line is looking like 90 yds of concrete at $90/yr, a ton or two of rebar, 50-60 foundation to subfloor Simpson ties, and 4 weeks on the job. That's twice as long as we expected and puts the framing part of the job off until early December (cool, wet). So it goes.

Also, we need to know more about the actually concrete pouring process and schedule to get a reasonable bid on the excavation work, which precedes the concrete (obviously). For example, I imagine that the basement should be excavated first, then after the footer, 8' walls, perimeter drain and waterproofing is done, they would backfill and then excavate the crawl space (4 ft deep) and garage pad. The two excavation bids so far have all the excavation done at once and one backfill. Its not going to be this simple. More later.

[update 10/13/08]:
So today we settled on the foundation proposal. Don McNees of K&D concrete is going to do the work. We went with him for three reasons: 1) he recently did a job that was spec'd out by our structural engineer, so he's familiar with the details involved; 2) he was the most willing to discuss details, pitfalls, and the process of the four guys we contacted, and 3) he has worked a lot with our probable framers. So, after taxes we obligated $40k for concrete. However, when the big one (EQ) hits, our basement will be like the WWII bunkers at Fort Warden.

Now I need to settle on an excavator and make sure they can start on the hole around Oct. 27th, after the lot is cleared. Stay tuned.

Friday, October 10, 2008

First subcontract

Well, we picked someone to fell the trees, clear the brush, and remove the stumps. In addition, the logs will be stacked perpendicular to the road for later pickup by a loader (this guy takes them to a mill and sells them for us minus his transport fees). The final bids ranged from about $8k to $13k, and we chose the $8k guy. He submitted the most detailed estimate and can start when we want, which for now is Oct. 24th. He'll move onto the site before that, then fire up the chain saw. I wouldn't normally take the low bid (of many), but this guy (Bill Snyder, Balco Trucking and Excavation) is a former logger that got into the landclearing and excavation business when the spotted owl issue got ugly on the west coast. So at heart, he's a tree feller--which is what we want. Also, he knows how to dissect the trees for the best resale (this is called scaling).

Wednesday, October 8, 2008

Trees and shrubs to go

This should be quite a challenge. There are some 110-15 ft high trees on the lot, up to 30" in diameter. Normally if you removed a single tree, a logger would climb the tree and take it down in 5-10 sections. However, with so many large trees they'd like to push them over on the lot, then cut them into marketable lengths (32' of 40') for resale. There are 3 large trees in the center of the lot, so for these they'll have to be cut in half, dropped and then recut. Sounds like a scarry proposition to me, but you have to assume that these guys know what there doing (not like our present crop of politicans).

The timber resale market is in the toilet now. Two foresters that visited the property estimate that the logs might fetch $1500-2000 at the mills (50-60 miles away), but loading and truck transport will eat up about half of that amount. So we'll be lucky to clear $1000 from the lumber after its all done and over with. 3 years ago, the market was twice as good as now. I learned a bit about lumber in this process. The best trees are straight doug firs in 50-60 lengths that are 16-10' in diameter: intended as power poles. These can go for upwards of $1500 each. We don't have any. Second best trees are peelers. These are large diameter trees with few branches, preferably in 20-32 ft long sections. They'll be debarked and turned, and then peeled as veneer for plywood. We don't have any. Third best trees are for standard 2x lumber, quality dependent on knots and other imperfections. We have lots of these. Call them mega-toothpicks. Probably $100 each for a big one. The least valuable trees are the smaller diameter and crooked ones. They'll be pulp wood for anything from OSB to cardboard or firewood. They're worth less than the cost to move, but they have to go somewhere and the landfill charges more. There you go—Lumber 101. Go into plastics, as they said.

Tuesday, October 7, 2008

First bids for land clearing

Well, we have 5 bids for clearing the land. This involved cutting the larger trees into marketable lengths (32-40'), felling all of them 60-70), stacking the logs (for loading and resale), brush cutting, leveling the land a bit, removing the debris, and building a short gravel-covered entrance and culvert. The bids are general to detailed, and range from about $7500-13,000. The cheapest one seems fine, but they always say to discount the cheapest and most expensive. One bid includes about $3000 for the foundation excavation and backfilling (which seems reasonable), so this may be the best bid. Need a bit more info to access the bids and make a comparison. We need to decide this week before returning to Denver for a week, so we can get the excavation and foundation guys lined up and on a schedule.

One neighbor is concerned that the falling trees will cause cracks in her foundation or walls. Seems unlikely, but we'll see. The largest trees are 115-120 ft firs and will have to be halved in order to drop them within the bounds of the property, which is 100-220 ft. Hopefully we'll have a skilled logger; hate to have a big one clip an adjacent house.

Monday, October 6, 2008

Approval process

Well, we have Jefferson County's building permit and the approval of the Kala Point architectural committee, so we're ready to begin building our retirement house after the neighbors have their 2 cents worth (they can comment for 10 working days after seeing plans at the Homeowners Association office). Plans have been done for 6 months, and we moved to the area (Port Townsend, WA) about 6 weeks ago. For now, we're researching subcontractors in this order: 1) Tree and brush clearing, 2) Foundation excavation, 3) Foundation and slabs, and 4) Framing. In about 10 weeks ( after New Years Day) we'll start the plumbling and electricall which homeowners are allowed to do in WA. After that comes insulation (blow in foam and batts), drywall, painting and plastering, finish carpentry, final electrical plumbing, cabinets and other built ins, and floors. Some where along the line we have to put up about 1000 sq. ft of Hardiboard, 2000 sq. ft of cedar shingles and 300 ft of rock to finish off the exterior. Lots of fun ahead.

Thursday, October 2, 2008

Our retirement home


In 2003, we decided to move to Port Townsend, WA when I retired (Aug. 2008). We bought a 0.6 acre lot ($40,000, 100' x 22') in the Kala Point subdivision, a gated community about 6 miles south of town. Its a lovely community in a heavily treed part of the Quimper Pennisula. The Pacific NW was new to us, with most of our friends in the Denver area and relatives in the SF Bay area. Our thought was that we'd have a potential pool of 450 families as friends and all the amenities that a HOA community gives. There is 1.5 miles of private beach, a boat launch and floating dock, as well as tennis courts, a swiming pool and clubhouse. The HOA fees are modest ($600/yr), which goes to maintain infrastructure in the subdivision.

By 2005 we had developed pretty firm ideas for our new house. We interviewed a few architects and picked Richard Berg of Port Townsend because he had a good reputation and knew many locals in the building trades. Berg Architects (http://richardbergarchitects.com/) started on building plans in the Spring of 2007, first with conceptual drawings and basic floorplans. He made some substantial changes to our plans, but keep the basic design elements and living spaces that we had envisioned. Darlene Keefe did all the CAD work, and prepared the 18 sheets for construction. We were planning a house of about 2000 square feet, but ended up with about 40% more from add ons.

In 2006, we hired Suzanne Martin of Miller Bay Water to prepare a septic design for the house. All houses in unincorporated Jefferson County are on septic and local wells, although we have water service from the Kala Point Water Co. She designed a pressure-system that has the drainfield in the front of lot and a reserve field in the rear. There are two tanks and about 200 ft of drain line--all designed for a 3-bedroom house if we ever decide to expand or convert some of the house (its being built as a 2 bedroom). In all, 8 septic percolation holes were excavated, in addition to four old ones from the previous owner (ca. 1992).

The plans we're completed in July 2008, and submitted to the Jefferson County (WA) building dept in early August. They had just a few changes and qualifications, but we basically flew thru the approval process in 6 weeks (plan approval was taking 3 months in the Spring of 2008 owing to staff reductions). So, we had a building permit on about Sept. 20th. Next step was to put our color and materials package together for the Kala Point Architectural Committee (aka the Color Commies). This is one of the potential downsides of a HOA. Nevertheless, there basic guidelines are designed to help protect everyone's home values from the errant double-wide or boat project. They require Earth Tone colors for the exterior materials, and minimal tree cutting to preserve the forest nature of the subdivision.

The house is going to be a NW Craftsman style, with a rock belt line on the street-view sides, stained cedar shingles above, and painted Hardieboard and singles on the back sides (not really viewed by anyone). The roof will be a dark colored 50-yr architectural asphalt composition shingle. There is about 2000 sq. ft on the main floor, an 800 sq. ft suite (visitors) upstairs, and an 800 sq. ft basement (not common here) for the utilities, wine cellar and storage). The garage is oversized at 730 sq. ft, but includes room around the margins for a shop and tool storage. My first post-construction project will be a 17' Pygmy Coho single kayak kit, which I bought, shipped to Denver and moved back to PT. Its got about 2500 miles on it now and never been in the water.

Blog Archive

Subcontractors and Suppliers

  • Balco Excav. (land clearing, Bill Snyder)
  • Bill McCutchen's Mill (cedar trim)
  • Blake Tile and Stone, Sequim (Judy Reno, Eldorado Stone, Tile)
  • Bob Brown Plumbing (Bob & Josh Brown)
  • Boise Cascade joists (from Carls)
  • Carl's Building Supply (Mike, Melissa, Michele, Terry & Lawrence)
  • Castlerock Landscaping (Tim Hamm, Sequim)
  • Cotton RediMix (concrete and gravel)
  • Craighead Electric (Gary Estes)
  • Custom Hearth (propane fireplaces), Pousbo
  • Daltile (Seattle, Wedi board)
  • Discount Cabinets of Washington (Sequim)
  • Discovery Bay Materials (gravel, top soil)
  • Earl Kong (professional forester, PT))
  • EcoHaus (Amer. Clay Plaster, cork flooring)
  • Ellis Construction (Gary and Troy Ellis, framing)
  • Evergreen Products (Drywall, Sequim)
  • Fergusons, Seattle (Plumbing fixtures, Bud Allen Wright)
  • FInlandia Saunas (Tigard, OR)
  • Fitzgerald Concrete (driveway, Mike Fitzgerald)
  • Four Corners Nursery (trees, Port Hadlock)
  • Frank Feltes Custom Drywall and Painting (drywall and painting)
  • Frank Ward and Wayne Jobst (Stone masons)
  • Fredricks Appliances (Redmond, all appliances)
  • Giraffe Gutters (Dan Shaw, Chimicum)
  • Glass Etchings by Perrett (Jerry Perrett)
  • Hadlock Building Supply (bits and pieces)
  • Hardiboard, siding, backer board (from Carls and Home Depot)
  • Henerys Hardware (Cabot stain, misc. fasteners)
  • Hi-Tech Electronics (Audio & Media, Port Angeles)
  • Hide-A-Hose (Joseph, A-B Vacuum, Puyallup, WA)
  • Home Depot (electrical & plumbing supplies, interior paint)
  • Home Storage Solutions (John Plake, PT)
  • Hope Roofing (Pabco Paramont Advantage shingles)
  • Jim's Tool Time (J. Quandt, misc. carpentry)
  • K&D Concrete (Don McNeese)
  • Kitchen and Bath Studio (Shelly Little, cabinets)
  • Levi's Energy Services LLC (radiant design, vents, propane piping)
  • Meta Marble and Granite (travertine), Seattle
  • Michaelangelo (sepentinite), Seattle
  • Mikael Brostrom (Structural Engineer)
  • Mills Interiors (wood flooring, some tile)
  • North Coast Electrical (Electrical Supplies)
  • Olympic Garage Doors (Sequim)
  • Penisula Flooring (carpet)
  • Penisula Shower and Mirror (Sequim)
  • PexSupply (online plumbing and radiant supplies)
  • Puget Sound Power (and Atelco installers)
  • Richard Berg Architects (Richard and Darlene)
  • Richard Gifford Construction (septic, dry wells and grading)
  • Richerts Marble and Granite (countertop fabricators)
  • Seattle Lighting (lighting fixtures)
  • Secret Gardens Nursery (Sheila Piccini)
  • Shine Quarry (basalt for landscaping)
  • Sierra Pacific Windows (Rob Sorg)
  • Simpson Doors (from Carls)
  • Simpson Strong Tie (fasteners & hold downs)
  • Stewart Excavating (Mark Stewart, foundation)
  • Sunshine Propane (propane and tank)
  • Therma-Tru Doors (from Carls)
  • Tracy's Insulation (batts and blow in)
  • Trex Decking (from Carls)
  • Trussworks (roof trusses, Carl's)
  • Velux (Skylights and Solar tubes, Carls)
  • Versalam beams (from Carls)
  • Warmboard (Bruce Hull)
  • Wisbo Aquipex, Taco Pumps, Polaris tank (Sunshine Propane)

Followers

About Me

My photo
Professional geologist (USGS, 1972-2008), amateur home remodeler and now builder. Interested in sailing, all things involving salt water, woodworking, and food in general. Owner of Paleo Seis Surveys LLC, consulting in Quaternary geology and geological hazards.