Visitors to Date:

blog counter

Building a House in Kala Point, Port Townsend, WA

Building a House in Kala Point, Port Townsend, WA
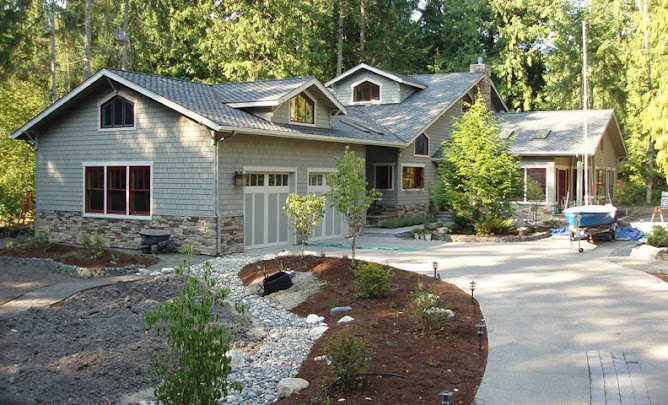
A running narrative of first-time builders of their retirement home in Port Townsend, WA (NE corner of the Olympic Pennisula, 60 miles NW of Seattle). Follow us as this adventure unfolds in late 2008 and beyond. 18 months under construction, we moved in on May 25th, 2010. Photo taken August 15, 2010.

Search This Blog

Monday, June 27, 2011

Cedar closet floor (Day 975)

Well, its been about 2 weeks since I lopped off the tip of my thumb. It healed amazingly fast, with several scabs. Once they hardened up and fell off, its been pretty normal except when you whack it on something or with something, then it hurts like hell. So for now, the thumb is a non issue. The docs said it would fairly normal by Christmas.

Am starting to mop up some small leftover projects before I tackle the remaining big ones. What big ones you say—aren't you done with that d#%$ house after almost 1000 days. Lets see what is left:

Upstairs bath and shower to tile with Ming green marble (12 x 12). Biggest job, probably a month of half days. Tile saw went home so I can relax about this one until the fall.

Sauna interior. This will actually be a fun medium project. Saving it for the winter and a trip to Portland to buy the Finlandia heater I've got my eye one. Note, no sales tax in OR.

Built in cabinets in the den. This will be a pretty big project. Need to build two 96" h x 44" w fir cabinets for the entertainment equipment, books, speakers, and CDs (yeah I know they are a soon to be obsolete media, but that's where all our music lives).

Wainscoting to match the cabinets. Nancy wants fir wainscoting to line the den. I'm thinking of recessed panels (1/4" CVG fir plywood) inset into 1 x 4 fir rails and stiles. This will be a production job more than anything, except that the panels should be integrated with the window and door trim. So the trim might have to come off to let the panels into them. Need to think about this since they don't give CVG fir trim and plywood away.

Sand and paint the trim in the stairwells. Not a big one, just dusty and hard on the knees. Plus it will have to be brushed on, so you have to be a bit careful and prepare the surfaces well. I've added this to the current projects, just so we can order and install the staircase carpeting before long.

Backyard landscaping. This isn't even on my radar. We'll get to it when we can't stand the weeds anymore, or when Nancy thinks she needs to grow some vegetables. Then again, we've got a great fruit and veggie stand about 2 miles away. Weeds are native vegetation, right?

So that's the major punch list for the house. Now back to the project at hand. Aromatic cedar flooring and painted trim for the downstairs closet. I had bought the cedar over the internet a year ago, so its plenty aged by now. I found 3/8" T&G cedar from the SE and am using it on the floor beneath the hanging clothes in the closet. Then we'll inset a bit of carpet (4' x 10') in the center to stand and dress on. The cedar comes 3.5" wide by 4 ft long, so its pretty easy to lay up and staple in place. You just have to keep an eye on the Pex tubing which crosses the short dimension of the 8'x 12' closet.

It took just about a day to lay the cedar floor, cut and paint the trim, nail it up, and then patch the nail holes. Not a big deal, but it was nice to finish off another one from my punch list.
Friday, June 10, 2011

Man vs Machine (Day 959)

Its been 959 days of construction and not an injury that involved blood or bones. Pretty lucky, but no one is lucky forever. Today I met my match with a Porter Cable circular saw. I picked up a used bathroom cabinet (21" x 72") for nothing, and was modifying it for the garage. Made some pull out trays and was preparing the face to accept a nice wood vice (Shop Fox). After consulting with Tool Time Jim, I decided to cut the face frame down so that the vice would mount flush with the cabinet top, which is two layers of masonite-like particle board. No way to put the cabinet up on the table saw, so I had to make a plunge cut into the oak (hard) face frame.

I started with my 18v Makita, but it wasn't powerful enough. Out came the 7" Makita, which was clearly up to the job. Plunged part of the 12" cut, then stopped. Reentered the cut and the saw bound up and jumped outta the groove. Unfortunately my thumb was in the wrong spot and before I knew it the Man vs Machine battle was over. I managed to nip off the corner of my thumb; sort of mitered the last 1/4" off. Didn't seem like a serious injury (and it wasn't), but there was blood spurting and it started to throb. Hurried into house, dowsed it with water and wrapped it up in a Brawny towel (how appropriate you say). Nancy fired up the Subaru and off to Jefferson Heath Care. The mopped it all up, took a few x-rays to make sure bone wasn't involved (it wasn't), then put a tidy little gauze wrapper over the thumb. Said it would be useful in a month and as good as almost new by Christmas.

When I got home I finished off the plunge cut with a hand saw. Mission accomplished, except for the ca. $800 hospital bill. That cabinet doesn't seem like such a good deal now, but I'm going to use the hell out of it.

Thursday, June 9, 2011

Time for a party (Week 137)

Finally. The fireplace is done and now we can move our living room furniture back into place and make the insides look nice again. It hasn't taken that long in terms of hours of labor, although a month has passed since I started this little project.

The actual rock lay up took about 4 half days, and went faster the more I'd done. The viscosity of the mortar is important, as it keeping the wall and rock surfaces moist. If you don't spray down the wall (textured surface), it will suck the moisture out of the mortar and you'll get a dry, weak bond. So rather than mixing the mortar like peanut butter, it should be a bit wetter—like warm yogurt. If so, you have about 30 seconds to mess with the placement of the rock, then its bonded enough that you can let it go and it won't fall off. Remember that I'm laying the rock from top down in order to keep mortar off the finished surface of the rock wall, and this has worked out pretty well.

People have asked me about the pattern for laying the rock. This is where a little artist talent helps, not that I have any. There is no pattern, just keep "random" in mind. I usually lay out a box of rock on the floor and organize them by size, being a type A guy. These are all rectangular blocks, ranging from 4" x 4" and 4" x 8" on the small side to 12" x 18" at the upper end. So you don't want to cluster the little ones together, or have too many big ones in the same area. Also you don't want any 4-way intersection:3-way (T intersections are the norm). The only cutting comes into play is where you abut another surface, like the mantle or the closed end (right side) of the plastered wall (Tuscon gold). Here you just have to cut to fit, but never leave less than 4 inches to deal with. Its better to have a 6 inch ending piece, then a little 2" scrap. Likewise around the mantle (although I already failed this test once, see photo above on lower left side).

When you get into a complex cut, such as around the mantle pieces, its easiest to make a pattern out of cardboard. Measure, draw cut, and fit it in. Trim as necessary, then you have a template to mark all the cuts you'll need to do on the tile saw. By the way, this stuff cuts like butter and fast. If you've a bit big, just take a coarse file and whittle the piece down to fit. Its quite forgiving.

After the rock was all fit (but not placed), Nancy put four coats of polyurethane satin finish on the mantle piece and legs. Sanded with 220 after coat no. 2, then hit it with a foam sanding pad (like steel wool) before the fourth and last coat. The finish has good depth and the wood should redden up a bit with time, as has our doors and windows throughout the house.

Next came the travertine tile that surrounds the firebox and matches the hearth. The mantle tiles are 12" x 12", whereas the hearth tiles (4) are 18" x 18". The tile went up pretty fast, only trick was to make sure that I got a flush edge with the mantle and uniform and parallel gaps between the tiles. Nancy buttered up the tiles and I stuck them to the plywood backing—finished it in less than an hour. Then I grouted the tile with an unsanded caulk since the tiles may expand and contract with the gas fireplace is on. Cleaned up and pronounced the job done. Now we can party with furniture in the living room.

P.S. The colors in the last photo are pretty close to true.

Sunday, June 5, 2011

2 in 1 (Day 952±)

Two vehicles in our one garage. Thought it would never happen, it just took 13 months. The big hold up was the wet tile saw that sat in my bay. Jim (Tool Time) Quandt finally needed it back, but just for a week or two. So for now, we have both our car and truck under cover. The truck is Tom's Ford Ranger Pickemup, which I traded for the Toyota 4Runner. It made more sense that he has an enclosed truck with four in the family, whereas all I seem to use my truck for is going to the dump and lumber yard. At least I won't have to power wash the truck to remove the mold, lichen and other forest fauna that want to grow in all the little grooves, nooks and crannies out here.

Subcontractors and Suppliers

  • Balco Excav. (land clearing, Bill Snyder)
  • Bill McCutchen's Mill (cedar trim)
  • Blake Tile and Stone, Sequim (Judy Reno, Eldorado Stone, Tile)
  • Bob Brown Plumbing (Bob & Josh Brown)
  • Boise Cascade joists (from Carls)
  • Carl's Building Supply (Mike, Melissa, Michele, Terry & Lawrence)
  • Castlerock Landscaping (Tim Hamm, Sequim)
  • Cotton RediMix (concrete and gravel)
  • Craighead Electric (Gary Estes)
  • Custom Hearth (propane fireplaces), Pousbo
  • Daltile (Seattle, Wedi board)
  • Discount Cabinets of Washington (Sequim)
  • Discovery Bay Materials (gravel, top soil)
  • Earl Kong (professional forester, PT))
  • EcoHaus (Amer. Clay Plaster, cork flooring)
  • Ellis Construction (Gary and Troy Ellis, framing)
  • Evergreen Products (Drywall, Sequim)
  • Fergusons, Seattle (Plumbing fixtures, Bud Allen Wright)
  • FInlandia Saunas (Tigard, OR)
  • Fitzgerald Concrete (driveway, Mike Fitzgerald)
  • Four Corners Nursery (trees, Port Hadlock)
  • Frank Feltes Custom Drywall and Painting (drywall and painting)
  • Frank Ward and Wayne Jobst (Stone masons)
  • Fredricks Appliances (Redmond, all appliances)
  • Giraffe Gutters (Dan Shaw, Chimicum)
  • Glass Etchings by Perrett (Jerry Perrett)
  • Hadlock Building Supply (bits and pieces)
  • Hardiboard, siding, backer board (from Carls and Home Depot)
  • Henerys Hardware (Cabot stain, misc. fasteners)
  • Hi-Tech Electronics (Audio & Media, Port Angeles)
  • Hide-A-Hose (Joseph, A-B Vacuum, Puyallup, WA)
  • Home Depot (electrical & plumbing supplies, interior paint)
  • Home Storage Solutions (John Plake, PT)
  • Hope Roofing (Pabco Paramont Advantage shingles)
  • Jim's Tool Time (J. Quandt, misc. carpentry)
  • K&D Concrete (Don McNeese)
  • Kitchen and Bath Studio (Shelly Little, cabinets)
  • Levi's Energy Services LLC (radiant design, vents, propane piping)
  • Meta Marble and Granite (travertine), Seattle
  • Michaelangelo (sepentinite), Seattle
  • Mikael Brostrom (Structural Engineer)
  • Mills Interiors (wood flooring, some tile)
  • North Coast Electrical (Electrical Supplies)
  • Olympic Garage Doors (Sequim)
  • Penisula Flooring (carpet)
  • Penisula Shower and Mirror (Sequim)
  • PexSupply (online plumbing and radiant supplies)
  • Puget Sound Power (and Atelco installers)
  • Richard Berg Architects (Richard and Darlene)
  • Richard Gifford Construction (septic, dry wells and grading)
  • Richerts Marble and Granite (countertop fabricators)
  • Seattle Lighting (lighting fixtures)
  • Secret Gardens Nursery (Sheila Piccini)
  • Shine Quarry (basalt for landscaping)
  • Sierra Pacific Windows (Rob Sorg)
  • Simpson Doors (from Carls)
  • Simpson Strong Tie (fasteners & hold downs)
  • Stewart Excavating (Mark Stewart, foundation)
  • Sunshine Propane (propane and tank)
  • Therma-Tru Doors (from Carls)
  • Tracy's Insulation (batts and blow in)
  • Trex Decking (from Carls)
  • Trussworks (roof trusses, Carl's)
  • Velux (Skylights and Solar tubes, Carls)
  • Versalam beams (from Carls)
  • Warmboard (Bruce Hull)
  • Wisbo Aquipex, Taco Pumps, Polaris tank (Sunshine Propane)

Followers

About Me

My photo
Professional geologist (USGS, 1972-2008), amateur home remodeler and now builder. Interested in sailing, all things involving salt water, woodworking, and food in general. Owner of Paleo Seis Surveys LLC, consulting in Quaternary geology and geological hazards.