
On Monday afternoon, after the ceremonial dance of the inspectors (when is he coming, did I miss him, will he make it today), ours showed up at 4 pm. Apparently only 2 of 3 inspectors were on duty Monday, which generally more requests than other days of the week. This is because any requests called in between Friday and Sunday will be scheduled for Monday. Nevertheless, he came and he approved. It was sort of casual. Jim (the inspector) strolled through the house, asked a few questions, said it looked good and with the stroke of a pen approved our house for occupancy. We still had to get the certificate from the county, but we're legal of live there now—538 days after breaking ground (Oct. 25, 2008) and about twice as long as Kala Point thought it should take anyone to build a house. Contractors yes, home owner/builders no. I suspect we waisted a few months of the 18, but there was no way we could have even finished it in a year unless we were strictly subbing everything out. Here is the list of major chores we did in building our house (in chronological order)
WHAT WE'LL HAVE DONE AT MOVE IN TIME
Staked out the house and marked all trees for felling
Installed basement and perimeter drains, and sump pump (in basement)
Laid 2300 ft of Pex tubing in the Warmboard, another 1000 ft upstairs for do it yourself radiant
Installed all the drain pipe (ABS) and fresh water pipe (Pex) in the entire house
Laid main lines for electrical, water, cable, and phone (in ditches)
Drilled studs and pulled all the wire in the house for electrical
Installed all the lighting (except 4 of 6 exterior) fixtures
Installed all the receptacles and a few light switches
Strung and wired all low-voltage circuits (TV, computer, phone, and cable)
Hung about half of the soffit (T&G cedar)
Hung all the exterior window and door trim (36 units)
Hand dipped about 5000 shingles (Nancy) and I sprayed another 2500 for exterior
Painted all the facia, soffit, window and door trim
Spray painted the interior of the garage and man cave
Finished all the interior fir window trim with brushing lacquer (Nancy)
Cut and finished about half of the other window and door trim
Helped mount the kitchen and pantry cabinets (about 35 units)
Mounted all mudroom cabinets (6 units)
Laid the cork tile in the pantry
Mounted 40 feet of maple butcher block counter tops in pantry and mudroom
Cut and laid tile in the kitchen, guest bath, sauna, and mudroom
Cut and laid tile in the master bath
Cut and laid tile in the master shower, including travertine shelves from polished slab remnant
Built door thresholds (4) to match hardwood floors
Put up American Clay plaster in great room (green) and dining room (gold)
Helped with the crown molding on the kitchen cabinets
Painted and mounted all the paint-grade trim and baseboard
Mounted all the fir baseboard
Installed all interior lock sets (20)
Installed all the appliances (except propane hookup to counter top range)
STILL TO DO (from now to who knows when)
1. Complete the upstairs bedroom; shower, tub, cabinets, toilet, sinks, ceramic tile and hardwood flooring, and base trim, as well as painting of trim (most of upstairs).
2. Carpet the stairs and closets.
3. Build cabinets (built in) and mantle in the den.
4. Build the mantle and hearth in the living room, plus add rock to that wall .
5. Complete the sauna and shower in guest bathroom (first floor).
5. Put down some sort of flooring in the man cave and add base trim.
6. Build cabinets and table in the wine cellar.
7. Complete the landscaping.
8. Build my Pygmy kayak.
9. Take a nice vacation.
THINGS WE PAID FOR (aka the "heavy lifting")
Tree clearing, excavation, and grading
Foundation and slabs, forming and pouring
Framing, installing windows, and 5 exterior doors
Insulating
Drywall and painting interior (primer and final coat)
Cabinets (purchased assembled and delivered to site)
Hardwood flooring on first floor (red birch, tung oil finish)
Crown molding in kitchen
All in all, I suspect that we saved about 25 percent by being our own contractor. Of this, the majority was from our labor (15%) and the remainder (10%) was from doing our own contracting and researching/purchasing of supplies. We avoided subcontractor markups on materials and appliances by doing this ourselves, using the internet for some lighting fixtures, all the cabinet hardware, Pex supplies, and other hard to find items.
Building a House in Kala Point, Port Townsend, WA

A running narrative of first-time builders of their retirement home in Port Townsend, WA (NE corner of the Olympic Pennisula, 60 miles NW of Seattle). Follow us as this adventure unfolds in late 2008 and beyond. 18 months under construction, we moved in on May 25th, 2010. Photo taken August 15, 2010.
Tuesday, April 27, 2010
Thursday, April 22, 2010
Electrical Passes (Day 533)
Sure enough, we passed our final electrical inspection on Wednesday afternoon. It was a bit anticlimactic since I knew exactly what had to be fixed and fixed it with Gary Estes' help (Craighead Electric). However, we got to play that "Chicken Game" with the inspection department, which is always fun. Electrical inspections are handled by the Dept. of Labor and Industries (aka L&I) out of Port Angeles, not by our county. So there is a whole different process and bureaucracy to deal with. If you call in the inspection request on a weekend, it gets logged in on Monday morning and assigned to an inspector on Tuesday morning, unless of course there were too many requests for that day (of course). After calling in to check on the date/time of our inspection, we were told that our inspector (Mike Anderson) had us as eighth on is list for Wednesday, probably in the afternoon. Well that narrowed it down to 12-4 pm.
I was helping a friend build a deck nearby, so there was no one around the new house as lunch time approached. Not wanting to miss and get charged extra for this appointment, I went to the new house and busied myself with miscellaneous chores, of which there are thousands. Nancy came back from picking up tile in Sequim at 1:30, so she got to house sit (and garden) while I went back to the deck job. Not a half hour later, here comes the inspector. Back to the house, just in time to see him finish and put the much hollowed "final inspection" sticker on the electrical panel. Woosh, we're ready to use some serious kilovolts now.
Hopefully we can schedule the final County inspection for Monday, April 26th. This is the even more sought-after "Occupancy Permit", which entitles us to a $6500 credit from Uncle Sam if we qualify by May 1st. Smells like furniture money to me. More later, Michael
Monday, April 19, 2010
For whom the bell tolls (Day 531)

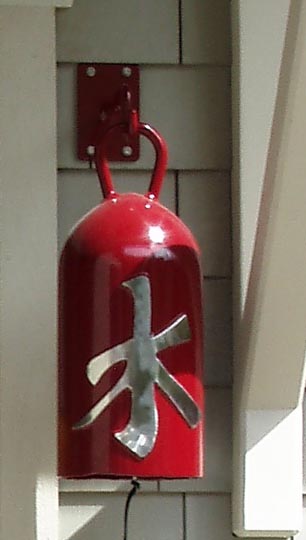 Us. When we went to the Tulip Festival in La Conner, WA, we saw these great bells made from old welding tanks. The artist cuts them from 7", 9", and 10" diameter tanks, welds a hook on the top and makes a hanger. Then he welds a hand-crafted Japanese character on the front, buffs it up (stainless steel), and tapes it off. Then it goes off to the powder coater and gets painted. They had a red one that was a close match for the windows, so we went for the artistic door bell, 7" wide and about 18" long. It has a nice earthy gong, if you chose to ring it (please). Its only money, but heck it looks good at the front entrance. The symbol means water, which we thought was appropriate for Kala Point and the Puget Sound.
The big dust up (Day 530)
Talk about a dust up. Not the confrontational type, but the big sander type. Mills Interiors' guys (Mike and Ivan) showed up at 8 am, exactly on time, and proceeded to take it down a few silly millimeters. They said there would be some dust so off I went to Hadlock Building Supply for a bunch of light weight plastic sheeting, 9 ft wide (ceiling height). I taped off the kitchen cabinets and appliances, the sun room windows, the fireplaces, and some other items that don't like dust. Closed the doors to the pantry and bathroom, and basically limited where the sanding dust could go. It turns out that not much dust was generated, but they did make two large garbage bags of sawdust (1100 square feet times several millimeters sanded off).
The floor sanding process was interesting, although I'd seen Ernie (S)anderson (ex USGS) do it to our hall floors in Denver 25 years ago. First they go at the floors with a drum sander (horizontal axis), sanding at about a 30° angle to the flooring. This allows them to cross grain and level out any high spots in the flooring. We're using No. 2 Red Birch, its knotty and has a lot of color variation vs. No. 1 which is more uniform (and monotonous). Some of our floors go 50 ft in one stretch, so monotonous wasn't what we were looking for. After the cross angle sanding with 40 grit, they go parallel to the grain with 80 grit. Now the floors are flat and smooth.
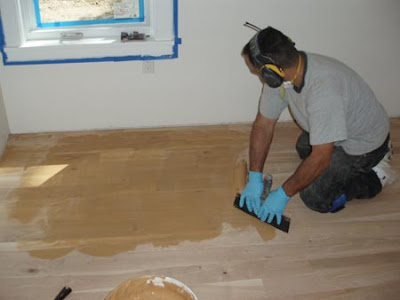
 Out comes the filler. There are knots to fill, gaps between boards, and various imperfections—or as we like to call them—Architectural Features. Naive as I am after 18 months at this construction job, I offered to help them put the filler in. Heck I have two putty knives so this could speed things along—NOT. They whipped out a 5 gallon bucket of wood filler (a semi-liquid form) and proceeded to fill everything in one fell swoop with a 14" drywall knife. Sort of like frosting a cake for the Jolly Green Giant. These guys know what they're doing and are fast. They put the putty down in the master bedroom in about 10 minutes, and its about 250 square feet in area. I'd still be getting my little can of putty open to fill some knots. I've learned to just step back, watch, and learn now the professionals make money in these businesses.
 After the putty dries (about 30 minutes, but depends on temp and humidity), they go at the floors again, this time with an 80 grit paper on the drum sander. When this sanding is done, they'll go around and find places that have putty wedges (a shallow spot) or spots that need additional putty, and then resurface these spots. After the 80 grit is done, they'll be ready to apply the first of three coats of finish.
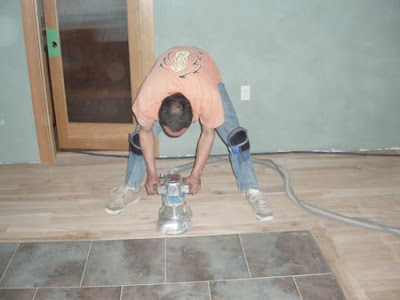 While Mike and the drum sander were cutting away, Ivan was doing all the edges with the edge sander. Its basically a disc sander on wheels. He runs it along the walls and all the other edges, like where wood meets tile (see photo to left). The drum sander can get about 1/8" away from the walls, but can't get into the corners. This is where the hand work starts. They use a scraper for the corners, dragging it along grain to take it down to the level of the adjacent floor. After scraping, a rectangular orbital sander is used to get it to the 80 grit level of finish. The thresholds and bull-nose pieces are sanded with a small orbital or by hand, as required.
At the end of the day, everything was sanded with 40 grit and about half the floor had been filled and sanded with 80 grit. I suspect the are about 50% through the prep stage (7 hours work for 2 guys), so they should finish all the sanding on Tuesday and apply finish on Wednesday and Thursday. Mike Mills put down three finishes on some test patches.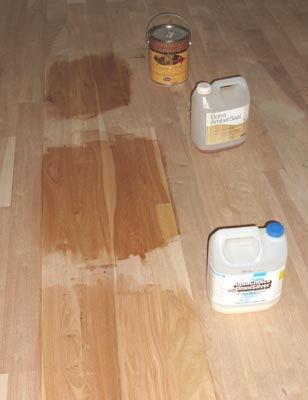 Two are water base polyurethanes and the third is an old world tung oil finish. We liked the look and feel of the tung oil, and the fact that its easy to reapply to damaged areas, so that what we're going with. In the adjacent photo, its the third (and farthest) finished patch. It tends to enhance grain and darken the wood more than the polyurethanes. When dry it will have a satin (non-glossy) finish and should fell good under foot since this will be a shoe-free house.
While all the sanding was going on Nancy did some gardening and I mucked out the garage. A couple hundred pounds of scrap wood was sliced and diced into kindling, the MDF scarps went into garbage bags for the dump, and a whole lot of dust was sucked up into my 35 year old Craftsman Shop Vac. I wish the damn thing would blow up so I could get a new one, but its going to have the best of my and make through this project just to spite me.
The floor sanding process was interesting, although I'd seen Ernie (S)anderson (ex USGS) do it to our hall floors in Denver 25 years ago. First they go at the floors with a drum sander (horizontal axis), sanding at about a 30° angle to the flooring. This allows them to cross grain and level out any high spots in the flooring. We're using No. 2 Red Birch, its knotty and has a lot of color variation vs. No. 1 which is more uniform (and monotonous). Some of our floors go 50 ft in one stretch, so monotonous wasn't what we were looking for. After the cross angle sanding with 40 grit, they go parallel to the grain with 80 grit. Now the floors are flat and smooth.
 Out comes the filler. There are knots to fill, gaps between boards, and various imperfections—or as we like to call them—Architectural Features. Naive as I am after 18 months at this construction job, I offered to help them put the filler in. Heck I have two putty knives so this could speed things along—NOT. They whipped out a 5 gallon bucket of wood filler (a semi-liquid form) and proceeded to fill everything in one fell swoop with a 14" drywall knife. Sort of like frosting a cake for the Jolly Green Giant. These guys know what they're doing and are fast. They put the putty down in the master bedroom in about 10 minutes, and its about 250 square feet in area. I'd still be getting my little can of putty open to fill some knots. I've learned to just step back, watch, and learn now the professionals make money in these businesses.
 After the putty dries (about 30 minutes, but depends on temp and humidity), they go at the floors again, this time with an 80 grit paper on the drum sander. When this sanding is done, they'll go around and find places that have putty wedges (a shallow spot) or spots that need additional putty, and then resurface these spots. After the 80 grit is done, they'll be ready to apply the first of three coats of finish.
 While Mike and the drum sander were cutting away, Ivan was doing all the edges with the edge sander. Its basically a disc sander on wheels. He runs it along the walls and all the other edges, like where wood meets tile (see photo to left). The drum sander can get about 1/8" away from the walls, but can't get into the corners. This is where the hand work starts. They use a scraper for the corners, dragging it along grain to take it down to the level of the adjacent floor. After scraping, a rectangular orbital sander is used to get it to the 80 grit level of finish. The thresholds and bull-nose pieces are sanded with a small orbital or by hand, as required.
At the end of the day, everything was sanded with 40 grit and about half the floor had been filled and sanded with 80 grit. I suspect the are about 50% through the prep stage (7 hours work for 2 guys), so they should finish all the sanding on Tuesday and apply finish on Wednesday and Thursday. Mike Mills put down three finishes on some test patches.
 Two are water base polyurethanes and the third is an old world tung oil finish. We liked the look and feel of the tung oil, and the fact that its easy to reapply to damaged areas, so that what we're going with. In the adjacent photo, its the third (and farthest) finished patch. It tends to enhance grain and darken the wood more than the polyurethanes. When dry it will have a satin (non-glossy) finish and should fell good under foot since this will be a shoe-free house.
 While all the sanding was going on Nancy did some gardening and I mucked out the garage. A couple hundred pounds of scrap wood was sliced and diced into kindling, the MDF scarps went into garbage bags for the dump, and a whole lot of dust was sucked up into my 35 year old Craftsman Shop Vac. I wish the damn thing would blow up so I could get a new one, but its going to have the best of my and make through this project just to spite me.
Tuesday, April 13, 2010
Kentucky Derby (Day 524)
We had our final electrical inspection today and it turns out it wasn't so final. We failed on 5 points, 4 of which are easily solved (time and $$) and one of which requires some sleuthing.
The easy stuff includes:
1) waterproof trim on all the shower and bath stall lighting cans (had one in and two sitting there),
2) enclosed trim on the closet lighting cans (never saw this coming),
3) an ungrounded metal receptacle in the master bath linen closet (add a ground jumper),
4) modify a temporary box to be function in the future upstairs linen closet,
5) fix receptacles and two lights that don't work in the basement and upstairs bedroom (I knew about the lights, but not the receptacles). This is an issue for the real electricians, Craighead Electric.
So now the rush is on to get the electrical fixed, rebook a final-final electrical, and then the final inspection from the county for our occupancy permit. Deadline, in terms of IRS tax credit, is April 30th. This is beginning to feel like the Kentucky Derby, which coincidentally, runs May 1st.
Sunday, April 11, 2010
10 Best and Worst (Day 522)
As we approach the end of this project, it is worth reflecting on the best and the worst things that happened in the past 18 months. If you've done this in the past, I'm sure you'd have a different list. If you are contemplating building a house, take a close look—at both lists.
10 Best Things about building your own house (no particular order).
1. You get it your way.
2. You have plenty to do for a year or two.
3. You learn tons about the construction business, woodworking, and other crafts.
4. You get connected to a whole different culture than you normally would (for us).
5. You get an enormous amount of pride from having built a house, with your hands
6. You meet a lot of interesting people, many who become true friends.
7. If done right, you get way more (+25%) for the same price as buying.
8. You know exactly how everything was done and where things are (plumbing, etc).
9. It can be a hell of a lot of fun, challenging, and rewarding.
10. You can find any room in your sleep, even if its pitch black & even on the first night there.
10 Worst Things about building your own house (no particular order).
 1. You can really screw up and even loose big money.
2. You can kiss off a vacation for a year or two.
3. Expect a lot of discussions (some heated) with your building partner.
4. Even though you think you can have it your way, you can't. Compromise is the best you'll do.
5. Expect some sleepless nights as you worry whether something was done right, or at all.
6. Even though friends say they'll be there to help, you're on your own. The best help is hired.
7. Expect to get hurt, injured, or maimed. If not, you've been really lucky.
8. You know exactly where every booboo is in your house.
9. Whenever someone says they built their house, you doubt it (or ask for endless details).
10. You can sleep in your car, but you can't drive your house (that would be an RV).
Thursday, April 8, 2010
Wolf in the Hole (Day 519)
 Nancy's big (30") Wolf double oven has been residing in the garage since last July when we bought it from Fredrick Appliances in Redmond. Last week, Bill Craighead (Craighead Electric) wired the 240V, 50 amp box at the rear of the oven case, so it was my job to throw that Wolf in the hole. Easier said than done.
The case measured up as a tight fit (height and width) but this is a common problem. Sometimes you have to grind a bit to allow screws to pass the side rails, but we had a bigger problem. Medallion Cabinets, the company that built the kitchen cabinets, screwed up and built the case an inch short in terms of depth. The plans that The Kitchen and Bath Studio (Shelly Little, Port Townsend) submitted clearly showed the case to be 24" deep, but they built it at 23 1/4". So what is the problem you say. Well if the back to the cabinet was flush against the wall, you'd have to cut the entire back out, the 1/2" of drywall, and take another 1/2" off the studs.
Luckily, we'd put a pony wall up to hold the cabinets away from the wall to allow a deeper counter top (28"). So we had some space to deal with. However, it was an ugly process. First I took the circular saw to the back of the cabinet, which left a 1" rim around the sides. Then the portable planer came out to reduce the left side to 1/2" and the bottom to flush with the oven base. In addition, the front had a 1/8" reveal on the oak trim piece, which induced a backward (at top) tilt to the oven when installed.
 On Monday, three of us (me, Darrell Olson, and Jim Quandt) lifted and attempted to install the oven twice, to no avail. Did I mention that the double oven weighs in at about 250 pounds. So we retreated and tried a new approach. Built a bench the correct height, get the oven up onto it, then slide it in the hole. I found a bench that would work, so on Tuesday we went at it again. In once, out for a bit more trimming, then back in to its final resting place. I hated like hell to chop up the oven case, but none of my butchery shows so I guess only us and the readers will know what happened in the long run.
 Long story short. Its in the case, wired, and ready for testing. I think a batch of biscottis would be an appropriate test--right Nancy?
Elsewhere around the house I'm putting cover plates in place, cutting in low voltage boxes for the three TV locations, installing florescent lights in the basement, compressing the plaster walls (a long-term, hour at a time process), hanging doors (where they don't overhang the hardwood flooring), and generally cleaning up. The door in the adjacent photo is a Simpson with narrow reed glass; its in the guest bathroom off the kitchen (green plaster wall). Next up are inspections, then initial sanding and sealing of the hardwood floors on April 19th (Mills Interiors). We plan to start moving in after Mothers Day (May 9th) and to be entirely in the house by May 15th, when our rental lease expires.
Monday, April 5, 2010
Approaching approval (Day 516)
Last week was sort of a wash since I had to go to Idaho to be a paid geologist. I'm starting to think in terms of what these jobs are going to become. For example, if I do this job we can lay carpet in such and such a room. Or perhaps hardwood upstairs. Take about being a geopimp!
Anyway, Idaho Falls was lovely as usual. Overcast. 38-40°F, and snow the last day. Saw the inside of the same conference room for 16 hours and discussed technical dribble ad infinitum. Heck, they pay me to sit there and talk once in a while, so who's complaining.
So since the last post I've been working on our punch list for the occupancy permit and Nancy the painter has been finishing the maple counter tops. All done now, wonderful, even the one next to my man sink in the garage.
Our large list (see Day 486) is down to four items. No. 1 is completing the appliance installation (double oven and refrig) and putting lights up in the basement. No. 2 is the stair railings. Just have to get my courage up to drill 12 holes per stair rail and hope I hit the studs. No. 3 is assemble all the appliance manuals, and no. 4 is to find and have the insulation specs for the house. The electrical issues will be solved tomorrow by Gary Estes, my electrical guru, who is coming by to help install the appliances and lights. No. 2 is just a matter of getting Nancy to hold the railings while I drill their mounting brackets.
Meanwhile, the fir trim is begging to be sanded and finished, which will take a few days. The plaster still needs some attention in terms of being compressed, and the wood floors need to be rough and fine sanded, probably in a few weeks (Mills Interiors).
If all goes well, we'll have our occupancy permit in about 10 days. The IRS deadline for the $6500 house repurchase credit is April 30th, but I don't want to cut it too close. Money talks and everything else walks, as they say.
Subscribe to:
Posts (Atom)
About Me

- Kala Point Builder
- Professional geologist (USGS, 1972-2008), amateur home remodeler and now builder. Interested in sailing, all things involving salt water, woodworking, and food in general. Owner of Paleo Seis Surveys LLC, consulting in Quaternary geology and geological hazards.