Visitors to Date:

blog counter

Building a House in Kala Point, Port Townsend, WA

Building a House in Kala Point, Port Townsend, WA
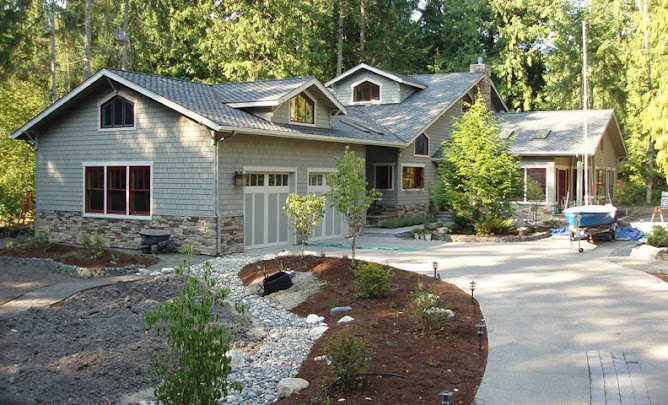
A running narrative of first-time builders of their retirement home in Port Townsend, WA (NE corner of the Olympic Pennisula, 60 miles NW of Seattle). Follow us as this adventure unfolds in late 2008 and beyond. 18 months under construction, we moved in on May 25th, 2010. Photo taken August 15, 2010.

Search This Blog

Wednesday, May 27, 2009

Multitasking (Day 224 of 273)

Multitasking—That's where you do several things at once, and none of them are what your supposed to be doing. For me that is Electrical, but some other things have been getting in the way. As you know from the header, we're at Day 224 of 273 and are only about 50% done so its looking like we'll have to extend our building schedule for about an extra 3 months. If I had 6 hands and three brains it might be a different story.

So the last week Nancy has been painting window and door trim with oil based paint (Cabot OVT, Cinder color). This is being driven by wanting to get the outside of the to a more finished state. One member of the architectural committee has already commented about our recent lack of progress, but he's only looking at the outside. They are oblivious to all the plumbing and electrical work that has happened and needs to be finished before we can move to the insulation and drywall, which are paid jobs that will go fast.

Over the weekend (a holiday for normal people) I finished mounting all window and door trim for the lower half of the house. We're getting ready to lay the Hardiboard on the back sides of the house, so all the trim and corner boards, and porch need to be in place. Troy Ellis (Gary's son) and I will hang the Hardiboard on Fathers Day, but at least I get to use my new nail gun (thanks Nancy and First Federal). Next I'll have to get the corner trim painted and nailed up. This provides a transition from the Hardiboard to shingles on the back corners of the house. There are also horizontal band boards: a basal one that the Hardiboard rests on and a belly board (about 10 ft up the sides) for the transition from Hardiboard to shingles above.

In preparation for the siding, I shot a level line around the whole house. This will provide a guide for the top of the rock and wood sill on the front of the house, and a guide for the siding on the back sides. I stapled up 30# felt (tar paper) as an underlayment for the rock, then will add a layer of metal mesh for the mortar that will hold the rock veneer to the house. With the felt up, the house is starting to take on more shape and feel.

So, instead of ploughing ahead with electrical it looks like we need to spend another week on the trim, paint, and exterior. The weather has been wonderful: 60's dry, with a lite rain every 4-5 days. No complaints in that department.

Gerald and Dottie Lee (Chicago) are stopping by this weekend on their way to a cruise to Alaska. Gerald was my best man 37 years ago, and we haven't seen them since 1994, when we stopped in Chicago on the way to the Adirondacks (Timbles place). Should be fun--and no building this weekend.
Monday, May 18, 2009

Lights on, anyone home? (Day 215 of 273)

Before you can run wiring for the lights, it turns out that you have to decide where those buggers are going to be. So, I started putting up the recessed cans (6" diameter lights) in the ceilings. These are the most affordable way to light a house and they're very discrete. In volume, the housings cost about $8 each, but then the trim kit (what you see) ranges from $5-25 each.

Nancy and I modified architect Berg's original lighting plan to our needs and whats. It turns out that we'll have about 50 recessed cans in the house. The highest concentration will be in the pantry (8), but don't forget about the kitchen, 2 bedrooms, 2 closets, and 3 baths. For the two rooms with vaulted ceilings, we used a version of recessed can for slopes. No big deal, they just cost 5 times as much ($38 each). We bought a dozen of these, which runs the total for overhead lights up to 60. Hell, electricity is cheap and we'll use the new CFL bulbs to save a few watts.

Now we need to make some more expensive decisions, specifically for directed and specialty lighting. For directed lighting, we need high intensity halogen spots (kitchen counter, hanging art pieces, etc) and for specialty lighting its the bigger ticket items, like hanging glass fixtures over tables and the kitchen island. We've looked at few lighting stores in Seattle and haven't been taken with any particular style or look yet, but we need to finalize this before I install the overhead boxes from which these lights will hang.

At the notorious Potato Bake (a Kala Point fund raiser chaired by my associate home builder), we met an interesting women named Karen Hoeve who lives about 2 blocks away. She is an interior decorator who specializes in Craftsman (Art and Craft style) houses, particularly lighting and color selection. BINGO. We invited her over last night to see some of her work and have a glass of wine; what a character and live wire. Hopefully she'll have some ideas upfront before we run the budget into the ground with consulting fees.

So, this week the main job is to install the overhead electrical and switches, all wire 14 gage wire. Meanwhile, Nancy has been hand painting our window and door trim with oil based paint (latex is for wimps), and I've been nailing it up. When all the trim is up, we'll be ready to start hanging Hardiboard with Troy Ellis, our framer's able son. Of course, I still have to build a little porch and steps for the back of the house door, so you don't walk out and break your neck from the 2 foot drop to grade. That little porch will take me a couple of days to do, since I have to pour a little footer for the 4x4 posts to rest on. Looks like we need 10 days in a week to get this house finished. We're already toying with the idea of asking for a 3 month extension on our Kala Point building permit, which would push the 273 days out to 365. You read it here, first.

Saturday, May 2, 2009

Man Cave Wired (Day 214 of 273)

Little bit late with this blog; for some reason work is getting in the way of blogging. Nevertheless, we're onto the electrical work in a big way. Gary Estes has been here and we discussed the general plan: he's doing the "get electrocuted stuff" and I'm doing the hole drilling, wire pulling, and box installs.

So it took a week of work on and off to wire the garage, but there was training time and other chores in there too. I installed four 220 v lines (table saw, compressor, welder, etc) and about 12 outlets. I think there are 6 circuits for these. Then I put in the overhead lighting on 2 circuits. Overall it wasn't bad, but it was slow. It will go faster in the main house area now that I know what I'm doing. One of the bigger problems is deciding how to get wire to all the places. You don't want to drill through trusses and try to avoid the big lumber (like 4 x 6 beams), so there is come creative routes from switches to lamps.

Wire sizes: This is pretty straightforward. For overhead lighting we use 14-2 wire (white). This means 14 gage with two wires and a ground. Wire gages are ass backward. 14 is smaller than 12, and bigger than 16. Sort of think about it as no. of wires that can fit in an inch, i.e., 14 gage is roughly 1/14th inch thick. 14-3 has three wires and one ground and is used for 3 way switches (we'll have a dissertation on this subject once I've passed my qualifiers).

For the plug in receptacles (110 v), we use 12-2 wire (orange). If you need GFI protection (as in garage by code), you install a GFI receptacle in the first outlet and everything downstream is protected. GFI receptacles are used where water within 3 feet of outlet, or where there might be standing water on the floor (garage). You can put as many as 8-12 outlets on a single circuit, since they figure you can't be running more than a couple of tools simultaneously.

For the 220 v. lines, we use 10-2 wire and have a single receptacle per circuit. For example, the 3- HP motor on my intended table saw would draw 25-30 amps at 110 v (too much for 12-2 wiring), but only draws half that amperage at 220 v, so you can supply power with 10-2 wire on a 20 amp circuit breaker. Problem solved, just more wires going to separate places.

For the front end of the electrical system, we have an assemblage of panels and shut offs. Power comes in the house from the street (ground transformer) through 00 cable (1 1/4 inch thick, 220 volts, 3 cables) and uses a piece of rebar tied to the foundation for a ground. This cable will be underground in 4 inch gray PVC conduit, then enters the garage wall through a 90° bend (sweep) that we placed in the concrete footer. Then it goes up and into the meter box, which is within the garage framing. The meter is externally mounted and gets read electronically from the street. From the meter box power is routed to a main shut off panel (interior) and then goes to two panels: one 200 amp in the garage (for boy toys) and one 200 amp in the basement for the house and girl toys (ovens, lights, etc).

After completing the garage and my basic wiring test (now I'm a rank amateur apprentice electrician), we took a week off to visit Denver and northern New Mexico on a mixed business trip and vacation. Managed to get our chili pepper tongues recalibrated and see a half dozen Denver couples for dinner and drinks. A successful trip, except for the excess baggage (personal weight gain) on the way back.

Now we've moved into the main house, putting up receptacle boxes and overhead (6" can) lights. 48 so far, with a few more smaller ones to be decided for lighting art work or specific parts of rooms, such as the kitchen counters and island.

Subcontractors and Suppliers

  • Balco Excav. (land clearing, Bill Snyder)
  • Bill McCutchen's Mill (cedar trim)
  • Blake Tile and Stone, Sequim (Judy Reno, Eldorado Stone, Tile)
  • Bob Brown Plumbing (Bob & Josh Brown)
  • Boise Cascade joists (from Carls)
  • Carl's Building Supply (Mike, Melissa, Michele, Terry & Lawrence)
  • Castlerock Landscaping (Tim Hamm, Sequim)
  • Cotton RediMix (concrete and gravel)
  • Craighead Electric (Gary Estes)
  • Custom Hearth (propane fireplaces), Pousbo
  • Daltile (Seattle, Wedi board)
  • Discount Cabinets of Washington (Sequim)
  • Discovery Bay Materials (gravel, top soil)
  • Earl Kong (professional forester, PT))
  • EcoHaus (Amer. Clay Plaster, cork flooring)
  • Ellis Construction (Gary and Troy Ellis, framing)
  • Evergreen Products (Drywall, Sequim)
  • Fergusons, Seattle (Plumbing fixtures, Bud Allen Wright)
  • FInlandia Saunas (Tigard, OR)
  • Fitzgerald Concrete (driveway, Mike Fitzgerald)
  • Four Corners Nursery (trees, Port Hadlock)
  • Frank Feltes Custom Drywall and Painting (drywall and painting)
  • Frank Ward and Wayne Jobst (Stone masons)
  • Fredricks Appliances (Redmond, all appliances)
  • Giraffe Gutters (Dan Shaw, Chimicum)
  • Glass Etchings by Perrett (Jerry Perrett)
  • Hadlock Building Supply (bits and pieces)
  • Hardiboard, siding, backer board (from Carls and Home Depot)
  • Henerys Hardware (Cabot stain, misc. fasteners)
  • Hi-Tech Electronics (Audio & Media, Port Angeles)
  • Hide-A-Hose (Joseph, A-B Vacuum, Puyallup, WA)
  • Home Depot (electrical & plumbing supplies, interior paint)
  • Home Storage Solutions (John Plake, PT)
  • Hope Roofing (Pabco Paramont Advantage shingles)
  • Jim's Tool Time (J. Quandt, misc. carpentry)
  • K&D Concrete (Don McNeese)
  • Kitchen and Bath Studio (Shelly Little, cabinets)
  • Levi's Energy Services LLC (radiant design, vents, propane piping)
  • Meta Marble and Granite (travertine), Seattle
  • Michaelangelo (sepentinite), Seattle
  • Mikael Brostrom (Structural Engineer)
  • Mills Interiors (wood flooring, some tile)
  • North Coast Electrical (Electrical Supplies)
  • Olympic Garage Doors (Sequim)
  • Penisula Flooring (carpet)
  • Penisula Shower and Mirror (Sequim)
  • PexSupply (online plumbing and radiant supplies)
  • Puget Sound Power (and Atelco installers)
  • Richard Berg Architects (Richard and Darlene)
  • Richard Gifford Construction (septic, dry wells and grading)
  • Richerts Marble and Granite (countertop fabricators)
  • Seattle Lighting (lighting fixtures)
  • Secret Gardens Nursery (Sheila Piccini)
  • Shine Quarry (basalt for landscaping)
  • Sierra Pacific Windows (Rob Sorg)
  • Simpson Doors (from Carls)
  • Simpson Strong Tie (fasteners & hold downs)
  • Stewart Excavating (Mark Stewart, foundation)
  • Sunshine Propane (propane and tank)
  • Therma-Tru Doors (from Carls)
  • Tracy's Insulation (batts and blow in)
  • Trex Decking (from Carls)
  • Trussworks (roof trusses, Carl's)
  • Velux (Skylights and Solar tubes, Carls)
  • Versalam beams (from Carls)
  • Warmboard (Bruce Hull)
  • Wisbo Aquipex, Taco Pumps, Polaris tank (Sunshine Propane)

Followers

About Me

My photo
Professional geologist (USGS, 1972-2008), amateur home remodeler and now builder. Interested in sailing, all things involving salt water, woodworking, and food in general. Owner of Paleo Seis Surveys LLC, consulting in Quaternary geology and geological hazards.