
For the last 6 months I've been watching an ad on Craigslist (not a masseur) for sawn cedar shingles. We plan on siding the front of the house with shingles and I had calculated that we have about 2400 sq. ft to cover. As with all shingles, they are sold in bundles, 4 to a square (nominally at 100 sq. ft). So we'd need 24 squares. But its a little more complicated. For cedar shingles, the minimum exposure for each shingle is usually 5", which gives 100 sq. ft to square. However, if you run the exposure at 6" the coverage goes up to 120 sq. ft per square. 6" exposure will look better on this house because its rather tall and will have a coarse rock belt line below the windows.
Therefore, we needed 20 squares (80 bundles) to cover the front and south sides of the house. We'll use Hardiboard planks (lap style) on the back side since they paint up well and handle moisture pretty well. I ordered 200 pieces from Carl's the other day, which should cover 1400 square ft. The price on this material works out to about $1/sq. ft, which is cheap for almost any kind of siding. Anyway, back to the shingles. Carl's best price on the shingles (all No. 1, blue label, blah, blah, blah) was $220 + tax for a square. That works out to almost $240 a square, but delivery is included (3 miles).
The Craiglist ad is for the A&A shake mill in Forks, WA, about 120 miles west of us and deep up in the rainforest of the Olympic Mountains. Interesting little town, currently known as the setting for the teen-flick Twilight, but I digress. Anyway, these little mills are on the brink of closure with wood demand and prices down almost 25% the last few years. They're dealing to stay alive. Their current price as $130/square (down from $145 last year) with no tax (don't ask) and 2% off for cash. Delivery would be about $280 from Forks, which works out to $14 a square. So my net would be roughly $145/square straight from the mill, no middle man. It was a deal I couldn't turn down. The garage of the new house is full of shingles and cedar trim now. Paint (stain) is on hand, so the brushes will be coming out soon.
Building a House in Kala Point, Port Townsend, WA

A running narrative of first-time builders of their retirement home in Port Townsend, WA (NE corner of the Olympic Pennisula, 60 miles NW of Seattle). Follow us as this adventure unfolds in late 2008 and beyond. 18 months under construction, we moved in on May 25th, 2010. Photo taken August 15, 2010.
Sunday, April 26, 2009
Monday, April 20, 2009
Red, White and Blue (Day 187 of 273)
After weeks of ABS and its messy black cement, we're onto the the relatively clean job of installing the domestic water piping. Until a few years ago this meant ordering hundreds of feet of 3/4" (supply) and 1/2" (distribution) copper pipe, getting out your gas torch, and soldering it all together. I used to be a pro at this, but the last few years I've lost my touch and am actually intimidated by the whole process. To add to my angst, copper has become very expensive with China eating pipe like noodles—they're even buying mines in Peru to get guaranteed resources. Same strategy with cement and steel. They expect to build 40,000 miles of highway in the next decade, which is equal to ALL the highways in the USA.
Alas, Pex to the rescue. This plastic pipe has been about for about 30 years, and is used extensively in Europe. I think its introduction and acceptance in the USA has been impeded by the plumbers unions, mainly because its just too easy to install. Denver doesn't allow it, but the International Building Code (and Port Townsend) does. Whatever the reason, I'll leave the little bit of copper work we'll need to Bob Brown and do all the plastic piping my self. I started with the Pex on Wednesday (5 days ago) and had most of it done by Sunday evening.
We're running three main lines (i.e. zones). No. 1 is the hot water supply, which will be a closed, circulating loop. What I mean is that there will be a little pump & timer on the line that automatically circulates hot water every 10± minutes at the times of the day that hot water is used. For example, in our house hot water is used for showers in the am, for cooking (mainly dinner) and for laundry. Anyway, with hot water always in the main loop, any faucet is only 3-4 ft away and you should have fully hot water in 10-20 seconds. I used red Pex for this--makes sense (duh). What do you think about that, Mr. Sailboat? I know it takes 2 minutes (and wastes 3-4 gals of water) to get hot water to the shower next to Nancy's old bedroom in California (but you guys have way too much water anyway).
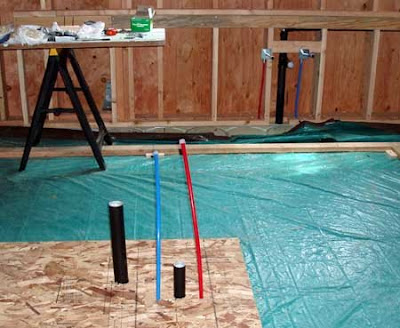
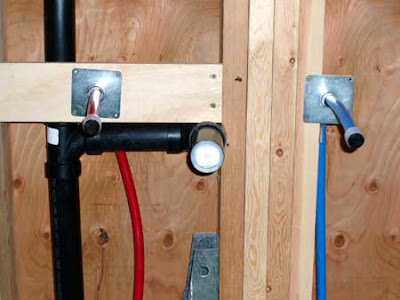 The second line is the cold water supply, but only for non-drinking purposes (showers, laundry, toilets, etc). I used blue Pex for this. We've isolated this cold water to eventually accommodate a water softener or high-tech filtration system which we might need, but aren't sure. The third line is the cold water potable supply (kitchen sinks and outside hose bibs). I used white (clear) Pex for this. We don't want to drink softened water or put it on the yard plants. However if we get a filtration system, then we'll just replumb the two cold water lines together and all is well.
So there you go: Red, White and Blue plumbing—quite patriotic . It has a Steve Cooley feel to it.
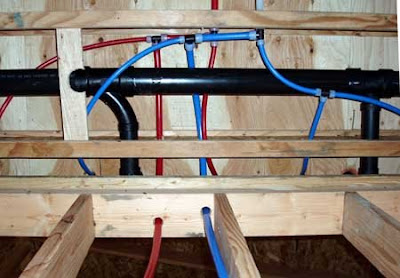
Contrary to my preconceptions, the domestic water part of the plumbing is way easier than the hard pipe waste and vent plumbing. The Pex flexs and can make gentle bends: you can bend the 1/2" Pex into a radius of about 4" and 8" for the 3/4" Pex. So you can snake it into and out of walls and floor joists and only need to drill holes about 1" in diameter, which you're permitted to do anywhere in an engineered joist. I have a variety of little plastic fittings such as elbows, tees, and connectors. You can have three 1/2" lines off a 3/4" line, so most bathrooms have a 3/4" line the passes beneath it with the shower, and vanity and toilet coming off that line.
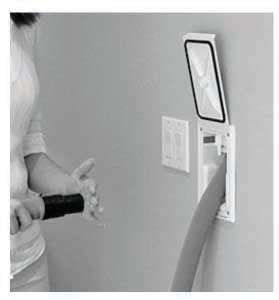
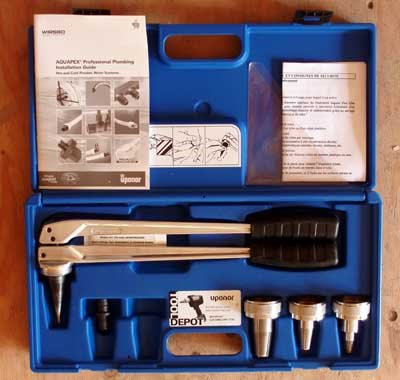 The only ringer in this process is the Pex expander tool. This device (see picture of blue box) is used to expand the pipe so the fittings will fit. You put a collar on the pipe, and insert the expander and start pumping. It felt like I'd been to the gym when I got home the first day. Most homeowners would never have one becasuse they aren't for rent (only sold to Pex certified installers). But after installing 2,200 ft of Pex in the Warmboard, I felt pretty qualified so I ordered one from Pex Supply. After I'm done with the house, I plan is to sell it after to my radiant heating guy (Levi Ross, with lifetime occasional-use clause) or on Craigslist. It was $300 new, so if I get $150-$200 for it I'm way ahead.
Alas, Pex to the rescue. This plastic pipe has been about for about 30 years, and is used extensively in Europe. I think its introduction and acceptance in the USA has been impeded by the plumbers unions, mainly because its just too easy to install. Denver doesn't allow it, but the International Building Code (and Port Townsend) does. Whatever the reason, I'll leave the little bit of copper work we'll need to Bob Brown and do all the plastic piping my self. I started with the Pex on Wednesday (5 days ago) and had most of it done by Sunday evening.
We're running three main lines (i.e. zones). No. 1 is the hot water supply, which will be a closed, circulating loop. What I mean is that there will be a little pump & timer on the line that automatically circulates hot water every 10± minutes at the times of the day that hot water is used. For example, in our house hot water is used for showers in the am, for cooking (mainly dinner) and for laundry. Anyway, with hot water always in the main loop, any faucet is only 3-4 ft away and you should have fully hot water in 10-20 seconds. I used red Pex for this--makes sense (duh). What do you think about that, Mr. Sailboat? I know it takes 2 minutes (and wastes 3-4 gals of water) to get hot water to the shower next to Nancy's old bedroom in California (but you guys have way too much water anyway).

 The second line is the cold water supply, but only for non-drinking purposes (showers, laundry, toilets, etc). I used blue Pex for this. We've isolated this cold water to eventually accommodate a water softener or high-tech filtration system which we might need, but aren't sure. The third line is the cold water potable supply (kitchen sinks and outside hose bibs). I used white (clear) Pex for this. We don't want to drink softened water or put it on the yard plants. However if we get a filtration system, then we'll just replumb the two cold water lines together and all is well.
So there you go: Red, White and Blue plumbing—quite patriotic . It has a Steve Cooley feel to it.

Contrary to my preconceptions, the domestic water part of the plumbing is way easier than the hard pipe waste and vent plumbing. The Pex flexs and can make gentle bends: you can bend the 1/2" Pex into a radius of about 4" and 8" for the 3/4" Pex. So you can snake it into and out of walls and floor joists and only need to drill holes about 1" in diameter, which you're permitted to do anywhere in an engineered joist. I have a variety of little plastic fittings such as elbows, tees, and connectors. You can have three 1/2" lines off a 3/4" line, so most bathrooms have a 3/4" line the passes beneath it with the shower, and vanity and toilet coming off that line.
 The only ringer in this process is the Pex expander tool. This device (see picture of blue box) is used to expand the pipe so the fittings will fit. You put a collar on the pipe, and insert the expander and start pumping. It felt like I'd been to the gym when I got home the first day. Most homeowners would never have one becasuse they aren't for rent (only sold to Pex certified installers). But after installing 2,200 ft of Pex in the Warmboard, I felt pretty qualified so I ordered one from Pex Supply. After I'm done with the house, I plan is to sell it after to my radiant heating guy (Levi Ross, with lifetime occasional-use clause) or on Craigslist. It was $300 new, so if I get $150-$200 for it I'm way ahead.
Sunday, April 19, 2009
Drill Baby, Drill (Day 186 of 273)
Yes, I'm a big fan of Sarah Palin, aka "the Drill Baby" from Laska. Just think, if McCann had been elected, Sarah would be VP, and James Watts would be back as the Secretary of Inferior. I would have had to stick around the USGS just to keep an eye on these three amigos from hell. But I digress.
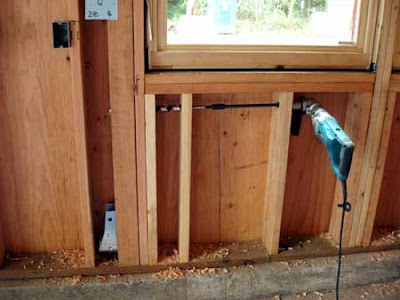
I had to drill some long holes for the plumbing the other day, so I unwrapped my heretofore unused Cully 18" Ship Auger (1 1/8" diameter). Strapped that baby to my Makita angle drill, and powered it up. The task at hand was drilling through a 2"x6" nailed to a 4" thick Versalam then through a Boise BC5000 engineered joist 3" behind. I wonder if Richard Berg or Mikael Brostrom have ever been behind the business end of this sort of drilling machine. Did I mention that the target was 9 1/2' off the floor.
So up the ladder I go with my two friends, Culley and Makita. I planted the bit, aimed it along the plumbing line and powered up. This bit chewed through the wood like a golden retriever going for a tennis ball. Within 20 seconds I was in clear air with wood chips everywhere. Mission accomplished. Did I forget to mention that if the bit hits something hard (like a nail) and binds up it will break your wrist(s). No broken wrist this time.
There was lots more overhead drilling that day, but mostly feeble targets like 2x6s and joists. Packed up for the day and headed home, feeling sort of proud of myself. Well by that evening I shoulders were a little sore, and by this morning I couldn't lift my arms above my shoulders. Fortunately Dr. Advil was in the room and we had a serious meeting: take 4 tablets three times a day and find something easier to do today. Looks like Sunday will be spent sweeping and cleaning up. More battles to fight next week. Drill Baby, Drill.
Next week: Yep, Gary Ellis built it and I'm boring holes in this house like a termite. Drilled through a series of 2x6 studs that sandwiched a 4x6 post and managed to get the drill firmly buried. Took about an hour to dig it out, but I got a hole all the way through it as shown in the second photo. Success comes slowly. Looks like an electricians job is about 1/2 drilling, 1/4 pulling wire, and 1/4 hooking it all up. I pulled my first wire on Monday; a series of four 240-volt lines for the garage using 10-2 wire. Also, Gary Estes (electrician) installed the meter and subpanels on Monday and I helped him pull 100 ft of No. 0 three-cable wire from the garage through the house an into the basement. The coil of wire weighed about 150 pounds and acted like an anaconda when we unrolled it. Yes, unroll or you're going to have a mess on your hands. We'll have a little tutorial on wire sizes later (gauge 0 is really big and 20 is really small, go figure).
I had to drill some long holes for the plumbing the other day, so I unwrapped my heretofore unused Cully 18" Ship Auger (1 1/8" diameter). Strapped that baby to my Makita angle drill, and powered it up. The task at hand was drilling through a 2"x6" nailed to a 4" thick Versalam then through a Boise BC5000 engineered joist 3" behind. I wonder if Richard Berg or Mikael Brostrom have ever been behind the business end of this sort of drilling machine. Did I mention that the target was 9 1/2' off the floor.

So up the ladder I go with my two friends, Culley and Makita. I planted the bit, aimed it along the plumbing line and powered up. This bit chewed through the wood like a golden retriever going for a tennis ball. Within 20 seconds I was in clear air with wood chips everywhere. Mission accomplished. Did I forget to mention that if the bit hits something hard (like a nail) and binds up it will break your wrist(s). No broken wrist this time.
There was lots more overhead drilling that day, but mostly feeble targets like 2x6s and joists. Packed up for the day and headed home, feeling sort of proud of myself. Well by that evening I shoulders were a little sore, and by this morning I couldn't lift my arms above my shoulders. Fortunately Dr. Advil was in the room and we had a serious meeting: take 4 tablets three times a day and find something easier to do today. Looks like Sunday will be spent sweeping and cleaning up. More battles to fight next week. Drill Baby, Drill.

Next week: Yep, Gary Ellis built it and I'm boring holes in this house like a termite. Drilled through a series of 2x6 studs that sandwiched a 4x6 post and managed to get the drill firmly buried. Took about an hour to dig it out, but I got a hole all the way through it as shown in the second photo. Success comes slowly. Looks like an electricians job is about 1/2 drilling, 1/4 pulling wire, and 1/4 hooking it all up. I pulled my first wire on Monday; a series of four 240-volt lines for the garage using 10-2 wire. Also, Gary Estes (electrician) installed the meter and subpanels on Monday and I helped him pull 100 ft of No. 0 three-cable wire from the garage through the house an into the basement. The coil of wire weighed about 150 pounds and acted like an anaconda when we unrolled it. Yes, unroll or you're going to have a mess on your hands. We'll have a little tutorial on wire sizes later (gauge 0 is really big and 20 is really small, go figure).
Thursday, April 16, 2009
Hide A Hose (Day 184 of 273)
No this isn’t some kinky sex game from college (get your mind outta the gutter Cooley), but rather a neat central vacuum system that we’ve seen at home shows for several years. Hide A Hose (http://www.hideahose.biz/index.html) is a typical central vacuum system but its unique twist is the retractable hose. Central Vacs are popular because they are powerful and built into the house, either initially or as a retrofit. Those that have them commonly complain about the frickin hose, which can be 20-50 ft long plus the power head. Moving it around then storing it is a problem. Did I mention that its a local company, home grown and flourishing in Monroe, WA just across the water on the dark side of the sound.
Hide A Hose solved the problem by allowing the hose to retract into the vacuum tubing. Quite ingenuous, and pricey ($2500). But when the chief cook and dust demon (aka the Decision Maker) for the new house says that’s what she wants, what are you going to do ? (order it, and the urinal).
 Since the central vac is built out of plastic piping (thin wall PVC), now is the time to install the system. In addition to the tubing, each wall inlet and toe kick pan is powered, so it makes since to do this right before the electrical goes in. Mike from Monroe (Hide A Hose installer) is coming over next week to do the job if we accept their estimate. I’d love to do it myself: if you don’t care about a warranty you can buy all the parts over the internet. Dr. Olsen of Denver installed his and he says it really sucked (the old house). However, to protect their margins, Hide A Hose and their dealers hide behind the warranty vale. Don’t even get me started on the whole Wolf, SubZero MSRP thing.
So for several thousand dollars (which everyone has too much of these days), they’ll install the tubing, power ports and central vacuum all in a day (see how hard it is). Then when the drywall and painting is complete, they come back to install the face plates and test the system. Seems pretty simple. Maybe I should become a dealer for them in Port Townsend (none here now). I could couple it with my mobile knife-sharpening business, and wrap it all under the “Slice and Suck” moniker (or We Slice, You Suck). Ken, are you looking for a good investment?
Hide A Hose solved the problem by allowing the hose to retract into the vacuum tubing. Quite ingenuous, and pricey ($2500). But when the chief cook and dust demon (aka the Decision Maker) for the new house says that’s what she wants, what are you going to do ? (order it, and the urinal).

 Since the central vac is built out of plastic piping (thin wall PVC), now is the time to install the system. In addition to the tubing, each wall inlet and toe kick pan is powered, so it makes since to do this right before the electrical goes in. Mike from Monroe (Hide A Hose installer) is coming over next week to do the job if we accept their estimate. I’d love to do it myself: if you don’t care about a warranty you can buy all the parts over the internet. Dr. Olsen of Denver installed his and he says it really sucked (the old house). However, to protect their margins, Hide A Hose and their dealers hide behind the warranty vale. Don’t even get me started on the whole Wolf, SubZero MSRP thing.
So for several thousand dollars (which everyone has too much of these days), they’ll install the tubing, power ports and central vacuum all in a day (see how hard it is). Then when the drywall and painting is complete, they come back to install the face plates and test the system. Seems pretty simple. Maybe I should become a dealer for them in Port Townsend (none here now). I could couple it with my mobile knife-sharpening business, and wrap it all under the “Slice and Suck” moniker (or We Slice, You Suck). Ken, are you looking for a good investment?
Monday, April 13, 2009
PPP (Propane Piping Plan, Day 181 of 273)
Interspersed with the plumbing chores last week, I worked with Levi Ross on the propane supply lines. There is no natural gas on the Olympic Peninsula, so your only choices for heating are propane (a derivative of natural gas) or electric. Propane is less efficient but priced better than electric, and it has its detractors. Mainly it’s storage and refilling, but also the fact that burning propane generates water (vapor). At full tilt, our propane boiler makes a quart of water every hour, so during the winter I suspect that we’ll make a couple gallons of water per day. Since the boiler is in the basement, we’ll dump the water into the sump pump basin (20 gals in the floor), then pump it up and out of the house, along with any water that has collected from the perimeter drain line.
We’re planning on a 500 gallon propane tank. 250 gal is more typical, but the rates are better on 500 gals and you only fill it half as often. Tanks (fuel bottles) are either above ground (leased or you own) or buried (you own), which is what we plan to use. The 500-gal tank is about 10 ft by 3 ft in diameter (think small submarine), so you have to dig a big hole, something like 12’ long by 4’ wide and 5’ deep. All that you see is a rounded top (the snorkel) where you fill the tank.
The hole for the tank and trench over to the house will be dug later this year along with the septic tanks, but for now we needed to place the propane pipe within the house. The basic strategy for placing parts in the house is least flexible to most flexible. You start with concrete and wood, then do to ABS and steel pipe, then finish up with electrical (extremely flexible). If you do a whole house vacuum, like us, that goes in after the steel pipe.
 For all gas lines within the house you use 3/4” steel pipe for the main supply line, then T off it with 1/2” for the gas appliances. Levi brought over his pipe cutter and threader, and had 50 ft of pipe delivered. In addition he had a large supply of short threaded pipe (2”-12” pieces) and fittings (elbows, Ts, and plugs) plus shutoff valves.
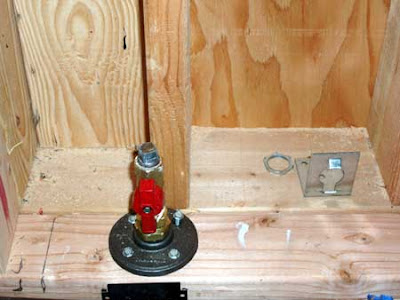
We laid out the pipe, figured drops and risers around immovable objects (like beams and posts) then started cutting pipe to size. It took us about 8 hours to hang and connect the black steel pipe in, then another couple of hours to hook up the flexible gas pipe. You use the flexpipe to connect the appliances to the steel pipe, with a shutoff valve at the downstream end. The photo on the left shows the stub in for the Wolf rangetop.
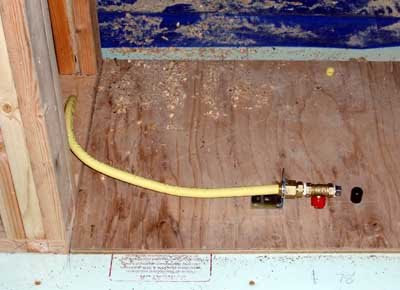 We have a gas rangetop in the kitchen, two gas fireplaces, and a 60 gal boiler (hot water heater). The main fireplace is a see-through model (first introduced to us by home builder Steve Titus in Denver). The photo on the right shows the flex pipe which will connect to the base of the fireplace.
In addition, I’ll have Levi put a T on the outside line for a gas BBQ if we decide to add on in the backyard. Next thing to do at my end is to install the fireplaces in their framed boxes and either put the vent pipes in or hire it out. Will probably pay for this since we are running behind schedule and time is worth more than money right now.
We’re planning on a 500 gallon propane tank. 250 gal is more typical, but the rates are better on 500 gals and you only fill it half as often. Tanks (fuel bottles) are either above ground (leased or you own) or buried (you own), which is what we plan to use. The 500-gal tank is about 10 ft by 3 ft in diameter (think small submarine), so you have to dig a big hole, something like 12’ long by 4’ wide and 5’ deep. All that you see is a rounded top (the snorkel) where you fill the tank.
The hole for the tank and trench over to the house will be dug later this year along with the septic tanks, but for now we needed to place the propane pipe within the house. The basic strategy for placing parts in the house is least flexible to most flexible. You start with concrete and wood, then do to ABS and steel pipe, then finish up with electrical (extremely flexible). If you do a whole house vacuum, like us, that goes in after the steel pipe.
 For all gas lines within the house you use 3/4” steel pipe for the main supply line, then T off it with 1/2” for the gas appliances. Levi brought over his pipe cutter and threader, and had 50 ft of pipe delivered. In addition he had a large supply of short threaded pipe (2”-12” pieces) and fittings (elbows, Ts, and plugs) plus shutoff valves.
We laid out the pipe, figured drops and risers around immovable objects (like beams and posts) then started cutting pipe to size. It took us about 8 hours to hang and connect the black steel pipe in, then another couple of hours to hook up the flexible gas pipe. You use the flexpipe to connect the appliances to the steel pipe, with a shutoff valve at the downstream end. The photo on the left shows the stub in for the Wolf rangetop.
 We have a gas rangetop in the kitchen, two gas fireplaces, and a 60 gal boiler (hot water heater). The main fireplace is a see-through model (first introduced to us by home builder Steve Titus in Denver). The photo on the right shows the flex pipe which will connect to the base of the fireplace.
 In addition, I’ll have Levi put a T on the outside line for a gas BBQ if we decide to add on in the backyard. Next thing to do at my end is to install the fireplaces in their framed boxes and either put the vent pipes in or hire it out. Will probably pay for this since we are running behind schedule and time is worth more than money right now.
Saturday, April 11, 2009
Wasted and vented, thank god (Day 179 of 273)
Its Sunday morning and I'm going over to the Church of the Holy ABS (not abstinence). Two more waste pipes to connect and this house will be able to transport a substantial waste unit (i.e. turd) from one of our three toilets to the perimeter of the house. Don't worry, we'll connect the whole shebang to the septic system when it gets built out in the summer (almost the last thing done).
I've learned a few lessons and fixed my screwups when Bob Brown (plumber) has been gracious enough to point them out. In the last couple of weeks I've been finding my own mistakes, and caught them in the layout stage so there hasn't been too much cutting and patching. Two things fooled me early on. 1) Tight bends are allowed only on vents (its only gas), so on fluids you use moderate bends (sweeps) for going down and long sweeps for going flat or changing direction horizontally. 2) Sinks are different than vanities wash basins. Sinks carry solid waste (coffee grounds, vegetable matter, etc), but wash basins are just for gray water, unless your cat has taken to shitting in them. In that case you need to train them to use the toilets. So for sinks the vertical exit lines are 2" pipe rather than 1.5". This caused me some grief and ripouts. As I've said in the past, the ABS pipe is cheap and what's time to a pig (a Pete Rowlyism). But that's all gray water under the bridge, as they say.
I finished plumbing the ultimate man-feature, a urinal for the garage. So you can build kayaks or do other projects all day long, drink beer, and never have to leave the garage (or enter the feminine sanctuary of the house) to take a leak. I suspect its the best $175 I've ever spent.
It was a mild day, so late in the afternoon Nancy and I had a picnic (wine and appetizers) on the beach. Four minutes from the house and we saw the bald eagles that nest there. Nancy's taken a liking to them, perhaps more than to me.
Saturday, April 4, 2009
Let there be voltage (Day 169 of 273)
On Friday (April 4th), we met with Gary Estes of Craighead Electric in Port Townsend. We got a line on Gary from Kyanne Anderson (see Day 14 blog), who built a house with her husband Roger over at the other sanctuary called Cape George Estates (another gated community, about 5 miles SW of Port Townsend). Kyanne did all her own wiring, so why couldn't we? We'll see.
Anyway, Gary is a friendly guy and a bit reserved; however, when he found out that I was a Mac aficionado he really opened up. He's the head of the local (Chimicum) chapter of the MUG (Mac Users Group), so now we had a common bond. Gary is going to lay out the wiring scheme (much like a the diagram for a wiring harness in a car), give me a materials list (first cut) and put the electrical panels in (a bit beyond my ability). He'll probably start in 2 weeks and we'll wire the garage first as a primer for my taking on the main house. After walking through the house and discussing our general needs and wants, we made some basic decisions and agreed to locate all the switched and outlets. We cut out pieces of poster board (3 colors) for the electrical boxes and stapled them to the walls. As we move about the house we'll jigger them around and see if the scheme makes sense. I don't understand the wiring of 3-way switches so we'll get a tutorial for these and other common practices in the garage.
I sent Gary the electrical plan that Darlene had drawn in AutoCad and exported as a pdf. Opened this in Adobe Illustrator and made a bunch of modifications on the basis of what we knew we wanted to change. Resaved the document and sent it to Gary. He uses a simple cad drawing program and uses my drawing as a template (underlay). Then he sketches out the wiring diagram coded with wire type. Who thought I'd become a mechanic for a giant auto that doesn't move (call it Kala Point Car). He also sent along the materials list and I opened an account at North Coast Electrical, a large supply house in Bremerton that delivers to our area (for free) several times a week. He says the prices will be as good as or better than Home Depot and we'll get first quality items (I presume this means no Chinese outlets or switches). Here's the list. Just for yucks, note that we'll start with 2,750 ft of wire (a bit more than a half mile). Pulling all that through 1" holes should be fun.
Michael-
Here is a list of material to get you started on your project. I left off the bigger wire, because that can be purchased by the foot either locally or at Home Depot.
1- bag, tan wirenuts
1- bag, green wirenuts
1- case of single gang nail-on boxes
15- 2 gang boxes
2- 3 gang boxes
5- Single gang face nail boxes
3- Adjustable single gang face nail boxes
48- IC-22 recessed cans (lights)
10- 3-0 nail-on boxes
10- 3-0 boxes w/ 16" bar hangers
10- 3-0 boxes w/ 24" bar hangers
500- Viking 100 staples
100- Viking LL staples
100- Viking 131 staples
1000'- 14-2 NMB wire
1000'- 14-3 NMB wire
250'- 12-2 NMB wire
250'- 12-3 NMB wire
250'- 10-3 NMB wire
1000'- Cat5E wire (grey)
1000'- RG6 coax
x- single gang data rings
x- Arlington exterior outlet (in-use box) for Hardyboard
x- Arlington exterior outlet (in-use box) for Stone
1- Panasonic bathroom fan
1- Aldes VS whole house fan system (4 vents, one fan)
That's all I can think of right now. Couldn't remember where the stone stopped, or I'd give you #'s for the Arlington boxes. I didn't see phone, data, or cable on your plan, so I have X for data rings. 1,2,3 or more connections can go to a single data ring using various plate configurations. Also, you may want to consider a centralized data panel. We can talk about that later. If you are considering running computer ethernet wiring, you may want to get a 1000' box of blue Cat5E also. Gary Estes, Craighead Electric.
Subscribe to:
Posts (Atom)
About Me

- Kala Point Builder
- Professional geologist (USGS, 1972-2008), amateur home remodeler and now builder. Interested in sailing, all things involving salt water, woodworking, and food in general. Owner of Paleo Seis Surveys LLC, consulting in Quaternary geology and geological hazards.