Visitors to Date:

blog counter

Building a House in Kala Point, Port Townsend, WA

Building a House in Kala Point, Port Townsend, WA
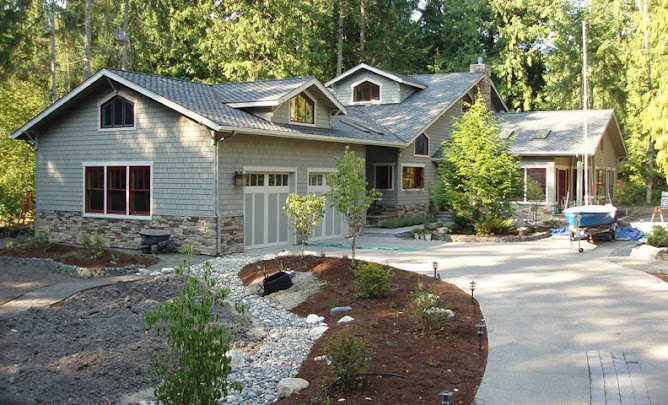
A running narrative of first-time builders of their retirement home in Port Townsend, WA (NE corner of the Olympic Pennisula, 60 miles NW of Seattle). Follow us as this adventure unfolds in late 2008 and beyond. 18 months under construction, we moved in on May 25th, 2010. Photo taken August 15, 2010.

Search This Blog

Tuesday, December 30, 2008

And It did . . . (Day 70 of 273)

So on Dec. 17th we left for 10 days in California and it snowed three more times here, setting some sort of record for Port Townsend. More importantly, it didn't get above freezing so we came back to 7 inches of snow and frozen wood. By Colorado standards it was a moderate frost, nevertheless Gary Ellis and crew had a much-deserved Christmas vacation (at no pay).

On Monday (first-day back), the temps were in the 40s, the generator was a chugging, and the nail guns were a firing. The power company still hasn't shown up to connect the temporary power; something about being over in Seattle dealing with all the downed trees and power outages (none over here). Gary and crew put most of the 45 floor joists in place, and finished them off this morning. Our soon-to-retire inspector (one-eyed Frank) spent 0.5 minutes inspecting the subfloor framing (all was well), and the Warmboard arrived at 9:30 am as requested (thanks again Mr. Carl). I made two trips to Carl's for more nails, some miscellaneous hardware, and various fittings. Did you know that a galvanized 1/2" x 7" bolt costs $4.25?; no, neither did I. Then I needed 6 torx screws (3/16" x 7"), which are sold in boxes of 50 for $70 (1.40 each), but I didn't need 50, just 6. So off to McHenerys (the McGuckins of Port Townsend), who sell them by the piece ($2.00). No big deal, just another bargain-searching expedition. I suspect that I spend 50% of my time looking to save $2 on some trival parts and 10% of my time accepting subcontracts for tens of thousands of dollars.

By the early afternoon, Ellis and crew had about 40 sheets of the Warmboard down, with 24 to go. They are being very careful, aligning the grooves and keeping them all in a row (Bruce Hull and Barry LaDuke of Warmboard would be pleased). We have four types of patterns: S (straight), L (left), R (right), and D (double). The Warmboard Co. does the design work and makes a layout sheet for us and the guys lay them down like gigantic Legos. It it all comes out right we'll use up all the sheets and have 7 loops (in 2 zones) to lay Pex pipe in.

Levi our hydronics expert recently went rogue and formed his own company (Levi's Energy Services LLC. We'll still deal with him as a subcontractor thru Sunshine Propane, but he's getting out there on his own for greater fame and profit (can't blame him in this business environment). Levi is a great guy: today he delivered the 2300 ft of Pex, all the manifold fittings and assorted pieces, and loaned us a tubing handler (roller contraption), heat gun, and electric caulk gun (no squeezing needed, Nancy

Tomorrow I’ll do all the custom routering of the Warmboard. This means using their templates to route connecting lines where neeed, and using a 1" drill to penetrate the plywood where the Pex needs to go into the basement. If it all works out as planned, we'll have 2300 ft of Pex in place and Gary and crew can proceed with vertical framing. If not, they're be a lot of discussion and some scurrying about.

Since the temps will be in the 40s when we lay the pipe this weekend, we'll need to heat it up a bit to bend it into the corners and to make the dives into the subflooring. Snow and freezing temps are the last thing we need now. It should be an interesting process. We’ll vacuum and wipe out the channels in the Warmboard, then I’ll roll out the tubing (ca. 300 ft for each loop). Nancy will put a 1/8" bead of Silicon caulk in the channel and I'll follow with the tubing, hammering it in place as we go. The bitter ends of the tubing need to extend into the basement far enough to attach to the manifolds, which is the heart of the radiant heat distribution system.
Friday, December 19, 2008

Let it snow, let it snow . . . (Day 59 of 273)

Well, Colleen of Denver wanted to know how and where the house sits on the lot. The lot is 200-240 ft deep and about 100 ft wide (0.6 acres), or about 4 x larger than the one that we had our house on in Denver. Its heavily treed on the back (E) left (N) side, but open to the right (S) and street side (W). We only left a few trees on the lot since most of it is occupied by something (house, garage, driveway, septic fields (front and rear-reserve), buried propane, and septic tanks. We build some low mounds in the front that will provide a visual break from the street, when vegetated.

We'll get good south sunlight from about 10 am to 6 pm in the summer, but just a bit in mid day in the winter because the sun only rises to about 20° above the horizon at noon. Makes you feel like you're living way north. The latitude here is about 47.5°, or 8 degrees north of Denver. Conversely, its still dusk at 10 pm in the summer, a great time to go down to our beach and poke around.

The house is 58 ft x 48 ft (N and E sides) and the garage is 30 ft x 26 ft. So the depth of the house is pretty long at 88 ft. The garage is set back about 75 ft from the street, with a long curving driveway. Those weird inclined lines on the image are the septic drains (5) in the front yard. We'll probably plant some type of ground covers in this area, since we're not interested in mowing or maintaining a lawn (sound familar Mackey).

Its still snowy and cold (26°F) today (Friday), so the framers are contemplating a Hawaiian vacation (or at least the sauna and hot tub at the rec center. Its not supposed to warm up until Christmas Day, so we won't miss any good weather while we're in the Bay Area. Merry Christmas.

Tuesday, December 16, 2008

Saw's sawing, hammer's nailing (Day 56 of 173)

On the heels of a terrible snow storm (2 inches, 28°F), Gary Ellis and his son Troy started the framing. They were there promptly at 7:30 am (daybreak here) and we off loaded my newly acquired Dewalt 7000W generator and fired it up. I bought this puppy over the weekend from a guy in Mt. Vernon, which is north of Everett and east of the Sound. Found it on Craigslist (no it isn't stolen) for $950, about 1/3 of the new price. He used it for 4 hours for backup power, then decided he didn't really need it. We have enough voltage to power all the Christmas lights in Kala Point.

About 8 am, Carls delivery truck arrived with $12000 of lumber for the subfloor framing, beams, sill plates and floor joists. He skidded the load off next the house and promptly got stuck. Troy pulled him out with their 4x truck and all was well. By lunchtime Gary and Troy had all the sill plates cut, drilled and bolted down and were starting on the Versalam beams, which run across the basement and crawl spaces. Next comes the 3" Versalam rim joists around the perimeter of the house, and then the floor joists, 2" x 11 7/8" BCI 5000s (these details are for Steve T).

Overkill you say— no just solid to resist Mother Nature's impending M8 earthquake Cascadia subduction zone earthquake (thanks Steve, Alan, Bob, and Sam, all USGS EQ research guys).

I managed to do some minor jobs (nuts on bolts) and chase down missing parts and lumber. By the end of the day everyone was pretty cold, but its starting to look like a house will rise from this spot. I've included some representative pictures of the subfloor framing and sill plates, and that cute little generator that is bound to drive my neighbor crazy in the morning. Notice the picture of a sill plate riddled with bolts. This is the "Ode to Mikael" at the front entrance, where we planted a Geo Washington dollar for good luck (see the Putzmeister, Day 42).

By Tuesday pm, Gary and Troy had all the sill plates bolted down, all six 5 1/4" Versalam beams in place, and were working on the rim joists (3" Versalam). These will take a while since they need to be attached to the sill plats with a Simpson A23 bracket (L-shaped angle bracket), about 150 in total. Thank god for nail guns.

The left photo shows a 12' long beam under the sauna, a header (beam) in the crawl space opening, and a 26' beam over the basement and under the main living area. The photo on right shows the whole 48 ft of the main beam. It came in 2 pieces, probably about 300 pounds each! Gary and Troy horsed in into place by themselves.

It looks like we're down for a while. It snowed again on Wednesday and Thursday and is staying cold. So I suspect the framers will lay off a while. I'd like to be back from Christmas break (Bay area for a week) when the cold Warmboard goes down. In addition, the installation notes say that the Pex piping needs to be laid at 40°F or higher, which is isn't even close to right now. Gary has another framing job behind ours, so he's motivated to finish, whereas we'd like to get a better weather window to lay the Pex done.

Thursday, December 11, 2008

Almost ready to frame (Day 51 of 273)

Its Thursday, and we're getting ready to backfill around the basement and crawl spaces on Friday. The inspector threw me a curve ball on Wednesday and said I needed a perimeter drain around the crawl space footers, as well as the basement. So off I went to Carls to buy 200 ft of 4" perforated flexible pipe with a sock on it (woven mesh to keep the fines out). This was way easier to install than the 4" sewer pipe (PVC), but you have to be careful to lay it on a gradually declining grade (no hills or humps). I ran this pipe down into the basement drain and into the sump. This afternoon we shot 12 tons (about 9 yds) of pea gravel onto the drainage pipes then Jason (a hired hand) and I will shovelled it around and raked it out into a 6"-12" thick layer. Any water around the foundation will settle here, move into the perforated pipe, and flow into the sump basin (we hope). I don't ever expect to see water in the sump basin but we have that base (and code requirement) covered now. Once the backfilling is finished, Gary Ellis and his crew of 2 will start the framing, it we'll have timber in the air before you can blink. He's thinking it will be 6-8 weeks to dry the house in, which means we'll try to roof this sucker in early February (burrr). All is well, for now.

Business is turning tough up here (and everywhere else). K&D Concrete, which did the foundation, had a couple of jobs lined up for December then had them canceled at the last minute. So Don had to lay off his staff until the first of the year, pending work. Subs that I called for estimates are calling me back looking for work. Gary the framer has one job following ours, but nothing else on the horizon. I suspect we won't have any trouble getting reasonable bids on the roof and drywall, which are the next two jobs I have to address. We'll start the plumbing and electrical (with a little help) when the house is dried in.

Thursday, December 4, 2008

Shooter trucks and the mag float (Day 44 of 273)

Sounds like a Clint Eastwood movie, right? The forms are off the walls, so Don is hot to trot and get the basement and garage slabs (floors) in. Yesterday we brought in clean 3/4" gravel for fill below the slabs. We needed about 25 yds in the garage, and Friday we'll order another 25 yds for the basement. Normally you'd just tip the dump truck up and pour the gravel in. However, our basement sits way back on the lot, so we're using an ingenious piece of machinery called a shooter truck (see photo). Basically its a 9-yd dump truck with a shoot and 25-ft-long conveyor belt. You rev up the conveyor belt, open the shoot and gravel goes a flying. It can be swung from side to side and elevated for distance throwing. The operators say the can shoot it 50-60 ft, so we'll see because its at least 40 ft. across the diagonal dimension of the basement, and no way to approach it from the rear. Should be exciting, especially the part where I (as in me) hold 4x8 sheet of plywood on the outside of the basement to act as a backstop for the flying gravel. Actually, you make a stand for the plywood and place it at the target, then skidaddle away.

This morning, the crew raked out the gravel, compacted it, covered it all with 6 mil plastic, and laid in the rebar on a 2' spacing. At about 9 am the concrete arrived and they poured the garage slab, about 10 yards. Since it was in the low 30s this morning, Don had them add hot water at the batch plant (warms the cold gravel), as well as accelerator (a chemical used to hasten setting up of the concrete), and it was poured on the dry side. All of these little tricks are intended to make the concrete set up quicker in the cool weather, otherwise they'd be there at midnight finishing it off. Don worked the concrete over with a "mag float" (photo to right), which has a light weight magnesium handle that extends to 30 ft in length. Then the young guys got on their knees and worked it over with hand trowels, all 780 square feet. Everything turned out fine and the troweling was done around 4 pm, about 8 hours after the concrete was mixed. It looks pretty good and will be hard enough to walk on in the morning.

While all this was going on I put in the 3" ABS drain pipe, floor drains and sump basin in the basement. All of this will be covered by gravel, then the slab will be poured over the pipe and up to the floor drains and sump basin. The perimeter drain for the outside of the basement comes through a 6"PVC pipe we cast in the footer, then enters the sump basin. Inside water (on the floor) and outside water will flow in the basin and be pumped up and out of the house through a 1.5 " pipe.

Tomorrow (Friday), they'll shoot gravel into the basement, so we're ready for inspection on Monday and the slab on Tuesday. There are sill a bunch of forms to be removed, but they'll do that in their spare time. So, we are almost done with the foundation. Framing should start in about a week, when all the concrete has cured for a 7 days (ca. 50% of full strength, which = 3000 psi).

Tuesday, December 2, 2008

The Putzmeister

The Putzmeister you say; probably some sort of golf term that Bob Fleming invented in the 60's. No, its the $880,000 concrete pumper we rented today. Probably German for "Pourmaster". Read on if you'd like to learn more about concrete prices and what it really costs to get it on the ground (especially for Richard and Darlene). Otherwise, go back to your cocktails and say a prayer for us.

The Putzmeister BRF 36 is a boom-mounted concrete pumper (see Day 17, but I digress). I found out a bit more about it, the process and prices in case you ever need to have concrete pumped on your building site. This Putzmeister is about 10 years old and cost $800,000 new, probably worth $400,000 or less in the current market. It has a 90-100 ft reach, Brundage-Bond owns it, and it comes out of Poulsbo, that cute little Norwhoovian town across the Hood Canal. (With this baby, you could fill your neighbor's pool full of whatever and leave no sign of entry.) The current rate for this intermediate-size model is $140/hr plus $2.5/yd of concrete pumped (the wear factor). So today, the Putzmeister left Poulsbo at 10:30 am, drove for an hour (at the $140 rate), pumped until about 4:00 pm (47 cubic yards), and made it back to Poulbo at 5 pm, just in time for the Simpsons (seems appropriate).

To make my business friends Ken O & Colleen happy, here is daily accounting:

Putzmeister @ $140 x 6.5 hrs plus 47 x $2.50/yd = $1027.50 (+ 8.4% tax) = $1113

Concrete @ 47 yds x $92/yr (delivered) = $4324 (+ 8.4% tax) = $4687

Add these together (~$5800) and the net cost for a yard of concrete on our lot is $123. $125/yd sound like a nice round figure if you plan to enter into such a folly in the Port Townsend area. By the time we're done pouring the foundation, we'll have laid 90 yards of concrete for about $11,250. However, don't forget the additional $25k for a half-mile of rebar, about 100 anchors, hundreds of 2x4 braces and concrete forms (2'x8' panels), and our concrete guys skill and hard labor (3 guys for about 45 total days). PS, Washington taxes everything, even labor.

Since this was such a blessed occasion, Nancy and I placed a 2008 Washington dollar coin in the foundation. Where you ask? Well at the entrance of course. It will be under a 2x8 sill plate, some BCI 5000 joists, Warmboard, and the front-door threshold, but that's only 15" so maybe the good luck will exude upward into each and every visitors feet. The second reason we put it here is because this is a little tribute to Mikael Brostrom, our structural engineer. It turns out that in this 8 ft section of the concrete wall there at 12 (yes TWELVE) hold downs. Four Simpson SBBTs and eight regular sill plate anchors. That is one anchor per 8", the highest concentration anywhere in the house and maybe the state of Washington.

When the building inspector asked me "How many SBBTs (Simpson tie-down anchors, in photo) there are in the foundation walls, I proudly said 42!" He countered with "I think that's a record for me as an inspector". He's retiring from the Jefferson Co. Building Dept. in two months, so I think this record will remain intact.

Forms are in, ready to pour (Day 42 of 273)

The forms for the basement and stem (short) walls are all in and squared up. In addition, long battens have been added to the inside of the forms to indicate the top of the poured concrete. On Monday (Dec. 1), Don (concrete), Gary (framer), and I met at the site to map out all the Simpson tie downs. In addition to the regular sill-plate tie downs, there are 42 Simpson hold down rods (SSTB) and brackets (HDU). The rods are hooked at the end (see photo) to engage horizontal rebar in the walls. The upper part is angled a bit to offset from center, and the upper 5" extends about the concrete (3.5" are threaded for coupling). The stack of materials we're holding down to the concrete consists of a 4x pressure treated sill plate (3.5"), BCI engineered joists (11 7/8"), Warmboard (1 1/8"), and a 2x sole plate (1.5"), so the threaded rod has to go through 15" of subfloor materials. So, in addition to the SSTB anchors, we'll have to use a coupler and an extension rod that is at least 12" long. I just priced the components, for yucks. The SSTB rods are $20-30 each (depending on length) and the HDU hold downs are $15-20 each, and the extension rods and couplers are another $5. So it looks like we'll use about $1500-$2200 of Simpson equipment just on the basement/first floor. The HDU brackets also are used to hold the upper plate, second floor joists, and second floor sole plate together. Then there are tie downs for all the roof joists, and a variety of others that I haven't even tumbled to. I suspect we'll be into the Simpson Strong Tie company by about $5000 before this sucker is screwed down to the Earth's crust. However, I've stopped thinking about the M8 earthquake Cascadia subduction zone that Alan Nelson and Brian Atwater have been teasing the pubic with. Its 200 km west and >50 km below us, so what is there to worry about?

In addition to the regular walls, we'll have two pads that support . The large pad in the basement (first photo) supports an overhead Versalam beam (3" x12 ") and the basement staircase. The second pad is in the adjacent crawl space and it supports the same beam under the bedroom. The beam is 48 ft long and runs N-S across the entire width of the house. In these photos (Jason, light-colored shirt) is putting the SSTB rods in place along the south (bedroom) exterior wall, whereas David (gray shirt ) is preparing to cut into the forms to place a metal beam support that gets poured in place. Its Tuesday am, and we're waiting for the second foundation inspection. Assuming he shows up this morning, we'll pour all the vertical walls and two pads this afternoon. No rain in the forecast, so all is well.

Finally, Gary Estes of Craighead Electric showed up at lunchtime on Monday to install the temporary power pole. This is a separate story in itself, but after getting approval from Puget Sound Energy (3 weeks), we were allowed to trench the three feet from the high-voltage transformer on our neighbor Kathy's property (formerly the Wallin house). Gary placed the power pole in the hole I dug, braced it up and laid about 10 ft of cable in the trench for PSE to connect to. After inspection, I'll call PSE for a temp hookup and we'll have 2 20 amp circuits available to the lot, just in time for Gary Ellis Construction to start the framing. He's pencilled in to start on about Dec. 11th, just 9 days from now. In the mean time, I need to get the first lumber and tie down package ordered from Carls. This will consist of sill plates and bolts, BCI floor joints, the Warmboard, and the basement egress window.

Subcontractors and Suppliers

  • Balco Excav. (land clearing, Bill Snyder)
  • Bill McCutchen's Mill (cedar trim)
  • Blake Tile and Stone, Sequim (Judy Reno, Eldorado Stone, Tile)
  • Bob Brown Plumbing (Bob & Josh Brown)
  • Boise Cascade joists (from Carls)
  • Carl's Building Supply (Mike, Melissa, Michele, Terry & Lawrence)
  • Castlerock Landscaping (Tim Hamm, Sequim)
  • Cotton RediMix (concrete and gravel)
  • Craighead Electric (Gary Estes)
  • Custom Hearth (propane fireplaces), Pousbo
  • Daltile (Seattle, Wedi board)
  • Discount Cabinets of Washington (Sequim)
  • Discovery Bay Materials (gravel, top soil)
  • Earl Kong (professional forester, PT))
  • EcoHaus (Amer. Clay Plaster, cork flooring)
  • Ellis Construction (Gary and Troy Ellis, framing)
  • Evergreen Products (Drywall, Sequim)
  • Fergusons, Seattle (Plumbing fixtures, Bud Allen Wright)
  • FInlandia Saunas (Tigard, OR)
  • Fitzgerald Concrete (driveway, Mike Fitzgerald)
  • Four Corners Nursery (trees, Port Hadlock)
  • Frank Feltes Custom Drywall and Painting (drywall and painting)
  • Frank Ward and Wayne Jobst (Stone masons)
  • Fredricks Appliances (Redmond, all appliances)
  • Giraffe Gutters (Dan Shaw, Chimicum)
  • Glass Etchings by Perrett (Jerry Perrett)
  • Hadlock Building Supply (bits and pieces)
  • Hardiboard, siding, backer board (from Carls and Home Depot)
  • Henerys Hardware (Cabot stain, misc. fasteners)
  • Hi-Tech Electronics (Audio & Media, Port Angeles)
  • Hide-A-Hose (Joseph, A-B Vacuum, Puyallup, WA)
  • Home Depot (electrical & plumbing supplies, interior paint)
  • Home Storage Solutions (John Plake, PT)
  • Hope Roofing (Pabco Paramont Advantage shingles)
  • Jim's Tool Time (J. Quandt, misc. carpentry)
  • K&D Concrete (Don McNeese)
  • Kitchen and Bath Studio (Shelly Little, cabinets)
  • Levi's Energy Services LLC (radiant design, vents, propane piping)
  • Meta Marble and Granite (travertine), Seattle
  • Michaelangelo (sepentinite), Seattle
  • Mikael Brostrom (Structural Engineer)
  • Mills Interiors (wood flooring, some tile)
  • North Coast Electrical (Electrical Supplies)
  • Olympic Garage Doors (Sequim)
  • Penisula Flooring (carpet)
  • Penisula Shower and Mirror (Sequim)
  • PexSupply (online plumbing and radiant supplies)
  • Puget Sound Power (and Atelco installers)
  • Richard Berg Architects (Richard and Darlene)
  • Richard Gifford Construction (septic, dry wells and grading)
  • Richerts Marble and Granite (countertop fabricators)
  • Seattle Lighting (lighting fixtures)
  • Secret Gardens Nursery (Sheila Piccini)
  • Shine Quarry (basalt for landscaping)
  • Sierra Pacific Windows (Rob Sorg)
  • Simpson Doors (from Carls)
  • Simpson Strong Tie (fasteners & hold downs)
  • Stewart Excavating (Mark Stewart, foundation)
  • Sunshine Propane (propane and tank)
  • Therma-Tru Doors (from Carls)
  • Tracy's Insulation (batts and blow in)
  • Trex Decking (from Carls)
  • Trussworks (roof trusses, Carl's)
  • Velux (Skylights and Solar tubes, Carls)
  • Versalam beams (from Carls)
  • Warmboard (Bruce Hull)
  • Wisbo Aquipex, Taco Pumps, Polaris tank (Sunshine Propane)

Followers

About Me

My photo
Professional geologist (USGS, 1972-2008), amateur home remodeler and now builder. Interested in sailing, all things involving salt water, woodworking, and food in general. Owner of Paleo Seis Surveys LLC, consulting in Quaternary geology and geological hazards.