Visitors to Date:

blog counter

Building a House in Kala Point, Port Townsend, WA

Building a House in Kala Point, Port Townsend, WA
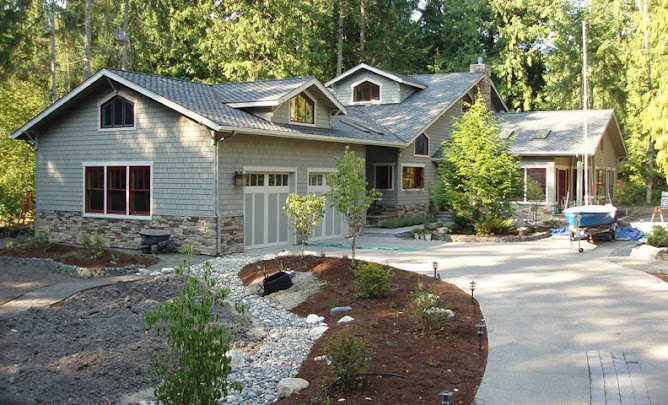
A running narrative of first-time builders of their retirement home in Port Townsend, WA (NE corner of the Olympic Pennisula, 60 miles NW of Seattle). Follow us as this adventure unfolds in late 2008 and beyond. 18 months under construction, we moved in on May 25th, 2010. Photo taken August 15, 2010.

Search This Blog

Wednesday, July 29, 2009

We own some Serpentinite (Day 279)

After picking out our kitchen counter top material at Michelangelo in Seattle, we sealed the deal by writing a fabrication contract with Richert's Marble and Granite in Sequim, WA. There are hundreds of fabricators in the region, but we like these guys (locals) a lot. It started a couple of years ago when we stopped by to see their operation. Susie and John run this shop with 3-6 employees (I'm guessing, business is slow now days). Good display room, nice clean shop and very friendly. Then we noticed they have a Subaru (just like ours--more to talk about). An they are sailors (Caribbean bareboaters). Shoot, we could hardly get outta the place. So we asked about lunch, and Susie suggested the Old Mill Cafe in Carlsborg, about 2 blocks from there place. Great restaurant, the owner Larry is quite a character and waitress Jeanine and her husband (Brian Kawal) make high end custom furniture in Sequim (take a look at www.briankawal.net).

Anyway, over the past few years we'd stop by and chat with Susie, who manages the front end of the shop. She does all the layout for the slabs, and John does the cutting and fabrication. On Monday we went over to see our 2 slabs of Verde Vermont Antique. John had selected two for us and brought them over to Sequim along with a dozen other slabs for current customers. They looked just as good as in Seattle, but my photos aren't great due to reflections from the polished surface of the rock.

The company that markets this material isn't doing themselves any favors by calling it Serpentine (or green) Marble. Marble, as you may know, is a low grade metamorphic rock almost always composed primarily of calcium carbonate (calcite). One of calcite's (and thus marble's) interesting traits is that it is soluble in acid. Now who would ever put acid on a counter top you say: Try vinegar, lemon, tomato, wine, coca cola, etc. All in the 2-4 pH range. Each will etch the surface and leave a visible ring, which cannot be removed.

So we literally did the acid test on the Verde Vermont Antique. White wine (pH 3) and a slice of lemon (pH 2.3) overnight on a sample we got from Michaelangelos. Sat overnight, then I wiped the mess up in the morning. Both left a slightly darker spot, but no etching of the polished surface. The dark spot disappeared as the rock dried, so that was a surface effect. In our minds, the rock passed the ACID TEST. So in reality, the Verde Vermont Antique should be marketed as Serpentinite, but that's not nearly as intriguing a name. Here is a little blurb on the geology of Verde Vermont Antique for my geology friends (from www.vtverde.com). The quarry is located about 2 miles north of Rochester, VT, on the eastern margin of the Green Mountains.

Vermont Verde Antique while having the “look” of marble is a serpentine and classified as a hydrous magnesium silicate. With the hardness and durability of most granite and its low absorption rate and high flexural strength, it is an excellent choice for both interior and exterior uses. Vermont Verde Antique is the commercial name for the serpentine “marble” derived from highly sheared ultramafic rocks that have been rewelded and metasomatized by the process of serpentinization. Numerous lense-shaped serpentinite bodies of varying size occur along the spine of the Green Mountains, west of the Adirondacks. The ultramafic bodies, once thought to be of igneous intrusive origin, are now recognized as segments of ancient oceanic crust that became part of the eastern North American continent during the Taconian orogeny. This is considered to be middle Ordovician in age, around 450 million years ago. More deformation and metamorphism took place during the Acadian orogeny around 360 million years ago. This may have resulted in the polishable Vermont Verde Antique serpentine.

Saturday, July 25, 2009

A Craftsman Touch (Day 275)

Last weekend, Troy Ellis (framer's son) and I installed the front door. Now you'd think this was like any other door, but not so. This was the Big Kahuna—36" wide Simpson (made by Reed Mill Corp), vertical-grain fir door with custom leaded glass entry door. 7 1/8" thick jamb, because its a sheer wall (5/8" sheathing, 5/5" thick studs (2x6), +5/8" plywood, and 1/2 " drywall). You have to know this BEFORE ordering the door, or you'll be building custom jamb extensions.

This little baby cost $1153, which included a modest discount from Carl's (thanks Melissa). So you don't want to screw up this install. Troy messed with the door for an hour before it was plumb, square, and level. Something we didn't consider was hinge placement. The key to getting a well hung door (easy ladies), is to replace one or more of the door hinge screws (normally 1" long) with 3" screws that go all the way into the king stud. However, because we have 5/8" plywood and 1/2 " drywall inside the stud, there's no meat to screw to. So we nailed a 1-1/8" block to the stud opposite the hinges and screwed to this. All was well; the hinges are bedded in real wood and the door is stable now. Mikey solved this problem, that makes him an apprentice framer.

Nancy is the detailer at the house, thus all finishing touches are in her arena. The photo to the right shows her putting the second coat of varnish on the exterior of the door. We'll probably end up with four coats for now, then a couple more per year. Keeping a finish on an exterior door is like playing cards with the devil. You win a few rounds, but at the end of the night your wallet is empty.

We're using Man-O-War varnish, semi-gloss sheen. Has the maximum UV protection (for sunlight), and goes on pretty well (according to our master painter). The interior of the door, which hopefully won't see the elements, is finished in brushing lacquer, semi-satin sheen. This stuff is easy to brush on and dries really quick (like 30-60 minutes).

Since this blog is sort of a home-building journal, the other stains and finishes are listed herein so I can remember them in 10 or 20 years when the house needs repainting.

Exterior finishes and materials:
Facia boards and door trim boards: Cabot Solid (Oil) Stain, Cinder color except facia on small gables (latex)
Soffit, shingles, and garage door trim: Cabot Semi Solid (Oil) Stain, Pewter color
Garage doors interior: Cabot Solid (latex) Stain, Cinder color; garage door trim: Cabot Semi Solid (latex) Stain, Pewter color
Corner boards, belly board, Hardiboard, and garage door interior: Cabot Semi Solid (Oil) Stain, Pewter color
Decking: Trex Accent, Weathered Grey, solid boards (1/1" x 5")
Rock: Eldorado Stone, Mesquite Cliffstone (see Day 258), corners and facing rock. Mortar is type S with one shovel of lime per bag of mortar mix.

For those of you keeping count, I just used up the first box of staples for hanging the shingles. 5000 per box, 2 per staple = 2500 shingles currently hung. Not bad, but that means there are about 5500 to go. God help us. If you EVER hear anyone say "the only way to paint shingles is to dip then before hand", then ask that SOB if he's ever done it.

Friday, July 24, 2009

Open and Close (Day 274)

The garage doors that we got such a good deal on back in June were delivered and installed on Monday (July 20th). Lee Hitt of Olympic Garage Door Co. (between Port Angeles and Sequim) showed up a bit early and was eager to hang those big boys (9' wide, by 8' high). I had trimmed out the openings with 5/8' plywood (to match eventual drywall in garage). In about 4 hours, Lee had hung the roller hardware, assembled and hung the four panel doors, and put up the motors and tracks, and fine tuned the whole act.

The motors are 1/2 HP (free upgrade) Liftmasters, and they are REALLY quite. They have kevlar belts (like fan belts) and make almost no noise at all. The control boxes are next to the garage/mudroom door and show alternating time/temp. Three buttons so you can program both doors and a fence/gate if you have one.

The doors are insulated, steel panels: heavy duty for sure. We got a great deal on the doors. We walked in to Olympic Garage Doors looking for a deal, but needed a special size (9 ft wide, 8 ft high). The owner mentioned that they happened to have a set of high quality doors that had been ordered, but sized incorrectly by the client. Their mistake was our gain. They had been painted for the original buyer, so we'll repaint them to match the trim and shingle colors. After we got done dealing (35% off, plus some upgrades), it was the easiest and fastest deal we had made on the entire house. And now that they are up and working, we can put another check on the big list for the Architectural Committee.

Thursday, July 23, 2009

D DAY (Day 273 of 273)

Wednesday, July 23, 2009.

On Oct. 23rd, 2008 we started the building process by cutting down trees on our lot. According to the Architectural Committee, in 9 months we should be done (at least with the exterior). We're not close and won't be, so there will be HELL to pay. However, they started their 9-month meter at the Nov. 5th committee meeting, after neighbors have had 2 weeks to comment on our plans.

So the real drop dead (and we may) date is August 5th, or day 296 by our "Build It Now" clock. We'll probably be at this for 600 days before the entire house is finished (or maybe never). We still would like to vacation a bit next winter, so once we're in the house our schedule and enthusiasm may wane. We hope to move in by Halloween, but we'll to need to have a County Building Occupancy Permit in hand. To move in, you need normal house services: electricity, plumbing (one working sink, shower, and toilet), septic system, cover plates on outlets, smoke detectors, etc. It doesn't need paint, flooring, carpet or all those things you normally associate with a real home.

So on August 5th, the first Wednesday of that month and about 2 weeks from now, we'll bring our case (an appeal really) to the committee, asking for an extension to complete the exterior of the house. We'll see where we are at the beginning of August and create a plan for getting the exterior all done. I think we can make a case for 2 extra months considering the winter weather, lack of resources (paid guys bouncing around the house), the shingle-dipping and hanging process, and the type of house (custom) we're building. If they deny our request, we may have to set up a machine gun nest in the front yard and defend our property as a Sovereign Nation. Stay tuned to Machettes vs. the Grand Defenders of Timely Building.

Sunday, July 19, 2009

That is a lot of crap (Day 269 of 273)

Now that is a lot of crap, you say. Actually will be contained in 2-1000 gallon tanks which were installed last week (ca. Wednesday, see photos). Richard Gifford (Gifford Construction—Septic) dug a big hole for them, then Rocky came over from PA and delivered 2 precast 1000 gallon concrete tanks. Tank No. 1 is for the primary effluent (polite speak for crap), and its divided into two compartments. About 60% is for the turds, piss, dish water, shower, etc., and the other 40% is for the gray water that comes off the brown water. Then the gray water gets filtered, and flows via a 4" PVC pipe into Tank No. 2, which you might call not-so-gray water. This tank is the secondary pump tank, which contains a pump, a float and inducer (signal maker for effluent level), and miscellaneous parts. Since we have a pressure (not gravity feed) system, the pump gets turned on a regular basis; depending on flushes, it may pump 50-100 gallons into the drain field every four hours (all this is to be decided by the septic engineer and our usage patterns). The design calls for 250 gals of inside water use per person per day, so our 500 gallons would be passed along to the drain field each day.

Watching the tanks get delivered and dropped in place was pretty special. Rocky (and sidekick Roxy, a brown lab with bad hips) backed the rig up to the holes, lifted the secondary tank and slide it in place like a pillow into its case. The truck has a 14 ft extension boom, which wasn't enough to put the primary tank in place, so Richard back filled around the secondary tank and Rocky backed up to the edge of it, just enough to drop the primary (upstream) tank into place. A little jockeying and all was well. Later this week, Richard plumbed the two tanks, laid the 4" sewer pipe to the house where I'll connect the ABS drain pipe (3"), and installed the pump. Richard will be back in about 10 days to do the manifold installation, lay the pipe in the drain field, and pressure test the system. At that point we’ll be ready for our septic system inspection, which is conducted by the County Health Dept, not the Building Dept.

One complication in our layout is that the sewer and water pipes cross over each other, so we had to amend our approved septic plan (+$175) and install 2" shielded conduit for the water pipe. The logic, however flawed, is that during a big earthquake (the Cascadia one I presume) the ground might shake and settle, thereby breaking the sewer and water pipes, allowing the contents to commingle (always a bad thing) and polluting our water supply. That would be the least of our problems, since we wouldn't have water pressure (broken pipes, remember) to fight the ensuing fire that consumes the house. But I digress.

If all goes well, we’ll have the lot regraded to final form after the inspection in about 2 weeks. Richard will put 12-18” of material (mostly silty sand and gravel) over the drain field lines and then about 6” of topsoil. We can only grow shallow-rooted plants over the drain field, something like grass. Nancy prefers lavender, and bought her first 18 babies at the Sequim Lavender Festival yesterday.

Friday, July 17, 2009

Countertops (Day 268 of 273)

We spent Wednesday and Thursday in Tacoma and Seattle looking at counter top material (rock), lighting and plumbing fixtures. What a mind numbing experience, even for an ex-rock jockey. I've got to tell you three things about shopping for rock counter tops:
1) They have three types of rock: granite, marble, and other stuff.
2) No "granite" rock name is realistic or even descriptive. Its all a bunch of plunk. Delicatus, Seafoam, Gold Blush, Aquamarine (you'd think you were ordering drinks at a fufu bar), and
3) You can't tell what anything costs other than: D, costly; C, more costly; B, expensive; and A, don't even ask—its for the rich and famous.

Every rock dealer is the same. The smaller shops will have 30 granites, 10 marbles, and a couple travertines. The big dogs will have 3-4 times the selection, but you'll see everything the smaller shops have, so just go to the big ones first. They only sell wholesale to certified fabricators: that is, regular customers with resale licenses. Occasionally you can find a supplier/fabricator that stocks a moderately wide (i.e., popular) selection of materials, but this is what you'll also see at Home Depot or Lowes. Nothing wrong and prices are lower, so if you need "granite" to update the kitchen go to those companies and save some bucks.

Now if you're particular about the type of rock (or partner) you want to spend the next 20-30 years with, you better shop around. I think that Nancy and I have looked at counter top materials at least a dozen times, both in Denver and in the Pacific NW. In South Seattle they have 5 big warehouses within a 3 block radius, so its easy to see a 1000 slabs in a day. For us, it came down to Pentel (the big dog) and Michelangelo (the well trained dog). When we went over for this shopping extravaganza, we were sure we'd get soapstone for the main kitchen counter tops (a decision we'd made years ago, reinforced when we saw and played with the Mackey's soapstone in Denver) and some sort of porphyritic (coarse grained) granite. I had liked something called silver seafoam and seafoam silver (two different versions of same), so that is what we focused on. (see, Nancy got to choose the main counter, and I got to have a vote on the island). Well it didn't come out that way.

The soapstone we saw, and it wasn't abundant up here, was not what we wanted. Mottled with little veining (white streaks of quartz), little movement (or fabric) and mostly dark. Then we spotted something called Verde Vermont Antique, which is marketed as a serpentine marble (it can't be both). It is a real serpentine, but polishes like a marble (softer, carbonate rock). Well hells bells, this stuff is beeaauutiful, harder than soapstone, acid resistent, and polishes like real granite.

We only saw it at Michelanglos, and they didn't have samples. So we pressed the salesman, because he said it was resistant to acids (tomatoes, lemons, wine—all as in a regular dinner meal) but was marketed as a marble (fizzes with application of acid!). He called a local fabricator that had bought and cut some Verde Vermont last week and went over to pick up a scrap. The second problem was we couldn't get all the perimeter counters out of a single slab according to Suzie Richerts (Richerts Marble and Granite, Sequim), so we were going to be blessed with about 2/3rds of a slab that would not be used. Sounds like expensive vanity tops, so we decided to make all the kitchen counters out of the same material—Verde Vermont Antique. You can see more about this American quarried rock (fabricated in Italy) at the following site: http://www.marblemodes.com/html/vermont_verde.html. On our next trip, we'll pick out two slabs and plunk down a wheelborrow full of greenbacks.

Wednesday, July 8, 2009

And we have gas (Day 265 of 273)

No, we didn't eat of load of old pinto beans, but instead had the propane tank installed. Not a big deal, you just write a check and sit back. Well it is a bit more complicated, really.

First, you have to decide on how big a tank, to own or lease, and whether it will be above ground or buried. For us it was 500 gallons, own it (20 year lifespan) and buried (nothing to see). This is the more expensive option upfront, but cheaper in the long run (20 yrs). You get a better price on propane the more you buy at once, and we'll only have to get the puppy filled twice a year. Propane is about $1.29 a gal here this summer, so that is $500 per fill (they only fill to 80% of capacity for safety reasons). Plus there is a "500 gallon club" in Kala Point. A bunch of old geezer got together and they negotiated a volume contract with one of the local suppliers, who comes out and services 20 to 30 members of the club in one fell swoop.

When you put the tank in the ground, all you see is the snorkel which is covered by a green top (not in photos yet). This lid is hinged so that the fittings are exposed above ground. The lid sticks up about 6 inches above grade and can be surrounded by plants or shrubs. Pretty slick.

So on Monday afternoon, the county inspector came and approved the propane installation. Richard Gifford (Gifford Construction, septic) backfilled the propane hole and trench leading to the house and regraded this part of the lot. Then we had 15 yards (three 5-yd loads) of topsoil dumped in the back of the lot. Once the septic tanks are installed (next week), we'll no longer have truck access to the rear of the house. We didn't want to be moving the soil from the front to the rear of the lot by wheelbarrow. That would be just about as onerous as shingle dipping, which continues in earnest. Nancy has dipped 24 bundles (2400 shingles) so far, or about 30% of the lot. She's acting a bit dippy, but what can you say.

Saturday, July 4, 2009

Crabby (Day 262 of 273)

Remember those stories back in the 1970's about guys wanting to cut their own wood to save money on heating. First its the chainsaw and accessories, then the pickup truck, etc. etc. Bottom line was the divorce settlement. After 5 cords of wood the net expense was roughly $15,000 a cord. We'll I've got a similar deal going with crabs, hopefully no divorce.

It all seemed so simple, primal, and obvious. Crab is good. Crabs live in Puget Sound. We live just off Puget Sound . . . thus I should go crabbing. A few glasses of wine later, and I've got a deal going with Hugh Musser, one of my Kala Point Cooking buddies (that is another story). We found a good used fiberglass crab boat (double hull rowing type) for $300 and split the cost. Now I'm in for $150, but have 1/2 of a boat. Not bad. Got my license that afternoon for $13, since I'm a full time Washington residence for > 6 months now.

We'll you need some crabbing gear. You're not going to get many crabs off the pier with a string and rotten chicken leg. Saw an ad in the local paper--crab pots on sale at Swains. Off I go. A crab pot (cage) is $22, plus 100 ft of leaded line, a sling, bait pot, and bouy. Total bill with tax = $77. Now I'm in for $240, but no crab.

The season opened on Wednesday, July 1, so Hugh and I got out early and dropped our pots in the water, just 100 ft off shore. Pretty easy row, baited them with some salmon parts Hugh got for almost nothing.

Yesterday out we went again, this time to check the pots and enclosed booty. BINGO. Hugh had one rock crab, which is a keeper at >5" across and of any sex. Dungeness are the preferred crab here, but you can only keep males >6 1/4" across. Off we go to check my pot, which is a bit larger than Hugh's: TRIPLE BINGO. 2 male rock crabs (>6") and a female dungeness, which went back in the water. We rebaited the traps and will go out Saturday to check them again. The crabbing season is roughly July 1 to Labor Day and from Wed-Sat only, meaning the traps have to come ashore this next go around.

Hugh didn't think his one crab was going to make a meal, so I got all three (next time he'll get the booty). Boiled them up last night and cleaned them for dinner this weekend. I think the 3 crabs weighed in at 4 pounds (shell and all). So the bottom line for the season so far is $240/4 pounds, for about $60 per pound. But I have bragging rights, dinner, and something to counter Flemings 36" northern Pike, which he snagged off his dock in Canada.

Did I fail to mention that New Day Fisheries in Port Townsend has live Dungeness crab for $6 a pound. Its going to be a long season.

PS. Two more crabs on Sat afternoon for another 3 pounds. Down to $35 a pound for the season so far. Break even point is 40 pounds of crab or about 25 of those little nippers.

Sunday, June 28, 2009

Getting Stoned (Day 258 of 273)

Stones, specially tabular decorative rock (aka Eldorado Stone). It looks like rock, feels like rock and hefts like rock, but the stuff is concrete. Now that pains me in a major way, having made my living for 35 years looking at, beating up, and sampling real ROCKS. Ah shit!

It turns out that real rock costs a fortune to get and lay, and requires foundation support. Conversely, this fake rock (I always tell it like it is) is 1.5-2 inches thick and looks about 90% like the Real McCoy. The problem is if you have to cut the stuff to end a row or go around another object, then you get an attractive cross section of CONCRETE, with small (pebble size) aggregrate. The photo on the left is the rock we bought: Eldorado Stone Mesquite Cliffstone, see more about this geologic bastard at there website (www.EldoradoStone.com). Hope it looks as good as it costs. Its largely dry stack, meaning little or no mortar between stones (blocks, really), just behind holding them to the scratch coat. I expect to have a nice pile of blocks around the house after the next M9 Cascadia earthquake.

Nevertheless, it does look good from several feet away and only costs an arm, instead of a kidney. My price was about $7 a sq. ft for the rock, plus mortar and wire mesh (another $1 sq. ft). Labor to lay it by someone good (not me) is about $10-12 sq. ft, for a net cost of about $20 sq. ft. Doesn't seem too bad for an attractive addition to the house. We'll have a 3-4 ft high skirt around the house (where the tar paper is in previous photos). About 325 sq ft, and 20 linear ft of corners (L-shaped pieces). $6500, CA-CHING.

Our mason is Frank Ward, a local (PT) guy that does nice work. I put up the wire mesh (extruded metal) by stapling it to the asphalt, tooth side up. The mesh provides a bedding surface for the scratch coat of mortar. When this mortar is dry, Frank will start laying out the stone and laying it from top-down. This way, the stone stays clean and the mortar (butter, they call it) will hold the stone in place.

The trick is to keep the rows horizontal and make the bottom come out even. That's the $10-12 sq ft of magic. He should start the job just before the upcoming 4th of July holiday and finish in 2-3 weeks. Stay tuned for more discussion of getting stoned.

Wednesday, June 24, 2009

Stairway to Heaven (Day 253 of 273)

Now, you have to be in your 50s to recognize that reference to the famous Led Zeppelin song, now 37 years old but sounding as good as the day it was released.

"Stairway to Heaven" is a song by the English rock band Led Zeppelin. It was composed by guitarist Jimmy Page and vocalist Robert Plant for the band's fourth studio album, Led Zeppelin IV (1971). It was voted #3 in 2000 by VH1 on their list of the 100 Greatest Rock Songs. It is the most requested song on FM radio stations in the United States, despite never having been released as a single there."

Now you're probably wondering what the hell is Machette talking about. We'll my wood cutting friend Bill McCutchen had offered to loan my his scaffolding a couple of months ago, and made good on the offer this week. I called to borrow it: OK he says, then proceeds to deliver it to the house and set it up for me (I dropped off a case of beer at this shop this afternoon; way cheap rent).

After the shingling is about 7 ft above ground level, you're going to be on some sort of elevated platform, hopefully scaffolding, but more likely ladders or combinations of saw horses and other devices. Let me tell you, the scaffolding is way safer and much easier to work from. I managed to lay about twice as many shingles yesterday, depleting my painted stock. So Nancy had to dip another couple hundred this am for the next bout of shingling, probably on Friday.


So the catch line is that every time I climb up onto the scaffolding, I may be finding my way to Heaven, especially if I tumble off of the 9 ft ladder I'm using to reach the peak of the garage roof. Wait til I have to stack the scaffolding two layers high and use a ladder for the rear gabled roof line and corbels (damn them things).

If you are prone to acrophobia, stop here. I attached the upper corbel by standing on the 9 ft step ladder (yellow). Need I say more.

Evil Knevil.


Monday, June 22, 2009

Shingles (not the disease) (Day 251 of 273)

We're waist deep into the shingle game, as you'll see from the photos. Its quite a production line, limited only by places to stand up the dipped shingles. (To save Steve Cooley the time, just let me say it: "I'll be dipped").

Nancy gets a couple hundred shingles off our little stack of 8,000, and dips them deep in the 5 gal can of Cabots stain (semi-solid, Pewter Grey). Then they go into paint roller pan covers (to drain), then get stood up against the walls, the stack, and anything else of a vertical nature in the garage. She'll dip til she drops.

After a day or two of drying (not entirely, just enough to handle them), I staple them up on the exterior. I'm using a Porter Cable narrow crown pnuematic stapler, currently my favorite power tool. I started with the garage, which is the closest part of the house to the road and most visible part of the house. After a little gerplutzing with string lines, I built a 8'-long ledger board that holds a row of shingles. I'm using a 6" exposure, mainly because its easier to keep track of the row heights (1/2 ft intervals). After a row is finished, I move the ledger board up 6" and do it all over again. Laid 200 shingles the first afternoon in 4 hours, then another 200 the next day in 3 hours. That's probably my most rapid rate of getting (them) laid. 200 shingles covered about 50 sq. ft, or 1/2 a square. So after two shots (7 hours) of shingling, I've laid one square (100 sq.ft) and have 19 to go. 6 hours per square x 19 squares, go figure (14.25 days). Then add some time to build and move scaffolding for the upper courses and some time to cut the angle for the gables. Looks like 3 weeks to go.

Perhaps its just a coincidence, but a 5/12 pitch (which is what the Richard Berg spec'd for the house) is 22.62°, which is pretty close to 22.5° which is a preset angle on my chop saw. Some things work out, no matter how much to try to screw them up.

Troy Ellis has about 1/2 of the Hardiboard laid and its looking good. Straight as an arrow, caulked tight, and uniform (7" exposure). He's at the point where he'll need to build scaffolding and hang board for the upper 3 ft.

Gotta go staple and dip. Doesn't get any better than this, or does it? That Catamaran in the Caribbean with Bahama Mamas (to drink) is going to feel pretty good—Crone, Creber and Knott.

Wednesday, June 17, 2009

Har, Har, Hardiboard (Day 246 of 273)

You know that old saying: Money talks and bullshit walks. Well, we decided to pay to have the 1599 sq. ft of Hardiboard installed on the rear of the house so some real progress is being made now (to placate the Arch. Comm). Troy Ellis (of framing fame) gave us a bid that worked out to roughly a $1/square foot plus $100 for layout of the Hardiboard. Hired and underway. It will take him about 3 weekends to finish the job, which frees us to hang shingles. So far it looks great. Straight even rows, which isn't easy since the north side of the house is 88 ft long. 1/4" of deviation shows up like a sore (festered) thumb.

Nancy started dipping these yesterday and got a little more than a square done (there are 20 squares to do). That is 150-200 shingles, which are now lying up against anything vertical in the garages (walls, shingle stack, sawhorses, etc.) After these dry in few days, I put them up and she'll dip another batch. At this amazing rate, she'll have them all dipped in about 6 weeks, are around our Aug 5th deadline to complete the exterior of the house. Meanwhile, I'm putting up corbels, diddling with the electrical, and completing some loose plumbing ends. The septic system is due to be installed later this month, so dirt will be flying soon.

Sunday, June 14, 2009

Mikey's Miters (Day 243 of 273)

Friday and Saturday I worked on putting up the cedar cap rail that will be above the rock veneer and below the shingles on the front and south sides of the house. The rock goes over tar paper and a coarse wire screen, which provides a base for the mortar (scratch coat) and rock. Bill (Bubba) McCutchen made the cedar cap for us, about 120 ft worth (not cheap but knot-free and straight). Its 2.5" wide, 1.5" thick, and has a 15°bevel on the front edge and a little groove on the bottom front, which serves as a drip guide. The cap rail wraps around the house at the same elevation, just below the window in the sunroom and bedroom. On the garage, the cap rail intersects the windows so we had to picture frame these by dropping the rail about 8".

Now it may seem to be an easy job to just nail this stuff to the side of the house, right along the top of the tar paper. But not so quick. Did I mention that there are 13 corner miters and 3 splices involved. Thank god for power miter boxes, like by 10" Dewalt. You can cut at 1/2° increments, but luckily most of the corners came out at exactly 90°. A few were 1-2° off, not because of poor framing, but wood shrinkage and twisting. So these miters became a bit more of a custom job. Nevertheless, with about 10 hours of labor I got them all up and looking good. Screwed the rail to the siding and studs with 3" square drive screws, angling up through the cap so that the screw head is buried in the rock and mortar and doesn't come up through the rail. Mr. Bill the cabinet maker would even approve of this job, I hope. Check out the photos.

Wednesday, June 10, 2009

Corbel, not Korbel-the champagne (Day 239 of 273)

On our house plans, I spec'd out some roof brackets (corbels) for the house. Most of these are decorative only, but give the house a nice Craftsman look. No problem, Darlene (Richard Berg's former associate) drew some up from a corbel I saw online. Turns out that there are 24 on the house (why not, its just money). For some reason, Home Depot doesn't stock these, so it looked like an extra week to build them. This was starting to be a small construction project of its own. I asked one of my cooking group buddies—Jim Quandt—if he wanted to take on this little job. Jim retired from Weyerhauser last year and started his own little home-repair company called Jim's Tool Time. (Funny, he doesn't look anything like Tim Allen.)
No problem said Jim, should take about
a week (~$1k) plus materials.

The corbels go on the gabled ends of the roof, where fake rafter tails (2 ft long) support the roof overhang. We have 4 large gables (main house) and 2 smaller ones, one each over the garage and upstairs bedroom. That accounts for 16 corbels. Then there are 2 each for the porches (shed roofs) and 3 for the pergola (a Nancy item). I drew up a model on the computer, refined it a bit, then re-sized it for each application. For example, the 2 corbels for the front porch needed to be 45" long (top dimension), whereas the regular gabled roof ones are only 24" long. The first two arrived last week and I bolted them up on the back porch. Looked great, so Jim started on the remainder of them. The remainder arrived today, so there will be some painting to do. I'll put up the front porch ones next, then work my way around the house. I'm beginning to wonder how I'm going to hold them up when I drill and bolt them to the house. On the back porch, I just used a 12' 2x4 to prop them up, but the ones on the second floor, back side are 25 ft up in the air. Looks like I'll need a space crane and sky hook for this job (honestly, anyone have an idea on this?).

Jim built the corbels out of doug fir (cedar was too soft and expensive). They are mostly 4x stock with 2x4 lateral supports. For the large ones on the front porch he used 4x6 overhead, 4x4 on the verticals, and 4x4 on the laterals. I suspect that these will weigh 60 pounds each; luckily there is massive timber in the wall to bolt these into.

When all the corbels are up, we'll celebrate with a bottle of Korbel Brut, America's America's favorite bottle-fermented champagne. Korbel for Corbels, sounds appropriate. Lets not have any comments about launching this little ship, Cooley.

Toilet Talk (Day 238 of 273)

Oh boy, this blog is going to get shitty. Our septic guy (Leon Gifford, Gifford Construction) is coming over today to discuss all things septic. We need to roll on this one. So we'll discuss where will the two holding tanks go, routing of the effluent pipe from the second tank to the field, and layout of the piping in the field. Then, how much fill over the field and when to do all this. I have to get the waste pipe out of the house, to the first tank, and supply two underground electrical lines for the pumps. We'll have a pressurized field, which means that every hour or so the pump will dose (fancy word for pump) the field with effluent rather than rely on a gravity-feed mechanism. Since our soil is not well drained (glacial till = mostly silt), the county requires a pressurized system, which is more expensive to build, to maintain, and inspect. Estimate is just under $10k for the entire system. Alternately, we could rent a porta-potty ($80/month) for about 10 years.

Who'd thought flushing the toilet would result in such a complicated outcome. So, just a short blog--gotta go as they say.

Monday, June 8, 2009

New Game Plan (Day 236 of 273)

To answer the blog comments about what the Arch. Committee can do (I can't comment directly for some reason), they can withhold or keep our $1000 application fee and reportedly fine us on a monthly basis. I'll have to investigate the penalties and see if its worth being a bad boy. Nevertheless, I shifted to a new game plan called "Make it look like a finished house". As I had mentioned, one of the holdups on the exterior shingling (other than dipping the 8000 little buggers) is that we had left out two upper story windows so the drywallers could load the rock (sheet rock, drywall, gypboard, etc) through the window openings.


Well, this morning I called Frank Feltes (Drywall and Painting) and asked him if we could order and load the rock now, rather than later. You'd think I'd rubbed the belly of a magic genie. By 10 am, Evergreen Building Products (Sequim) had a boom truck on the property and was loading 1/2" and 5/8" drywall into the Love Nest and the Man Cave (see photos). Man does that truck save some labor. Still, it took them 2 hours to unload the rock.

Talk about a dynamic test load. I figure there is about 6000 pounds of drywall sitting on those engineered joists in the living room, and 4000 pound up in the man cave. If its still standing tomorrow, I think we're good to go.So now the two remaining pentoid windows can go in and there won't be any technical reason to not finish the outside, except time. I spent 4 hours this afternoon adding the cedar trim that caps the rock. Lots of mitering and screwing from below so no fasteners show, but the 20 ft that I finished looks pretty good. 80 ft to go; looks like two days of work.

Friday, June 5, 2009

Playing hardball (Day 233 of 273)

So, I started to worry a bit about finishing on schedule (impossible) so I wrote a note to our Architectural Committee, requesting an extension to our finish date. Sent it off by email and got a quick NO. Here is the text from the chair, apparently they had been getting worried about our eyesore and talked about it last Tuesday and got my note on Wednesday.

"Michael - The committee has been discussing your project and had decided to send you a letter reminding you of the completion date of 8/5/09 and requesting that you look at what we call completion. The idea is that the outside be finished so the that the site would no longer look unsightly. Unfortunately, this letter went out only this morning due to the pressure of the annual meeting. The committee is not inclined to grant extensions except in the most extreme extenuating circumstances. Your request will be taken up at the July meeting. In the meantime, please look at what can be done to meet our definition of completion." Ron Kubec, June 5, 2009

Extreme extenuating circumstances--Like we're doing a lot of the work to save some bucks in a down real estate and stock market. Guess I have to schedule a heart attack so something like that. Worse comes to worse, we'll move the exterior to the top of the schedule. That also means getting the second floor drywall supplies loaded through the two open windows (love next and man cave). Then I can install these windows and get the shingles going. By the way, I've been thinking a lot about these shingles and how they're going to get onto the exterior walls.

20 squares of shingles. That covers 100 square ft and we'll have 5" exposure per shingle. They average 6" in width, so that figures out to be about 400 shingles per square. 400 x 20 is 8,000 shingles, ONE AT A TIME!. The pros suggest hand dipping these buggers so their covered on both sides and won't cup (mine did in Denver, but it's drier than a popcorn fart there). So imagine getting a big tub (bucket, trough), dipping each shingle and then putting them somewhere to dry for a couple days. 8000 shingles stacked in line will go 4000 ft, or out to the entrance to Kala Point. Then again, maybe we could put them up domino style and set some sort of dumb worlds record for "shingle dominoes." Go figure. Still working on this little problem, typically from about 2-3 o'clock each morning. Wish I had my old day job back and I just had to deal with nonexistent budgets at the USGS.

Monday, June 1, 2009

Back to Electrical (Day 229 of 273)

It was a slow week, last week, with various diversions but progress is being made. Poured a 2'x4' concrete pad at the back of the garage, built the front and rear porches (no steps yet) out of pressure treated 2x6 and 4x4 lumber, attached more window and door trim, and cleaned up a bit.

Levi Ross came over and we went through the Aldes ducting system for the house. Because the house will be fairly air tight, you need to supply some fresh air on a regular basis. So the fan system draws air through some ports in the walls (adjustable) and pushes it out of the house at about 20 cfm. I suspect that the whole house air is replaced every 4-6 hours, but that's just a guess. Two of the exhaust vents are powered units, attached to fan switches in the bathrooms. Kick on the switch, and the motor ramps up to 100 cfm and draws from the powered register, not all four. So Levi and I went through the various types and lengths of pipe we'll need to hook up the vents and motor. While Levi was here, he fixed a leak in the copper piping attached to the hot water boiler. This leak developed after we had pressure tested the system and fixed two leaks in the Pex junctions. We repressured the system to 50psi and its holding after a week, so I think the whole radiant floor system, manifolds, and boiler (hot water heater) are ready for prime time.

Signed a contract for insulation. Only got one bid on this since the company came highly recommended and is local (PT). Stayed away from the fancy (and expensive) Icynene and BioBased 2-part foamy applications mainly because they are expensive (2-3x) and I don't like the way they drip down from the roof in the attic and crawl spaces, and the fact that you have to cut away the firmed up foam to make changes in plumbing and electrical. Rather, we went to a blown in fiberglass product and standard fiberglass batts. The blown insulation works well in crawl spaces and tight spot. The guys staple up a nylon webbing (looks like heavy duty spider webbing), then cut a small hole in it for a hose and blow in the fiber. Fills all the small nooks and crannies and you get a good insulation rating and a pretty tight seal. I budgeted $10k for the 2700 square foot house, 1100 square foot garage and attic, and the basement. Bid came in at about $6800, so I ran with it.

Our third drywall bid showed up so we did the math and selected a sub. We had a bid from Pacific Drywall in Brinnon (30 miles S of us) come in at $27.5k, which seemed high. Our friends in Quilcene had used a Tacoma company and did their similar size, but more open (less walls) house for about $14k, so we thought ours would be ca. $20k in the end. Then I got a bid from Franks Drywall (Chimicum, local) for $17.5k. He has good credentials and was recommended by several folks, including my framer. The main question came down to overhead drywall. Pacific Drywall was adamant that you need to use 5/8" overhead on 24" centers (vaulted ceilings in bedroom, sunroom, and kitchen) whereas the two other installers wanted to use a stiffer type of 1/2" drywall (CD board). The thinner board bothered me (sagging) and isn't as fireproof as 5/8", which is required in the garage by code. So, I made a counter offer to Frank for 5/8" on the ceilings, vapor barrier paint, and some modifications: we settled at $17.8k and everyone was happy.

Starting today (Monday, June 1) we have to get back onto the electrical work, starting with the kitchen and heading east. I need to get the plumbing, electrical and venting finished by the end of June for the insulation and drywall installers. Also the Architectural Committee is starting to worry about our progress, especially on the exterior. I say come on over for a shingling party, guys. So, it looks like there's no more time for farting around. Oh did I mention, we're going on a whale watching trip tomorrow and I have a 2-day race (Classic Mariners Regatta) next week end. There goes the schedule already.

Wednesday, May 27, 2009

Multitasking (Day 224 of 273)

Multitasking—That's where you do several things at once, and none of them are what your supposed to be doing. For me that is Electrical, but some other things have been getting in the way. As you know from the header, we're at Day 224 of 273 and are only about 50% done so its looking like we'll have to extend our building schedule for about an extra 3 months. If I had 6 hands and three brains it might be a different story.

So the last week Nancy has been painting window and door trim with oil based paint (Cabot OVT, Cinder color). This is being driven by wanting to get the outside of the to a more finished state. One member of the architectural committee has already commented about our recent lack of progress, but he's only looking at the outside. They are oblivious to all the plumbing and electrical work that has happened and needs to be finished before we can move to the insulation and drywall, which are paid jobs that will go fast.

Over the weekend (a holiday for normal people) I finished mounting all window and door trim for the lower half of the house. We're getting ready to lay the Hardiboard on the back sides of the house, so all the trim and corner boards, and porch need to be in place. Troy Ellis (Gary's son) and I will hang the Hardiboard on Fathers Day, but at least I get to use my new nail gun (thanks Nancy and First Federal). Next I'll have to get the corner trim painted and nailed up. This provides a transition from the Hardiboard to shingles on the back corners of the house. There are also horizontal band boards: a basal one that the Hardiboard rests on and a belly board (about 10 ft up the sides) for the transition from Hardiboard to shingles above.

In preparation for the siding, I shot a level line around the whole house. This will provide a guide for the top of the rock and wood sill on the front of the house, and a guide for the siding on the back sides. I stapled up 30# felt (tar paper) as an underlayment for the rock, then will add a layer of metal mesh for the mortar that will hold the rock veneer to the house. With the felt up, the house is starting to take on more shape and feel.

So, instead of ploughing ahead with electrical it looks like we need to spend another week on the trim, paint, and exterior. The weather has been wonderful: 60's dry, with a lite rain every 4-5 days. No complaints in that department.

Gerald and Dottie Lee (Chicago) are stopping by this weekend on their way to a cruise to Alaska. Gerald was my best man 37 years ago, and we haven't seen them since 1994, when we stopped in Chicago on the way to the Adirondacks (Timbles place). Should be fun--and no building this weekend.

Monday, May 18, 2009

Lights on, anyone home? (Day 215 of 273)

Before you can run wiring for the lights, it turns out that you have to decide where those buggers are going to be. So, I started putting up the recessed cans (6" diameter lights) in the ceilings. These are the most affordable way to light a house and they're very discrete. In volume, the housings cost about $8 each, but then the trim kit (what you see) ranges from $5-25 each.

Nancy and I modified architect Berg's original lighting plan to our needs and whats. It turns out that we'll have about 50 recessed cans in the house. The highest concentration will be in the pantry (8), but don't forget about the kitchen, 2 bedrooms, 2 closets, and 3 baths. For the two rooms with vaulted ceilings, we used a version of recessed can for slopes. No big deal, they just cost 5 times as much ($38 each). We bought a dozen of these, which runs the total for overhead lights up to 60. Hell, electricity is cheap and we'll use the new CFL bulbs to save a few watts.

Now we need to make some more expensive decisions, specifically for directed and specialty lighting. For directed lighting, we need high intensity halogen spots (kitchen counter, hanging art pieces, etc) and for specialty lighting its the bigger ticket items, like hanging glass fixtures over tables and the kitchen island. We've looked at few lighting stores in Seattle and haven't been taken with any particular style or look yet, but we need to finalize this before I install the overhead boxes from which these lights will hang.

At the notorious Potato Bake (a Kala Point fund raiser chaired by my associate home builder), we met an interesting women named Karen Hoeve who lives about 2 blocks away. She is an interior decorator who specializes in Craftsman (Art and Craft style) houses, particularly lighting and color selection. BINGO. We invited her over last night to see some of her work and have a glass of wine; what a character and live wire. Hopefully she'll have some ideas upfront before we run the budget into the ground with consulting fees.

So, this week the main job is to install the overhead electrical and switches, all wire 14 gage wire. Meanwhile, Nancy has been hand painting our window and door trim with oil based paint (latex is for wimps), and I've been nailing it up. When all the trim is up, we'll be ready to start hanging Hardiboard with Troy Ellis, our framer's able son. Of course, I still have to build a little porch and steps for the back of the house door, so you don't walk out and break your neck from the 2 foot drop to grade. That little porch will take me a couple of days to do, since I have to pour a little footer for the 4x4 posts to rest on. Looks like we need 10 days in a week to get this house finished. We're already toying with the idea of asking for a 3 month extension on our Kala Point building permit, which would push the 273 days out to 365. You read it here, first.

Saturday, May 2, 2009

Man Cave Wired (Day 214 of 273)

Little bit late with this blog; for some reason work is getting in the way of blogging. Nevertheless, we're onto the electrical work in a big way. Gary Estes has been here and we discussed the general plan: he's doing the "get electrocuted stuff" and I'm doing the hole drilling, wire pulling, and box installs.

So it took a week of work on and off to wire the garage, but there was training time and other chores in there too. I installed four 220 v lines (table saw, compressor, welder, etc) and about 12 outlets. I think there are 6 circuits for these. Then I put in the overhead lighting on 2 circuits. Overall it wasn't bad, but it was slow. It will go faster in the main house area now that I know what I'm doing. One of the bigger problems is deciding how to get wire to all the places. You don't want to drill through trusses and try to avoid the big lumber (like 4 x 6 beams), so there is come creative routes from switches to lamps.

Wire sizes: This is pretty straightforward. For overhead lighting we use 14-2 wire (white). This means 14 gage with two wires and a ground. Wire gages are ass backward. 14 is smaller than 12, and bigger than 16. Sort of think about it as no. of wires that can fit in an inch, i.e., 14 gage is roughly 1/14th inch thick. 14-3 has three wires and one ground and is used for 3 way switches (we'll have a dissertation on this subject once I've passed my qualifiers).

For the plug in receptacles (110 v), we use 12-2 wire (orange). If you need GFI protection (as in garage by code), you install a GFI receptacle in the first outlet and everything downstream is protected. GFI receptacles are used where water within 3 feet of outlet, or where there might be standing water on the floor (garage). You can put as many as 8-12 outlets on a single circuit, since they figure you can't be running more than a couple of tools simultaneously.

For the 220 v. lines, we use 10-2 wire and have a single receptacle per circuit. For example, the 3- HP motor on my intended table saw would draw 25-30 amps at 110 v (too much for 12-2 wiring), but only draws half that amperage at 220 v, so you can supply power with 10-2 wire on a 20 amp circuit breaker. Problem solved, just more wires going to separate places.

For the front end of the electrical system, we have an assemblage of panels and shut offs. Power comes in the house from the street (ground transformer) through 00 cable (1 1/4 inch thick, 220 volts, 3 cables) and uses a piece of rebar tied to the foundation for a ground. This cable will be underground in 4 inch gray PVC conduit, then enters the garage wall through a 90° bend (sweep) that we placed in the concrete footer. Then it goes up and into the meter box, which is within the garage framing. The meter is externally mounted and gets read electronically from the street. From the meter box power is routed to a main shut off panel (interior) and then goes to two panels: one 200 amp in the garage (for boy toys) and one 200 amp in the basement for the house and girl toys (ovens, lights, etc).

After completing the garage and my basic wiring test (now I'm a rank amateur apprentice electrician), we took a week off to visit Denver and northern New Mexico on a mixed business trip and vacation. Managed to get our chili pepper tongues recalibrated and see a half dozen Denver couples for dinner and drinks. A successful trip, except for the excess baggage (personal weight gain) on the way back.

Now we've moved into the main house, putting up receptacle boxes and overhead (6" can) lights. 48 so far, with a few more smaller ones to be decided for lighting art work or specific parts of rooms, such as the kitchen counters and island.

Sunday, April 26, 2009

Factory Direct (Day 193 of 273)

For the last 6 months I've been watching an ad on Craigslist (not a masseur) for sawn cedar shingles. We plan on siding the front of the house with shingles and I had calculated that we have about 2400 sq. ft to cover. As with all shingles, they are sold in bundles, 4 to a square (nominally at 100 sq. ft). So we'd need 24 squares. But its a little more complicated. For cedar shingles, the minimum exposure for each shingle is usually 5", which gives 100 sq. ft to square. However, if you run the exposure at 6" the coverage goes up to 120 sq. ft per square. 6" exposure will look better on this house because its rather tall and will have a coarse rock belt line below the windows.

Therefore, we needed 20 squares (80 bundles) to cover the front and south sides of the house. We'll use Hardiboard planks (lap style) on the back side since they paint up well and handle moisture pretty well. I ordered 200 pieces from Carl's the other day, which should cover 1400 square ft. The price on this material works out to about $1/sq. ft, which is cheap for almost any kind of siding. Anyway, back to the shingles. Carl's best price on the shingles (all No. 1, blue label, blah, blah, blah) was $220 + tax for a square. That works out to almost $240 a square, but delivery is included (3 miles).

The Craiglist ad is for the A&A shake mill in Forks, WA, about 120 miles west of us and deep up in the rainforest of the Olympic Mountains. Interesting little town, currently known as the setting for the teen-flick Twilight, but I digress. Anyway, these little mills are on the brink of closure with wood demand and prices down almost 25% the last few years. They're dealing to stay alive. Their current price as $130/square (down from $145 last year) with no tax (don't ask) and 2% off for cash. Delivery would be about $280 from Forks, which works out to $14 a square. So my net would be roughly $145/square straight from the mill, no middle man. It was a deal I couldn't turn down. The garage of the new house is full of shingles and cedar trim now. Paint (stain) is on hand, so the brushes will be coming out soon.

Monday, April 20, 2009

Red, White and Blue (Day 187 of 273)

After weeks of ABS and its messy black cement, we're onto the the relatively clean job of installing the domestic water piping. Until a few years ago this meant ordering hundreds of feet of 3/4" (supply) and 1/2" (distribution) copper pipe, getting out your gas torch, and soldering it all together. I used to be a pro at this, but the last few years I've lost my touch and am actually intimidated by the whole process. To add to my angst, copper has become very expensive with China eating pipe like noodles—they're even buying mines in Peru to get guaranteed resources. Same strategy with cement and steel. They expect to build 40,000 miles of highway in the next decade, which is equal to ALL the highways in the USA.

Alas, Pex to the rescue. This plastic pipe has been about for about 30 years, and is used extensively in Europe. I think its introduction and acceptance in the USA has been impeded by the plumbers unions, mainly because its just too easy to install. Denver doesn't allow it, but the International Building Code (and Port Townsend) does. Whatever the reason, I'll leave the little bit of copper work we'll need to Bob Brown and do all the plastic piping my self. I started with the Pex on Wednesday (5 days ago) and had most of it done by Sunday evening.

We're running three main lines (i.e. zones). No. 1 is the hot water supply, which will be a closed, circulating loop. What I mean is that there will be a little pump & timer on the line that automatically circulates hot water every 10± minutes at the times of the day that hot water is used. For example, in our house hot water is used for showers in the am, for cooking (mainly dinner) and for laundry. Anyway, with hot water always in the main loop, any faucet is only 3-4 ft away and you should have fully hot water in 10-20 seconds. I used red Pex for this--makes sense (duh). What do you think about that, Mr. Sailboat? I know it takes 2 minutes (and wastes 3-4 gals of water) to get hot water to the shower next to Nancy's old bedroom in California (but you guys have way too much water anyway).

The second line is the cold water supply, but only for non-drinking purposes (showers, laundry, toilets, etc). I used blue Pex for this. We've isolated this cold water to eventually accommodate a water softener or high-tech filtration system which we might need, but aren't sure. The third line is the cold water potable supply (kitchen sinks and outside hose bibs). I used white (clear) Pex for this. We don't want to drink softened water or put it on the yard plants. However if we get a filtration system, then we'll just replumb the two cold water lines together and all is well.

So there you go: Red, White and Blue plumbing—quite patriotic . It has a Steve Cooley feel to it.


Contrary to my preconceptions, the domestic water part of the plumbing is way easier than the hard pipe waste and vent plumbing. The Pex flexs and can make gentle bends: you can bend the 1/2" Pex into a radius of about 4" and 8" for the 3/4" Pex. So you can snake it into and out of walls and floor joists and only need to drill holes about 1" in diameter, which you're permitted to do anywhere in an engineered joist. I have a variety of little plastic fittings such as elbows, tees, and connectors. You can have three 1/2" lines off a 3/4" line, so most bathrooms have a 3/4" line the passes beneath it with the shower, and vanity and toilet coming off that line.

The only ringer in this process is the Pex expander tool. This device (see picture of blue box) is used to expand the pipe so the fittings will fit. You put a collar on the pipe, and insert the expander and start pumping. It felt like I'd been to the gym when I got home the first day. Most homeowners would never have one becasuse they aren't for rent (only sold to Pex certified installers). But after installing 2,200 ft of Pex in the Warmboard, I felt pretty qualified so I ordered one from Pex Supply. After I'm done with the house, I plan is to sell it after to my radiant heating guy (Levi Ross, with lifetime occasional-use clause) or on Craigslist. It was $300 new, so if I get $150-$200 for it I'm way ahead.

Sunday, April 19, 2009

Drill Baby, Drill (Day 186 of 273)

Yes, I'm a big fan of Sarah Palin, aka "the Drill Baby" from Laska. Just think, if McCann had been elected, Sarah would be VP, and James Watts would be back as the Secretary of Inferior. I would have had to stick around the USGS just to keep an eye on these three amigos from hell. But I digress.

I had to drill some long holes for the plumbing the other day, so I unwrapped my heretofore unused Cully 18" Ship Auger (1 1/8" diameter). Strapped that baby to my Makita angle drill, and powered it up. The task at hand was drilling through a 2"x6" nailed to a 4" thick Versalam then through a Boise BC5000 engineered joist 3" behind. I wonder if Richard Berg or Mikael Brostrom have ever been behind the business end of this sort of drilling machine. Did I mention that the target was 9 1/2' off the floor.

So up the ladder I go with my two friends, Culley and Makita. I planted the bit, aimed it along the plumbing line and powered up. This bit chewed through the wood like a golden retriever going for a tennis ball. Within 20 seconds I was in clear air with wood chips everywhere. Mission accomplished. Did I forget to mention that if the bit hits something hard (like a nail) and binds up it will break your wrist(s). No broken wrist this time.

There was lots more overhead drilling that day, but mostly feeble targets like 2x6s and joists. Packed up for the day and headed home, feeling sort of proud of myself. Well by that evening I shoulders were a little sore, and by this morning I couldn't lift my arms above my shoulders. Fortunately Dr. Advil was in the room and we had a serious meeting: take 4 tablets three times a day and find something easier to do today. Looks like Sunday will be spent sweeping and cleaning up. More battles to fight next week. Drill Baby, Drill.


Next week: Yep, Gary Ellis built it and I'm boring holes in this house like a termite. Drilled through a series of 2x6 studs that sandwiched a 4x6 post and managed to get the drill firmly buried. Took about an hour to dig it out, but I got a hole all the way through it as shown in the second photo. Success comes slowly. Looks like an electricians job is about 1/2 drilling, 1/4 pulling wire, and 1/4 hooking it all up. I pulled my first wire on Monday; a series of four 240-volt lines for the garage using 10-2 wire. Also, Gary Estes (electrician) installed the meter and subpanels on Monday and I helped him pull 100 ft of No. 0 three-cable wire from the garage through the house an into the basement. The coil of wire weighed about 150 pounds and acted like an anaconda when we unrolled it. Yes, unroll or you're going to have a mess on your hands. We'll have a little tutorial on wire sizes later (gauge 0 is really big and 20 is really small, go figure).

Thursday, April 16, 2009

Hide A Hose (Day 184 of 273)

No this isn’t some kinky sex game from college (get your mind outta the gutter Cooley), but rather a neat central vacuum system that we’ve seen at home shows for several years. Hide A Hose (http://www.hideahose.biz/index.html) is a typical central vacuum system but its unique twist is the retractable hose. Central Vacs are popular because they are powerful and built into the house, either initially or as a retrofit. Those that have them commonly complain about the frickin hose, which can be 20-50 ft long plus the power head. Moving it around then storing it is a problem. Did I mention that its a local company, home grown and flourishing in Monroe, WA just across the water on the dark side of the sound.

Hide A Hose solved the problem by allowing the hose to retract into the vacuum tubing. Quite ingenuous, and pricey ($2500). But when the chief cook and dust demon (aka the Decision Maker) for the new house says that’s what she wants, what are you going to do ? (order it, and the urinal).

Since the central vac is built out of plastic piping (thin wall PVC), now is the time to install the system. In addition to the tubing, each wall inlet and toe kick pan is powered, so it makes since to do this right before the electrical goes in. Mike from Monroe (Hide A Hose installer) is coming over next week to do the job if we accept their estimate. I’d love to do it myself: if you don’t care about a warranty you can buy all the parts over the internet. Dr. Olsen of Denver installed his and he says it really sucked (the old house). However, to protect their margins, Hide A Hose and their dealers hide behind the warranty vale. Don’t even get me started on the whole Wolf, SubZero MSRP thing.

So for several thousand dollars (which everyone has too much of these days), they’ll install the tubing, power ports and central vacuum all in a day (see how hard it is). Then when the drywall and painting is complete, they come back to install the face plates and test the system. Seems pretty simple. Maybe I should become a dealer for them in Port Townsend (none here now). I could couple it with my mobile knife-sharpening business, and wrap it all under the “Slice and Suck” moniker (or We Slice, You Suck). Ken, are you looking for a good investment?

Monday, April 13, 2009

PPP (Propane Piping Plan, Day 181 of 273)

Interspersed with the plumbing chores last week, I worked with Levi Ross on the propane supply lines. There is no natural gas on the Olympic Peninsula, so your only choices for heating are propane (a derivative of natural gas) or electric. Propane is less efficient but priced better than electric, and it has its detractors. Mainly it’s storage and refilling, but also the fact that burning propane generates water (vapor). At full tilt, our propane boiler makes a quart of water every hour, so during the winter I suspect that we’ll make a couple gallons of water per day. Since the boiler is in the basement, we’ll dump the water into the sump pump basin (20 gals in the floor), then pump it up and out of the house, along with any water that has collected from the perimeter drain line.

We’re planning on a 500 gallon propane tank. 250 gal is more typical, but the rates are better on 500 gals and you only fill it half as often. Tanks (fuel bottles) are either above ground (leased or you own) or buried (you own), which is what we plan to use. The 500-gal tank is about 10 ft by 3 ft in diameter (think small submarine), so you have to dig a big hole, something like 12’ long by 4’ wide and 5’ deep. All that you see is a rounded top (the snorkel) where you fill the tank.

The hole for the tank and trench over to the house will be dug later this year along with the septic tanks, but for now we needed to place the propane pipe within the house. The basic strategy for placing parts in the house is least flexible to most flexible. You start with concrete and wood, then do to ABS and steel pipe, then finish up with electrical (extremely flexible). If you do a whole house vacuum, like us, that goes in after the steel pipe.

For all gas lines within the house you use 3/4” steel pipe for the main supply line, then T off it with 1/2” for the gas appliances. Levi brought over his pipe cutter and threader, and had 50 ft of pipe delivered. In addition he had a large supply of short threaded pipe (2”-12” pieces) and fittings (elbows, Ts, and plugs) plus shutoff valves.

We laid out the pipe, figured drops and risers around immovable objects (like beams and posts) then started cutting pipe to size. It took us about 8 hours to hang and connect the black steel pipe in, then another couple of hours to hook up the flexible gas pipe. You use the flexpipe to connect the appliances to the steel pipe, with a shutoff valve at the downstream end. The photo on the left shows the stub in for the Wolf rangetop.

We have a gas rangetop in the kitchen, two gas fireplaces, and a 60 gal boiler (hot water heater). The main fireplace is a see-through model (first introduced to us by home builder Steve Titus in Denver). The photo on the right shows the flex pipe which will connect to the base of the fireplace.

In addition, I’ll have Levi put a T on the outside line for a gas BBQ if we decide to add on in the backyard. Next thing to do at my end is to install the fireplaces in their framed boxes and either put the vent pipes in or hire it out. Will probably pay for this since we are running behind schedule and time is worth more than money right now.

Subcontractors and Suppliers

  • Balco Excav. (land clearing, Bill Snyder)
  • Bill McCutchen's Mill (cedar trim)
  • Blake Tile and Stone, Sequim (Judy Reno, Eldorado Stone, Tile)
  • Bob Brown Plumbing (Bob & Josh Brown)
  • Boise Cascade joists (from Carls)
  • Carl's Building Supply (Mike, Melissa, Michele, Terry & Lawrence)
  • Castlerock Landscaping (Tim Hamm, Sequim)
  • Cotton RediMix (concrete and gravel)
  • Craighead Electric (Gary Estes)
  • Custom Hearth (propane fireplaces), Pousbo
  • Daltile (Seattle, Wedi board)
  • Discount Cabinets of Washington (Sequim)
  • Discovery Bay Materials (gravel, top soil)
  • Earl Kong (professional forester, PT))
  • EcoHaus (Amer. Clay Plaster, cork flooring)
  • Ellis Construction (Gary and Troy Ellis, framing)
  • Evergreen Products (Drywall, Sequim)
  • Fergusons, Seattle (Plumbing fixtures, Bud Allen Wright)
  • FInlandia Saunas (Tigard, OR)
  • Fitzgerald Concrete (driveway, Mike Fitzgerald)
  • Four Corners Nursery (trees, Port Hadlock)
  • Frank Feltes Custom Drywall and Painting (drywall and painting)
  • Frank Ward and Wayne Jobst (Stone masons)
  • Fredricks Appliances (Redmond, all appliances)
  • Giraffe Gutters (Dan Shaw, Chimicum)
  • Glass Etchings by Perrett (Jerry Perrett)
  • Hadlock Building Supply (bits and pieces)
  • Hardiboard, siding, backer board (from Carls and Home Depot)
  • Henerys Hardware (Cabot stain, misc. fasteners)
  • Hi-Tech Electronics (Audio & Media, Port Angeles)
  • Hide-A-Hose (Joseph, A-B Vacuum, Puyallup, WA)
  • Home Depot (electrical & plumbing supplies, interior paint)
  • Home Storage Solutions (John Plake, PT)
  • Hope Roofing (Pabco Paramont Advantage shingles)
  • Jim's Tool Time (J. Quandt, misc. carpentry)
  • K&D Concrete (Don McNeese)
  • Kitchen and Bath Studio (Shelly Little, cabinets)
  • Levi's Energy Services LLC (radiant design, vents, propane piping)
  • Meta Marble and Granite (travertine), Seattle
  • Michaelangelo (sepentinite), Seattle
  • Mikael Brostrom (Structural Engineer)
  • Mills Interiors (wood flooring, some tile)
  • North Coast Electrical (Electrical Supplies)
  • Olympic Garage Doors (Sequim)
  • Penisula Flooring (carpet)
  • Penisula Shower and Mirror (Sequim)
  • PexSupply (online plumbing and radiant supplies)
  • Puget Sound Power (and Atelco installers)
  • Richard Berg Architects (Richard and Darlene)
  • Richard Gifford Construction (septic, dry wells and grading)
  • Richerts Marble and Granite (countertop fabricators)
  • Seattle Lighting (lighting fixtures)
  • Secret Gardens Nursery (Sheila Piccini)
  • Shine Quarry (basalt for landscaping)
  • Sierra Pacific Windows (Rob Sorg)
  • Simpson Doors (from Carls)
  • Simpson Strong Tie (fasteners & hold downs)
  • Stewart Excavating (Mark Stewart, foundation)
  • Sunshine Propane (propane and tank)
  • Therma-Tru Doors (from Carls)
  • Tracy's Insulation (batts and blow in)
  • Trex Decking (from Carls)
  • Trussworks (roof trusses, Carl's)
  • Velux (Skylights and Solar tubes, Carls)
  • Versalam beams (from Carls)
  • Warmboard (Bruce Hull)
  • Wisbo Aquipex, Taco Pumps, Polaris tank (Sunshine Propane)

Followers

About Me

My photo
Professional geologist (USGS, 1972-2008), amateur home remodeler and now builder. Interested in sailing, all things involving salt water, woodworking, and food in general. Owner of Paleo Seis Surveys LLC, consulting in Quaternary geology and geological hazards.