Visitors to Date:

blog counter

Building a House in Kala Point, Port Townsend, WA

Building a House in Kala Point, Port Townsend, WA
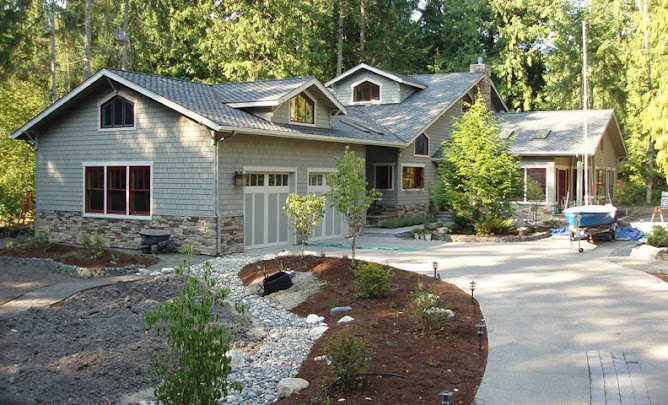
A running narrative of first-time builders of their retirement home in Port Townsend, WA (NE corner of the Olympic Pennisula, 60 miles NW of Seattle). Follow us as this adventure unfolds in late 2008 and beyond. 18 months under construction, we moved in on May 25th, 2010. Photo taken August 15, 2010.

Search This Blog

Monday, May 31, 2010

Locks and Panes (Day 573)

We've been punching down through the list this week, mainly on small items interspersed with unpacking boxes. Took a whack at cleaning up the garage but I didn't make any headway except to extricate a trailer full of cardboard boxes and pieces. It was time to say good goodbye to the old cardboard. I had previously bought a boatload of RamBoard (1/16" high density paper) for the floors, and will use it upstairs for carpeting during the rest of our construction.

Decided it was time to get some handles on the interior doors. We'd bought about 2o Emtek Arts & Crafts lever sets for the house and they'll look great with the Craftsman theme we have going. They aren't cheap; about $60-55 a set depending on type (privacy, passage, or dummy). After I put in a couple it became pretty routine and I managed to install 10 in an 6 hr day (it was Memorial Day, so we went out to lunch).

All the doors came pre-drilled for the locks. That means they have drilled a 1" diameter hole for the locking cylinder and a 2 1/8" hole for the lever assembly. The lock sets should go right in except the door company always errs on the small side for the cover plate and striker plate. So you need to chisel it a bit deeper (a real 1/8") and sometimes larger. That makes the 15-minute install take about 45 minutes. Still, 10 down and another 10 to do in the to-be-painted doors.

I was working in the back corner of the house and Nancy causally mentioned that I was in the hall of doors. Didn't realize that the little hallway (5' x 8') has 5 doors surrounding it. Two to the stairs (up/down) one to the pantry, one outside, and one to the den. That would give Alice an anxiety attack in her little Wonderland.

Tuesday, May 25, 2010

I Love/Hate the Trees (Day 567)

The trees in this area are absolutely beautiful and abundant. We love them. But then again, they really shed a lot of leaves especially in our occasional windstorms, like last week.

I had the afternoon free and noticed that the gutters were overflowing when it rained hard. I knew the answer--they were already full of forest litter, airborne type. The gutters went on the house in Oct. of 2009, which was 7.5 months ago. Out came the big ladder, a 5-gal bucket, and a gutter scoop (hands work just as well, but that's DIRTY). We have about 220 ft of gutters and 5 down spouts. The pine needles (mostly) pile up at the downspouts and clog the gutters. Since they were installed, they've filled up to about 2/3rd full, which means they'd be full to the brim in a year. Scoped out 5-5 gal buckets and hosed out the gutters. Installed downspout filters, which just keep the needles from heading down and filling up the dry wells. Took about 3 hours to do the whole house, plus rinse off the skylights and empty the valleys, which were clogged with needles too. At this rate, I suspect that I better clean them twice a year, once in the late fall when the needles have dropped and again in the late spring when we get some pretty good rains. The pros charge $75 for cleaning, probably $100 for a house this size, so I saved enough for a really nice dinner out. I like this non-paying job.

Saturday, May 22, 2010

In Hot Water (Day 564)

The shower is grouted, the door is in, and the faucets will be connected and trimmed out in a couple of hours. (You eagle eye types will notice that I still have one f_king piece of tile to cut and mount on the upper right side). I'm heading to the showers. You'll have to trust me that it works—I'm not putting a photo of my whale carcass in the web.

Had our first dinner party last tonight (Sat.). We invited three younger couples (its all relative) from Kala Point that are friends and have watched our progress and cheered us on for the past year and a half. They're all refugees from other less desirable places, but moved here in the past few years like us.

The Wolf stove will get a burn in and the serpentine counter tops are finally seeing the light of day, clean and relatively unburdened. Its feeling like a real house now. Yea ha.

Friday, May 21, 2010

Knobs and Pulls (Day 562)

Ran out of grout boast, an additive suggested by Judy Reno (aka Vegas) at Blake Sand and Gravel in Sequim, so the Clubhouse shower saga continues into the weekend. The additive is coming by UPS today (Friday), so I'll finish the grouting on Saturday.

The great thing about building a house is that its a multitaskers dream. There is always something to do, so I opened the 60 pound box of pulls and knobs for the various cabinets in our house, which my lovely wife and purchasing agent procured via the internet (Lee Valley Hardware, Canada). Being a student of master carpenter Bill Hart, I figured that I'd make a little corner jig for the cabinet doors and rail jig for the drawers. Use the jig to drill the holes for the knobs and pulls, respectively, in the same place every time. Seemed like a no brainer, but it wasn't that simple. Spouse extraordinaire decided that the drawer pulls needed to be centered in the recessed panels, and there are six different-height panels. So I made 6 jigs for the recessed panels and just measured for the pulls on all the door corners (4" up and 1 3/8" in, see photo to right). OK, so that wasn't so hard (2 hours).

Then I had to deal with the screws for the pulls and knobs. All the knobs go through 3/4" cabinet faces, so the standard 1" screws worked fine. However, the drawers have two configurations: recessed panels @ 1 3/8" thick and non-recessed panel @ 1 5/8" thick. So, all the supplied 1" screws for the pulls were worthless. Off to Hadlock Building Supply, after a free BBQ at Carls (monthly event at Carls). Bought 1.5" 8-32 pan-head machine screws for the recessed panels, and 2" 8-32 pan-head machine screws for the non-recessed panels. Here is where the work started. In order to use the 2" screws for the 1 5/8" panels, you have to cut off 1/4", grind the end, then re-tap the screwed up screw so it will go into the pull. Add 2 hours for modifying 40 screws, and the day is pretty much gone. 8 hours of labor and I got about 30 pulls and knobs mounted. Have another dozen to do in the kitchen, a dozen in the pantry, and a dozen in the master bath (36 total) for a full days work.

So how much would your cabinet guy charge you to mount the knobs and pulls? Looks like 16 hours @ $40 for $640 plus tax for a total of $700. Add $500 for hardware, and you have instant heartburn. So Saturday looks like grouting and trim for the shower faucets (then a shower), and Sunday is more knobs and pulls.

Nancy continues to souldier along with the boxes piled everywhere in the house. At least they are in their respective rooms. By Friday the kitchen, living room and dining room were box free, and the pantry had about 50% open floor space. John Plake of Home Storage Solutions (Stor-X cabinets, Vancouver, Canada) came by on Thursday and installed our storage in the closet. Overhead poles, shelves, and pull out drawers. Quite organized, I'd say. So all the clothes and jackets are hanging up again, and I can actually find something to wear other than my usual T-shirt and mortar impregnated Dockers.

By next week, we might actually try to pull some weeds, lay some more irrigation pipe, and plant some more shrubby bushes. If it doesn't rain. Cheers at Day 562.

P.S., nice seeing you at the Safeway pitstop, Amy.

Tuesday, May 18, 2010

Finally in the house (Day 559)

Hooray, we're finally in the house. Slept there last Friday (Day 555) for the first time, and each night since then. Its great to be home again. The rental home was great, but you never felt like it was permanent. After spending the weekend and part of Monday moving, we say we'll never do it (move) again. Next time will be to the old folks home or the crematorium, neither will all our worldly good, and boy do we have them. If we hadn't built a basement in the new home, I think we'd have a long term lease on some storage space.

Still doing the shower however. Today (Tuesday) I should finish the grouting and sealing, then my part is done. Although it should be job one, other things have got in the way; like moving boxes to the basement, recycling all the old ones, plus foam peanuts, bubble pack, and packing paper. Managed to recycle almost all of it, which is a good thing. We'll unload the moving boxes on Craigslist (cheap or free, which always goes fast).

Got the internet installed (obviously), but not without several hours of phone calling. Seems like our great regional phone company—Qwest— doesn't service our subdivision for internet, although they advertise all these great services. I guess their buried phone line isn't up to snuff for internet and they're not about to lay new ones, maybe ever. Land lines are a thing of the past, everyone tells me (except when you are in a cell phone hole). So we have several internet options: Local cable company (Broadstripe, out of Michigan--not so local), Verizon and Sprint LANs (a mile from us), and satellite (Dish or Direct TV). Since I'd laid the cable line to the house, that seemed like the logical choice. I don't care for LANs (security, intermittent service, and Verizon's cells don't work at the house), and haven't heard great things about satellite access.

Broadstripe showed up in two days (Monday), hooked up a temporary line from their box to the street side of my line, made up a junction box on our service panel, installed the cable modem in my media panel, and got us on line in about 2 hours. Now I need to get a router so we can have multiple ports active. No big deal, just a trip to Best Buy. Need shorter ethernet cables and a few USB extension cords, so a trip to Silverdale is in order.

On Wednesday, Peninsula Shower and Mirror (Sequim) is coming to install our glass door for the shower. There is a panel on the left and an in-out swing door on the right, both made from 3/8" tempered glass. Each piece probably weighs 60-80 pounds, so you don't just toss them around. The panel mounts in a 1" channel and the door has two robust hinges that mount on the right side wall. We ordered rain glass (texture on outside) to match the pocket doors in the bath and the window glass in the toilet room. Should look nice when its all done; even better is that we can stop going to the clubhouse for our showers.

John Plake of Home Storage Solutions (PT) is coming Thursday to install the closet cabinets. Brian and I had built a temporary clothes hanging system in the closet which has served its purpose, so that will come down Wednesday night. Its a 2 day install, so all the clothes need to hit the floor in the living room. Unless I've missed something, this should be the last subcontractor we need on the house. We can handle everything from here on, which basically involved tiling two more showers, one bathtub, a bath floor, building some custom cabinets (in the den) and beater cabinets for the shop

This will probably be the last regular posting since we are FINALLY IN THE HOUSE. I suspect my previous estimate of 750 days to complete the house (which takes us out 6 more months--late fall) is pretty close. That is basically 2 years from ground breaking, much longer than a contractor would have taken, a bit cheaper , but not nearly as much fun & frustrating as doing it yourselves.

Best regards, Michael and Nancy Machette.
May 18, 2010.

Sunday, May 9, 2010

A tile a day keeps the movers away (Day 550)

A tile a day keeps the movers away, at least that is the way its working out. Still cutting and laying tile in the shower, but I've got the hard parts done with the drilling of holes for the shower valves. Porcelain tile is hard and brittle, so you have to be pretty careful.

I made a cardboard template for the valve placements, traced them on a tile and went at it. The bottom (temp) valve needed a triangular hole about 4" in diameter, and the top (on/off) valve needed a simple 1 1/2" hole. I bought a diamond core bit for the drill, set it up on the tile saw (as a water source) and drilled away. As long as the bit is wet it will cut like its in frozen butter. A drill press would be best in order to keep the bit from skipping across the tile, which ruined my first attempt. After I got the technique down, it was pretty straight forward. Once the corner holes were in place, I used the tile saw to cut out between the holes. To do this you lower the running saw down into the tile and cut the face side. Then turn the tile over, and do the same. If everything connects, the center part will drop out. Bingo. The single holes for the on/off valve and shower head (later) are a piece of cake.

Once these custom pieces were done, its strictly a matter of cutting and laying the remaining tile. I have about 20 (of 70) tiles to go, the upper part of the inset box, and the sill at the front. The sill will be a bit tricky in that narrow pieces are used to face the front and back, and two bull nose pieces will face the top. The seam down the middle will be hidden by the shower door, which is scheduled to go in around May 20th. So it looks like we'll be using the shower with a curtain, not door for a week, but that is no big deal. Beats showing in the sink, which Jefferson County allows by code (go figure).

Nancy caulked and grouted the marble back splash in the pantry yesterday, so that room is COMPLETELY FINISHED. That is the first room that is all done. She's already shelved about 200 of her cookbooks, with another couple hundred to go. Biggest decision here is which make the pantry list, and which get delegated to the basement.

Its Mothers Day, so we're heading out to brunch at Nemos, then up to the house in the afternoon for more tiling. Jim Quandt (Jim's Tool Time) wants his saw back, so I need to layout and cut all the remaining tile. I don't know why he needs it now, I only borrowed it in late January.

Tuesday, May 4, 2010

We'll need a shower (Day 545)

The liquid kind, not a rain storm. I'm under the gun to get tile up in the shower for the master bath, since we'll need shower facilities the day (or night) we move in. We can take them at the clubhouse, but that is a hassle. I laid the floor of the shower on Sunday afternoon, and it went well. Using the Wedi shower pan made things go quickly. With a 3' by 5' base, the drain is exactly centered. So when I laid out the 2"x2" tiles for the floor (in 1' x 1' sheets), all I had to do was cut 4 tiles (4"x4") out of the center for the drain. Piece of cake. My only complaint about the Wedi board system is that the board is not pervious, so it takes a while (like overnight) for the mortar to set up. With cement board, the moisture wicks into the board quickly so you get a fast setup (ca, 1 hour). Your best bet with Wedi is to tile in the am, then clean mortar from the gaps and wipe up excess mortar in the afternoon.

On Monday I tackled the wall tile for the shower. This is more challenging than floor tile by a long ways. In addition to keeping all tiles perfectly square, you have to keep them on the wall. Normally, the suction provided by the cement-based mortar is sufficient, until you get to an open edge, like on the inset (for shower items) or the bullnose pieces for trimming out the edges.
The key is to getting the top edge of your first line (the bottom row) of tile exactly horizontal. To do this, I used my laser level and put a line about 22 1/4" up the wall, which is about 1/4" above the second row of tiles. The tiles are 13" square, but the first row is cut down to 9" so that the top and bottom rows match. (Its a basic law in tiling that you center the tiles were possible.) So, 9" + 13" = 22". Put a line of blue masking tape around the entire shower, then used that as a horizontal base line. The bottom line had to be custom cut since there was about 1/8" fall across the back of the pan (a result of buildup of caulk in the corners). No worries, it came out fine and after the first line the spacing was set for everything from there up.

On Tuesday I tackled the alcove (recess) that is built into the wall. This is for shampoo bottles, shavers, soap, etc. I had blocked this out earlier, and just made the Wedi board wrap into and out of this space. However, it complicates matters a bunch since you need to place the tile into the alcove first (tile outward, not inward) but the seams need to align with the field tile. So you do some alcove, then some field tile, then some alcove, etc., until you get to the top of the alcove. Then you hope (and pray) that the field tile on both sides of the alcove align perfectly for the top row. We'll see about that later in the week.

Also to be done this week is the installation of the instant hot water dispenser (thanks Ann Bambrick), setting the rock countertop in the guest bath, and finishing off the low voltage electrical so we have TV, phone and internet when we move in. We've already started to move boxes into the house (basement mostly) when our son Tom was here last weekend. About 50 down and 100 to go, plus furniture, kitchen stuff, and clothing. Life is accelerating.

Sunday, May 2, 2010

First Pie outta the Oven (Day 543)

Taking the weekend off because our son Tom and his girlfriend Jenn are in town for a visit. Its his 25th birthday soon and an opportunity to get together, since they live in South Dakota, 1500 miles to the east of us.We took in the Opening Day Boating ceremonies for Port Townsend and saw a nice boat parade with spirited winds in the afternoon. That night, Nancy constructed one of her near famous apple pies (too bad Mr. Bill) and we christened the Wolf double oven. 425°F for an hour and perfectly done. She's happy, so I'm happy.

Not much more to report, except we only have 14 days left before we move in. YIKES. Got to get moving on tiling the shower in the master bath, finishing baseboard trim, and painting windows in the master bedroom so we can make a place to sleep and wash up. We'll start slowly moving some of the 150 unopened boxes from the Denver move into the basement of the new house, then deal with the big furniture, the kitchen equipment, and clothes as we get closer to the deadline. Hopefully this will be our last move until the mortician shows up at the front door.

Tuesday, April 27, 2010

Final Inspection (Day 538)

On Monday afternoon, after the ceremonial dance of the inspectors (when is he coming, did I miss him, will he make it today), ours showed up at 4 pm. Apparently only 2 of 3 inspectors were on duty Monday, which generally more requests than other days of the week. This is because any requests called in between Friday and Sunday will be scheduled for Monday. Nevertheless, he came and he approved. It was sort of casual. Jim (the inspector) strolled through the house, asked a few questions, said it looked good and with the stroke of a pen approved our house for occupancy. We still had to get the certificate from the county, but we're legal of live there now—538 days after breaking ground (Oct. 25, 2008) and about twice as long as Kala Point thought it should take anyone to build a house. Contractors yes, home owner/builders no. I suspect we waisted a few months of the 18, but there was no way we could have even finished it in a year unless we were strictly subbing everything out. Here is the list of major chores we did in building our house (in chronological order)

WHAT WE'LL HAVE DONE AT MOVE IN TIME
Staked out the house and marked all trees for felling
Installed basement and perimeter drains, and sump pump (in basement)
Laid 2300 ft of Pex tubing in the Warmboard, another 1000 ft upstairs for do it yourself radiant
Installed all the drain pipe (ABS) and fresh water pipe (Pex) in the entire house
Laid main lines for electrical, water, cable, and phone (in ditches)
Drilled studs and pulled all the wire in the house for electrical
Installed all the lighting (except 4 of 6 exterior) fixtures
Installed all the receptacles and a few light switches
Strung and wired all low-voltage circuits (TV, computer, phone, and cable)
Hung about half of the soffit (T&G cedar)
Hung all the exterior window and door trim (36 units)
Hand dipped about 5000 shingles (Nancy) and I sprayed another 2500 for exterior
Painted all the facia, soffit, window and door trim
Spray painted the interior of the garage and man cave
Finished all the interior fir window trim with brushing lacquer (Nancy)
Cut and finished about half of the other window and door trim
Helped mount the kitchen and pantry cabinets (about 35 units)
Mounted all mudroom cabinets (6 units)
Laid the cork tile in the pantry
Mounted 40 feet of maple butcher block counter tops in pantry and mudroom
Cut and laid tile in the kitchen, guest bath, sauna, and mudroom
Cut and laid tile in the master bath
Cut and laid tile in the master shower, including travertine shelves from polished slab remnant
Built door thresholds (4) to match hardwood floors
Put up American Clay plaster in great room (green) and dining room (gold)
Helped with the crown molding on the kitchen cabinets
Painted and mounted all the paint-grade trim and baseboard
Mounted all the fir baseboard
Installed all interior lock sets (20)
Installed all the appliances (except propane hookup to counter top range)

STILL TO DO (from now to who knows when)

1. Complete the upstairs bedroom; shower, tub, cabinets, toilet, sinks, ceramic tile and hardwood flooring, and base trim, as well as painting of trim (most of upstairs).
2. Carpet the stairs and closets.
3. Build cabinets (built in) and mantle in the den.
4. Build the mantle and hearth in the living room, plus add rock to that wall .
5. Complete the sauna and shower in guest bathroom (first floor).
5. Put down some sort of flooring in the man cave and add base trim.
6. Build cabinets and table in the wine cellar.
7. Complete the landscaping.
8. Build my Pygmy kayak.
9. Take a nice vacation.


THINGS WE PAID FOR (aka the "heavy lifting")

Tree clearing, excavation, and grading
Foundation and slabs, forming and pouring
Framing, installing windows, and 5 exterior doors
Insulating
Drywall and painting interior (primer and final coat)
Cabinets (purchased assembled and delivered to site)
Hardwood flooring on first floor (red birch, tung oil finish)
Crown molding in kitchen

All in all, I suspect that we saved about 25 percent by being our own contractor. Of this, the majority was from our labor (15%) and the remainder (10%) was from doing our own contracting and researching/purchasing of supplies. We avoided subcontractor markups on materials and appliances by doing this ourselves, using the internet for some lighting fixtures, all the cabinet hardware, Pex supplies, and other hard to find items.

Thursday, April 22, 2010

Electrical Passes (Day 533)

Sure enough, we passed our final electrical inspection on Wednesday afternoon. It was a bit anticlimactic since I knew exactly what had to be fixed and fixed it with Gary Estes' help (Craighead Electric). However, we got to play that "Chicken Game" with the inspection department, which is always fun. Electrical inspections are handled by the Dept. of Labor and Industries (aka L&I) out of Port Angeles, not by our county. So there is a whole different process and bureaucracy to deal with. If you call in the inspection request on a weekend, it gets logged in on Monday morning and assigned to an inspector on Tuesday morning, unless of course there were too many requests for that day (of course). After calling in to check on the date/time of our inspection, we were told that our inspector (Mike Anderson) had us as eighth on is list for Wednesday, probably in the afternoon. Well that narrowed it down to 12-4 pm.

I was helping a friend build a deck nearby, so there was no one around the new house as lunch time approached. Not wanting to miss and get charged extra for this appointment, I went to the new house and busied myself with miscellaneous chores, of which there are thousands. Nancy came back from picking up tile in Sequim at 1:30, so she got to house sit (and garden) while I went back to the deck job. Not a half hour later, here comes the inspector. Back to the house, just in time to see him finish and put the much hollowed "final inspection" sticker on the electrical panel. Woosh, we're ready to use some serious kilovolts now.

Hopefully we can schedule the final County inspection for Monday, April 26th. This is the even more sought-after "Occupancy Permit", which entitles us to a $6500 credit from Uncle Sam if we qualify by May 1st. Smells like furniture money to me. More later, Michael

Monday, April 19, 2010

For whom the bell tolls (Day 531)

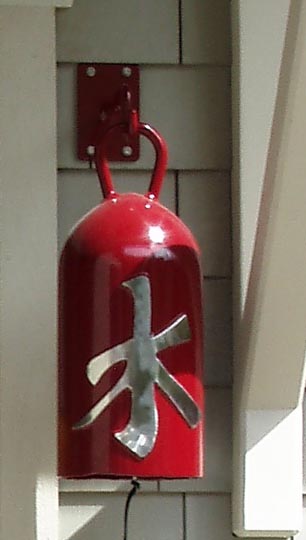
Us. When we went to the Tulip Festival in La Conner, WA, we saw these great bells made from old welding tanks. The artist cuts them from 7", 9", and 10" diameter tanks, welds a hook on the top and makes a hanger. Then he welds a hand-crafted Japanese character on the front, buffs it up (stainless steel), and tapes it off. Then it goes off to the powder coater and gets painted. They had a red one that was a close match for the windows, so we went for the artistic door bell, 7" wide and about 18" long. It has a nice earthy gong, if you chose to ring it (please). Its only money, but heck it looks good at the front entrance. The symbol means water, which we thought was appropriate for Kala Point and the Puget Sound.

The big dust up (Day 530)

Talk about a dust up. Not the confrontational type, but the big sander type. Mills Interiors' guys (Mike and Ivan) showed up at 8 am, exactly on time, and proceeded to take it down a few silly millimeters. They said there would be some dust so off I went to Hadlock Building Supply for a bunch of light weight plastic sheeting, 9 ft wide (ceiling height). I taped off the kitchen cabinets and appliances, the sun room windows, the fireplaces, and some other items that don't like dust. Closed the doors to the pantry and bathroom, and basically limited where the sanding dust could go. It turns out that not much dust was generated, but they did make two large garbage bags of sawdust (1100 square feet times several millimeters sanded off).

The floor sanding process was interesting, although I'd seen Ernie (S)anderson (ex USGS) do it to our hall floors in Denver 25 years ago. First they go at the floors with a drum sander (horizontal axis), sanding at about a 30° angle to the flooring. This allows them to cross grain and level out any high spots in the flooring. We're using No. 2 Red Birch, its knotty and has a lot of color variation vs. No. 1 which is more uniform (and monotonous). Some of our floors go 50 ft in one stretch, so monotonous wasn't what we were looking for. After the cross angle sanding with 40 grit, they go parallel to the grain with 80 grit. Now the floors are flat and smooth.

Out comes the filler. There are knots to fill, gaps between boards, and various imperfections—or as we like to call them—Architectural Features. Naive as I am after 18 months at this construction job, I offered to help them put the filler in. Heck I have two putty knives so this could speed things along—NOT. They whipped out a 5 gallon bucket of wood filler (a semi-liquid form) and proceeded to fill everything in one fell swoop with a 14" drywall knife. Sort of like frosting a cake for the Jolly Green Giant. These guys know what they're doing and are fast. They put the putty down in the master bedroom in about 10 minutes, and its about 250 square feet in area. I'd still be getting my little can of putty open to fill some knots. I've learned to just step back, watch, and learn now the professionals make money in these businesses.

After the putty dries (about 30 minutes, but depends on temp and humidity), they go at the floors again, this time with an 80 grit paper on the drum sander. When this sanding is done, they'll go around and find places that have putty wedges (a shallow spot) or spots that need additional putty, and then resurface these spots. After the 80 grit is done, they'll be ready to apply the first of three coats of finish.

While Mike and the drum sander were cutting away, Ivan was doing all the edges with the edge sander. Its basically a disc sander on wheels. He runs it along the walls and all the other edges, like where wood meets tile (see photo to left). The drum sander can get about 1/8" away from the walls, but can't get into the corners. This is where the hand work starts. They use a scraper for the corners, dragging it along grain to take it down to the level of the adjacent floor. After scraping, a rectangular orbital sander is used to get it to the 80 grit level of finish. The thresholds and bull-nose pieces are sanded with a small orbital or by hand, as required.

At the end of the day, everything was sanded with 40 grit and about half the floor had been filled and sanded with 80 grit. I suspect the are about 50% through the prep stage (7 hours work for 2 guys), so they should finish all the sanding on Tuesday and apply finish on Wednesday and Thursday. Mike Mills put down three finishes on some test patches. Two are water base polyurethanes and the third is an old world tung oil finish. We liked the look and feel of the tung oil, and the fact that its easy to reapply to damaged areas, so that what we're going with. In the adjacent photo, its the third (and farthest) finished patch. It tends to enhance grain and darken the wood more than the polyurethanes. When dry it will have a satin (non-glossy) finish and should fell good under foot since this will be a shoe-free house.

While all the sanding was going on Nancy did some gardening and I mucked out the garage. A couple hundred pounds of scrap wood was sliced and diced into kindling, the MDF scarps went into garbage bags for the dump, and a whole lot of dust was sucked up into my 35 year old Craftsman Shop Vac. I wish the damn thing would blow up so I could get a new one, but its going to have the best of my and make through this project just to spite me.

Tuesday, April 13, 2010

Kentucky Derby (Day 524)

We had our final electrical inspection today and it turns out it wasn't so final. We failed on 5 points, 4 of which are easily solved (time and $$) and one of which requires some sleuthing.

The easy stuff includes:
1) waterproof trim on all the shower and bath stall lighting cans (had one in and two sitting there),
2) enclosed trim on the closet lighting cans (never saw this coming),
3) an ungrounded metal receptacle in the master bath linen closet (add a ground jumper),
4) modify a temporary box to be function in the future upstairs linen closet,
5) fix receptacles and two lights that don't work in the basement and upstairs bedroom (I knew about the lights, but not the receptacles). This is an issue for the real electricians, Craighead Electric.

So now the rush is on to get the electrical fixed, rebook a final-final electrical, and then the final inspection from the county for our occupancy permit. Deadline, in terms of IRS tax credit, is April 30th. This is beginning to feel like the Kentucky Derby, which coincidentally, runs May 1st.

Sunday, April 11, 2010

10 Best and Worst (Day 522)

As we approach the end of this project, it is worth reflecting on the best and the worst things that happened in the past 18 months. If you've done this in the past, I'm sure you'd have a different list. If you are contemplating building a house, take a close look—at both lists.

10 Best Things about building your own house (no particular order).

1. You get it your way.
2. You have plenty to do for a year or two.
3. You learn tons about the construction business, woodworking, and other crafts.
4. You get connected to a whole different culture than you normally would (for us).
5. You get an enormous amount of pride from having built a house, with your hands
6. You meet a lot of interesting people, many who become true friends.
7. If done right, you get way more (+25%) for the same price as buying.
8. You know exactly how everything was done and where things are (plumbing, etc).
9. It can be a hell of a lot of fun, challenging, and rewarding.
10. You can find any room in your sleep, even if its pitch black & even on the first night there.


10 Worst Things about building your own house (no particular order).

1. You can really screw up and even loose big money.
2. You can kiss off a vacation for a year or two.
3. Expect a lot of discussions (some heated) with your building partner.
4. Even though you think you can have it your way, you can't. Compromise is the best you'll do.
5. Expect some sleepless nights as you worry whether something was done right, or at all.
6. Even though friends say they'll be there to help, you're on your own. The best help is hired.
7. Expect to get hurt, injured, or maimed. If not, you've been really lucky.
8. You know exactly where every booboo is in your house.
9. Whenever someone says they built their house, you doubt it (or ask for endless details).
10. You can sleep in your car, but you can't drive your house (that would be an RV).

Thursday, April 8, 2010

Wolf in the Hole (Day 519)

Nancy's big (30") Wolf double oven has been residing in the garage since last July when we bought it from Fredrick Appliances in Redmond. Last week, Bill Craighead (Craighead Electric) wired the 240V, 50 amp box at the rear of the oven case, so it was my job to throw that Wolf in the hole. Easier said than done.

The case measured up as a tight fit (height and width) but this is a common problem. Sometimes you have to grind a bit to allow screws to pass the side rails, but we had a bigger problem. Medallion Cabinets, the company that built the kitchen cabinets, screwed up and built the case an inch short in terms of depth. The plans that The Kitchen and Bath Studio (Shelly Little, Port Townsend) submitted clearly showed the case to be 24" deep, but they built it at 23 1/4". So what is the problem you say. Well if the back to the cabinet was flush against the wall, you'd have to cut the entire back out, the 1/2" of drywall, and take another 1/2" off the studs.

Luckily, we'd put a pony wall up to hold the cabinets away from the wall to allow a deeper counter top (28"). So we had some space to deal with. However, it was an ugly process. First I took the circular saw to the back of the cabinet, which left a 1" rim around the sides. Then the portable planer came out to reduce the left side to 1/2" and the bottom to flush with the oven base. In addition, the front had a 1/8" reveal on the oak trim piece, which induced a backward (at top) tilt to the oven when installed.

On Monday, three of us (me, Darrell Olson, and Jim Quandt) lifted and attempted to install the oven twice, to no avail. Did I mention that the double oven weighs in at about 250 pounds. So we retreated and tried a new approach. Built a bench the correct height, get the oven up onto it, then slide it in the hole. I found a bench that would work, so on Tuesday we went at it again. In once, out for a bit more trimming, then back in to its final resting place. I hated like hell to chop up the oven case, but none of my butchery shows so I guess only us and the readers will know what happened in the long run.

Long story short. Its in the case, wired, and ready for testing. I think a batch of biscottis would be an appropriate test--right Nancy?

Elsewhere around the house I'm putting cover plates in place, cutting in low voltage boxes for the three TV locations, installing florescent lights in the basement, compressing the plaster walls (a long-term, hour at a time process), hanging doors (where they don't overhang the hardwood flooring), and generally cleaning up. The door in the adjacent photo is a Simpson with narrow reed glass; its in the guest bathroom off the kitchen (green plaster wall). Next up are inspections, then initial sanding and sealing of the hardwood floors on April 19th (Mills Interiors). We plan to start moving in after Mothers Day (May 9th) and to be entirely in the house by May 15th, when our rental lease expires.

Monday, April 5, 2010

Approaching approval (Day 516)

Last week was sort of a wash since I had to go to Idaho to be a paid geologist. I'm starting to think in terms of what these jobs are going to become. For example, if I do this job we can lay carpet in such and such a room. Or perhaps hardwood upstairs. Take about being a geopimp!

Anyway, Idaho Falls was lovely as usual. Overcast. 38-40°F, and snow the last day. Saw the inside of the same conference room for 16 hours and discussed technical dribble ad infinitum. Heck, they pay me to sit there and talk once in a while, so who's complaining.

So since the last post I've been working on our punch list for the occupancy permit and Nancy the painter has been finishing the maple counter tops. All done now, wonderful, even the one next to my man sink in the garage.

Our large list (see Day 486) is down to four items. No. 1 is completing the appliance installation (double oven and refrig) and putting lights up in the basement. No. 2 is the stair railings. Just have to get my courage up to drill 12 holes per stair rail and hope I hit the studs. No. 3 is assemble all the appliance manuals, and no. 4 is to find and have the insulation specs for the house. The electrical issues will be solved tomorrow by Gary Estes, my electrical guru, who is coming by to help install the appliances and lights. No. 2 is just a matter of getting Nancy to hold the railings while I drill their mounting brackets.

Meanwhile, the fir trim is begging to be sanded and finished, which will take a few days. The plaster still needs some attention in terms of being compressed, and the wood floors need to be rough and fine sanded, probably in a few weeks (Mills Interiors).

If all goes well, we'll have our occupancy permit in about 10 days. The IRS deadline for the $6500 house repurchase credit is April 30th, but I don't want to cut it too close. Money talks and everything else walks, as they say.

Tuesday, March 30, 2010

Big progress today (Day 510)

Bob and Josh Brown (Bob Brown Plumbing) arrived at 9:30 on Monday morning, tools in hand. I decided to bite the bullet and have them do the final installation of the faucets, toilets and drains. I figured it would take me a week to do these since there are 2 toilets, a urinal, 6 sinks (drains and faucets). In addition, they plumbed and installed the dishwasher and the much-hated air-gap device. This is an obnoxious little breather cap that Jefferson County requires to be mounted on the countertop. The City of PT doesn't require it since most (all?) new dishwashers already have such a device built in. Nevertheless, we need it to pass the next and final inspection, so in it went. In addition to all the plumbing work, which was finished at 2:30 pm (5 hrs, two guys!!), I mounted the finished, but not-waxed, maple countertops in the pantry, since the farm sink has to sit on top of the counters. They look be'ute't'ful, as Billy Crystal would say. Off to Idaho for some geology today, then back to it this weekend. Getting close to our IRS deadline, so it will be a full-court push in April.


Saturday, March 27, 2010

Thanks, but no thanks (Day 507)

Some unknown person has posted a couple comments in Japanese(?), which aren't really helpful. So I changed the comments section to only allow registered followers to post comments.

關鍵字行銷 網路行銷 軟體行銷 搬家 活水機 濾水器 淨水器 1069 GUCCI GUCCI包 GUCCI包包 LV包 LV LV包包 除腳臭 自慰器 情趣用品 情趣商品 跳蛋 按摩棒 高雄監視器 監視器 監視器材 監視攝影 網路創業 當鋪 當舖 流當品 特賣會 團體服 免費廣告 佛具 加盟 臭臭鍋 加盟 火鍋 期貨 婚紗 情趣用品 情趣 女人徵信 女人徵信 女人徵信 女人徵信 女人徵信 減肥 豐胸 整形 電波拉皮 雷射溶脂 飛梭雷射 私密處保養

Spring has sprung (Day 507)

Spring has sprung. Officially it was a week ago, but the plants say it was yesterday. That is when the bright red Rhody that we planted last fall bloomed, big time. Its twin to the side is a few days late, but by the end of the weekend they should be out in all their glory. Rhodys however, can bloom just about any month of the year depending on their species. The big bloom usually happens around the end of April, just in time for the Rhody Festival in Port Townsend (May 10-16).

Today, I'm laying some more irrigation pipe (3/4" and 1/2" polypipe) for the drip system that will keep the trees and plants moist during our 3 dry months (July, Aug, Sept). Just insurance in case we take a long vacation during the summer, which sounds like a better idea by the day.

Thursday, March 25, 2010

Plastering, second round (Day 505)

After a week of resting my arms, Brian and I attacked the plaster wall for round 2, using the porcelina (clay). This goes on much smoother than the loma (sand) plaster and looks good when it dries. However, in order for the plaster to be hard and not chalk off, you need to compress it, which means wetting it up and troweling it back and forth with mild pressure.

The porcelina went on fine. Did the green wall first and had a gallon of mud left. So I cut back for the gold wall and had to really skimp to make it cover all the surface. It worked in the long run, but I wish I'd made 5 pounds more plaster for backup. Since I know the mix formula, I can always make more but that is a pain in the ___ and the color could be slightly off. We'll cross that quagmire when we get to it.

Did a bunch of other things this week and fiddled with the clay plaster. Added a metal shield to the garage attic ladder cover, which is a code issue (fireproof ceilings required in garages). Got the fan motor fixed since it was DOA. Turns out to be a bad rheosat in the hood. As low settings there wasn't enough voltage going to the motor to turn it, so it made some bad sounds and smells. Replaced the motor on warranty and racked up the rheosat. All is well and the Best Appliance people were real good about the work.

Nancy has been sanding and finishing the Eastern Hard Maple countertops that Bill McCutcheon made for us. I'd bought the wood at Edensaw, a local hardwood supplier that does a fantastic business in the marine trades here. They had too much maple (6000 bd ft) so they marked it down from $7.50 a foot to $3.50 a foot (less than half price). Couldn't pass up that deal. After Bill was done gluing up the board, planing them down and running them thru his big sander, we come out with about 27 ft of counters for the pantry, and another 11 ft for the mudroom desk. That works out to be 38 linear ft (75 sq. ft) for about $1350, or about $35 a linear ft. That is cheaper than any rock you can buy and about half the price of store bought butcher block tops. Another good deal realized, for a change.

Cut a bunch of paint grade trim to size for the closets, but will wait to install after flooring goes in. Brian came by for 6 hrs on Wednesday and worked on more doors. Since the plaster is all up, we mounted the trim on the guest bath, pantry and bedroom doors. The natural fir looks great against the clay. We also mounted the double pocket doors in the bath/bedroom opening. These were a bit of a pain to get square and level, but it worked out after a couple of hours of fiddling. So now all the doors downstairs have been hung with the exception of the fire-rated garage/mudroom door (don't want to damage it). Finally, today I finished the trim work on the pantry. Completed the toe kick by adding 1/4" plywood cover to the cabinet bases. The toe kick has to be above the floor so that the cork can expand and contract. Elsewhere in the pantry there are fir baseboards over the cork tiles and some L shaped fir trim on the edges of the cork-covered platform for the washer and dryer. Looks good, now just have to find some big monkeys to help lift all the appliances into the house from the garage.

Tomorrow I need to grout and seal the bathroom tile so that the plumber can come and set the toilets in place on Monday. To speed things along, I've asked him to install all the faucets and plumb the sinks so we can pass the Occupancy inspection in a couple of weeks. Once the plumbing and appliances are in place, the only stickler is the handrails which are made and finished, but not hung. Waiting for a box of hardware, then we're good to go.

Saturday, March 20, 2010

Day 500 (March 20th)

Today we've been building the house for 500 days and we're still not done. Seems like less, but the calendar doesn't lie. In the long run, I suspect it will be more like 750 days or two full years, and then we'll still have a punch list of things we'd like to do (more built ins, back yard, etc). Our move in date is set for the week of May 8-15 ; this is driven by the lease on our rented house, which expires on May 15th. We'll need a couple days to move and a couple days to clean up, so in essence we have about 6 weeks to finish the house. Hope to have the occupancy permit by Tax Day at the latest since there is a $6500 credit we can qualify for as repeat home buyers. So the next month will be crunch time for those remaining occupancy issues: mainly the appliances, stair rails, working bathroom (toilet), and garage/mudroom fire door. We'll hang the door then remove it after the inspection so it doesn't get damaged when we move furniture in. The more I do this building thing, the more it feels like graduate school. Maybe I can get my doctorate in home construction from the University of Phoenix.

By the way, our visitor counter is at about 5500 (thanks for all those eyes). Son Tom set it up in Nov. 2009 at 500 views, so it didn't look like we just started the blog. I'd already been blathering on for a year, so that means we've have 5000 hits in about 5 months or 1000 per month. No record for sure, but someones are watching us. Cheers, Michael

PS. First on the job accident other than bumps and bruises and sore muscles. The house has been pretty forgiving, but when stupidity enters the equation anything can happen. Tim Hamm and I were setting up some binder boards for gravel walkways in the front of the house. I was holding 2 ends together and screwing them together with a 1.5" drywall screw. Yeep, the screw went through the two boards and firmly attached them to my left index finger. Hurt like hell and then I had to use the power screw driver to detach my finger from the boards. Nice clean entry about 3/8" deep. So, my typing is off speed a bit now.

Thursday, March 18, 2010

Master Bath Tile (Day 498)

Finished up laying the floor tile in the master bath yesterday. Relatively simple pattern (12" x 12"), but we cut the corners off some tiles to inset 4 pieces of 2" x 2" tiles (4" x 4" overall). In order to get the cutoffs just right you have to make a jig (plywood), then overlie it on the intersection of 4 large tiles. Once you have your cut offs marked, you set up the tile saw with the 45° guide and a stop and cut away. Cut the first four a little small, check the overall dimension and then recut if needed. Once you get the saw setup, then cut all the corners off at once. We had 15 inset diamonds, so that was 60 tiles, or roughly 1/2 of the 125 we laid on the floor. The only tricky part to this job was fitting the tile under the jambs for the toilet room door. I had the tile cut and fitted, but forgot to put the left piece in before the adjacent tile. Then the tile wouldn't fit because the outside edge was elevated (resting on the adjacent tile). Luckily, I managed to pop the already laid tile up. Problem solved, but I might have cracked it in the process. I'd ordered 125 floor tiles and used 124, so there wasn't a lot of room for error. Next step is grouting. Nancy went over to Sequim yesterday to order the floor grout, as well as the shower tile and grout. So, within a week we should have everything here to finish the first (of 3) bathrooms in the house. Not looking forward to doing the upstairs one since it has both a shower and tub. That can wait until the summer.

Tuesday, March 16, 2010

You Know You're A Contractor If (Day 495)

Now, I'm not really a contractor (other than being our general), but some of the following ring true: Enjoy this one Ken and Steve.

You Know You're A Contractor If...

 1. Your dog rides in your truck more than your wife.

2. You wear specific hats to paint, grout, plaster, and cut trim, or to different stores (Carls vs Home Depot vs Seattle Lighting).

3. You have ever had to wash off in the backyard with a garden hose before your wife would let you in the house.

4. You've never thrown away a 5-gallon bucket.

5. You'll remember the square footage, pounds of nails required, crew labor rates and permit delays on a house you built, but cannot recall your wife's birthday or your anniversary.

6. You have used a Lee Valley catalog as toilet paper.

7. You have driven off the road while checking out a new house going up in your neighborhood. Even worse, you stop and interview the builder and subs, regularly

8. You have 'borrowed' gravel from the county road to fill potholes in your driveway.

9. You've used a 5-gal 'honey bucket' as a porta potty, for 3 months (which is why no. 3 is important)

10. You've used the same knife to exterminate vermin and peel apples; of course, you wipe it off so its clean.

Monday, March 15, 2010

Plastered all weekend (Day 494)

Yeep, we plastered all weekend. Brian (6'5" tall helper) and I hit it Saturday morning. I'd prepped the two walls (sunroom-gold) and kitchen-green) last week, taped off the trim and walls and laid plastic on the floors keep the excess plaster from staining the unfinished wood floor. The walls needed some "tooth" to them to hold the first coat of plaster, so they got painted with a latex primer with about 1 pound of fine sand per gallon. Same sort of mix you'd use on a porch to make it slip proof.

With calculator and kitchen scale in hand, I calculated how much plaster we'd need for the sunroom. American Clay advertises that a 50# bag of Loma (sandy base coat) will cover 200 sq. ft of wall. The 100% color was too much for us, so we started at 50% and it looked like shit (literally). So I upped the colorant to 66% and that was better, but the end result (when everything dried) as more like Gray Poupon. Its ok, but for the second coat (Porcellina), we'll go at 75% which will make the room "pop" a bit.

I mixed up 70# of loma using our bathroom scale to weigh the plaster. Then I weighed out the colorant, which comes in small bags. The Tucson Gold weighed 6.7 oz (190 g), so I needed 1.4x normal to get the right amount of color. Bought one of those little digital kitchen scales to weight it out; worked great. 266 grams of Tucson Gold and 70# of Loma. The bag says add up to 3 gals of water per bag, but I'd been warned that this would be too much. Right, we only used 11 qts (2.75) gals of water for 70# and it was a bit watery, so the right water mix is about 8 qts per bag. Your desired consistency is pudding: it should be stiff enough to hold a peak (like whipped cream) but not so stiff that its hard to trowel on (like peanut butter). With a bit of experience (like on Day 2), you can get it to pudding, remembering that you can always add water, but its hard to extract it (let it dry a day in an open bucket). Anyway, 70# mixed and off we went. I started in the sunroom and Brian started in the living room. Being a type A guy, I was slow. Brian whooped my ass on area covered, but my wall needed less refinement in the long run. You need a fairly smooth surface, complete coverage, and no buggers or divots. The leopard appearance on the gold wall is a result of uneven drying. The dark is wet, the light (final color) is dry.

The plastering went faster than I thought it would. An hour to prep and mix the plaster, 3 hours to trowel on the plaster (275 sq. ft), and an hour to clean up. Five hours total; I thought it would be more like eight. So Brian only got a half day of work in (no clean up for him)

On Sunday, we went at it again on the bigger wall, the green kitchen. Same routine of mixing, but a bit more. On Saturday we only had about 1 cup of extra plaster, so I mixed a bit more than needed (I thought). We had 325 ft to cover, so I made 85# of mud. The green color is Verde (green) Valley and comes in larger bags (290 g). We mixed this color at 100% (508 g) since the sample I'd made at EcoHaus in Seattle turned out to be just right for the room. And in the long run we had 2 cups left over. What happens is that you start to watch the remaining amount of plaster and the amount of wall and start stretching it out, recovering plaster from the floor (if clean and on the plastic). Its tough mixing a partial bag, so running out is not a pretty option.

The green wall went faster since we were now pros (with 3 hours of experience each). Knocked off this wall in a little over 2 hours even though it as 50 sq. ft larger. So now that we've done 2 large walls, I'd figure we can lay up about 100 sq ft per hour (2 guys). Brian is about twice as fast as I am, but I tend to handle the edges and he takes the main walls on. We're half way through, so I expect we'll have two half days of work next weekend, then another day to compress the final clay coat. I'll save that for a later post. Back onto tile in the bathroom this week. Its about 75% laid on the floor, then grout and sealer. Nancy will tackle filling the hundreds of nail holes in the fir trim, sanding, and patching the polyurethane finish. Sounds like fun, so no bitching from me on the tile.

Wednesday, March 10, 2010

The big bad wolf (Day 489)

He puffed and he puffed and blew the house down. NOT. We had the Wolf cooktop stove of Nancy's dreams hooked up today, and its sweet. Simmers so low you can melt chocolate chips on a paper plate right over the flames (no kidding). Levi Ross came over and hooked up the propane (15" flexible metal line), we plugged it in (igniteors), and turned it on. Presto--flames. Six 18,000 BTU burners; you can heat the house with this sucker!

Prepped the two plaster walls with latex primer and 16 oz of fine sand per gallon. Now we have 600 sq. ft of walls that look and feel like 100 grit sandpaper. Plastering is on the schedule for the weekend. Working on bathroom file in between, cutting the corners out of 13" tiles for 4"x4" insets. Kind of tricky until you get the jig made. Jigs are wonderful for anything you're going to do more than a half-dozen times, or if you don't have any patience or abilities to replicate your own work. Oops, got to go and watch The Middle now. Ciao. Michael

Sunday, March 7, 2010

The Occupancy Permit (Day 486)

On Monday, I ventured into the big town (Port Townsend) to have a little visit with the building department. These folks are actually quite friendly and helpful, perhaps a sign of the times. They are a fee-based county department, meaning that they pay their people and do business on moneys collected from building permits and other fees. They have $4500 of our dollars, so I don't really mind using up some of their time, from time to time.

I needed to get a better grip on just what needs to be finished to get an "Occupancy Permit." Its a pretty self explanatory permit; you get one and you can occupy you house. Simple enough, but what's on their magical list. About 25 items, some that seem trivial but most of which deal with health and safety. Here's what they need to see (abridged for space). X means we've already finished with these items (i.e., installed and operable):

X Smoke detectors
X Fan in laundry room
X Sheetrock taped and sealed
X Plumbing in and inspected.
X Septic system finaled
X Heating system working
X Electrical outlets covered, no exposed wires (including light boxes)
X Roof drainage system installed
X Siding on and painted or stained
X Garage doors installed
X Glass doors on fireplaces
X 911 placard (address) installed
X Exterior doors and threshold fit tight and are weather stripped
X Waterlines insulated in crawl spaces
X Hotwater pressure-relief value drains to outside
X All holes in drywall filled (pipes, wires, ducts, etc)
X Insulation certificate on hand
X All glass in hazardous locations is tempered
X All bath and whole house fans installed and operable

Yet to be completed:
Firewall between house and garage (still need to install the fire rated door)
Crawl spaces and attic access sealed with weather stripping (easy)
Stairs and decks have handrails (working on this now)
All appliances installed, operable, and manuals on hand (at the end)
Dishwasher must have air gap device (at the end)
One complete and operational bathroom (seemingly the big enchilada for us)

As for the remaining items, the last seemed most daunting until I asked what all needs to be in the bathroom. Its a toilet and a sink. Shower or tub is optional. They said that in a pinch, you can clean up (bathe) in the sink. Go figure.

Things you don't need to occupy a house:
Paint on the walls. Very many lights. Carpet or other covering on the floors. A tub or shower. Window coverings. Cabinets in the kitchen or bathrooms. Just those little things that make a house a home.

Looks like we should be able to get our Occupancy Permit in the next month and perhaps quality for a $6500 tax break from Uncle Sam. Oh boy, I'm getting excited about finishing up this little project.

Getting Plastered (Day 485)

The clay type, not the booze type of plastered. I spent Saturday March 6th with Brian (trim carpenter, soon to be amateur plasterer) at a 2-hour training session on clay plastering. Nancy and I had attended a full-days training in Santa Fe, which was great but it was 2 years ago. So it was time for a refresher. Brian and I went over to EcoHaus in Seattle via the Bainbridge ferry. Did I mention that he must have a tapeworm! Feed him a MacDonalds breakfast at 10 am, did a big lunch at 2 at the Pyramid Brewery, then he stopped for a candy bar on the way back. I figure the trip cost me more in food support than gas, but I need the big guy (see photo of him on Day 480 blog) to help put all that plaster on our walls. But I digress from the point of the day--plastering.

Our trainer was Middie, an attractive young woman from Seattle. Had been with EcoHaus for a couple years and had a degree in interior design. Who'd think that she could sling mud with the best of them. In a couple hours she showed six customers about the product, how to mix it up and apply it to wall, drywall sheets in this case. Luckily she asked if anyone had a special color in mind and I piped up with Verde Valley (light green) which we planned to use in the kitchen area. So she mixed up a 50 pound bag in a jiffy, and off we went.

American clay is an entirely organic product. Its composed of about 75% marble dust (binder), clay, and fine sand or ground up shells. The clay and sand is mined in New Mexico, whereas the marble dust is probably imported from Italy (their sources and quarry locations are proprietary info, so I'm speculating on the basis of my geologic background). The company is family owned and operated out of Albuquerque, NM; been around for 10-15 years I think. Check out there website (http://www.americanclay.com/our-clay) for info and pretty pictures of their product in use.

We'll use two types of American Clay. You always start with Loma, a sandy clay plaster that is the base coat. Loma has a sandy feel when applied, so we'll use a second, finish coat of Porcelina, which is smoother and resembles Venetian plaster. The nice thing about American Clay is that it has no lime (cement) content, so cleaning up tools, clothes, and adjacent surfaces is easy. Also the material isn't caustic to your hands like cement. On the eco side of things, the clay plaster generates gobs of negative ions, which is a good thing for controlling dust and other particles in the air. Their web site goes on with feel-good technobabble like : "Negative ions are believed to produce biochemical reactions that increase levels of the mood chemical serotonin, helping to alleviate depression, relieve stress, and boost our daytime energy." If this is true, I'll be one happy camper surrounded by 600 square feet of the stuff.

Another nice attribute of the clay is that its a hygroscopic material, meaning it absorbs water. In the Pacific NW this is a good thing. To what extent it does this is tough say. I'd had an argument with the trainer in Santa Fe back in 2008. This gal, who later left the company, told us that the clay absorbed 300 times its weight in water. My god, how could that be. Common sense never entered her little mind. Clay materials have a bulk density of about 1.2 g/cc but could go higher (1.5 g/cc) if compressed (like American Clay). That means that a sugar cube (1 cm) size block of American Clay, enough to cover about one square inch (7 sq. cm) in a layer 1/16" thick (the typical applied thickness) weighs 1.5 g. So stick with me here. You spread a sugar-cube size wad (1.5 g) of American Clay on the wall and it covers a square inch. To do a square foot (144 sq. in), you'd need 144 x 1.5 g = 216 g of material. There are 2.2 pounds per kg, so 216 g is the equivalent of 0.46 pounds. This makes sense since American Clay says one 50# bag of Loma will cover about 200 sq. ft of wall. OK, now back to the weight of absorbed water.

Your 216 g (0.46 lb) of clay covering that sq. ft of wall absorbs water with increasing humidity. If its foggy in the house, there is plenty of moisture to hydrate the clay. 300 x its weight in water means that one sq. ft of clay-covered wall absorbs 140 pounds of water, and that 1/16" thick layer must swell to about 18" in thickness. I have visions of a gooey mess. So what happened was that the trainer in Santa Fe mistakingly used x (times) rather than % (percent). Even after I pointed out the error and its common sense implications, she was reticent to admit the error and continued to claim the nearly miraculous qualities of the clay. Obviously she'd been much impressed with mud packs and mud baths. OK back to the walls and plastering.

After we apply the Loma clay, we'll come back and top coat it with the Porcelina clay. This has little to no sand in it so it comes out with a smooth surface, much like a babys butt (so to speak). When its dried to a leather hard surface, you can burnish it with a steel or plastic trowel which gives the surface a special patina. So it looks like the next week will be dedicated to priming the soon to be plastered walls and laying the tile on the master bath floor. Stay tuned.

The Great Wall (Day 483)

Tim Hamm, hardscaper extraordinaire, is at it again. Nancy got ready to plant ground cover on the dirt berm that we build just above the drainage ditch at the front of the house. I'd been worrying that the berm would just melt away with time and eventually end up in the ditch. So I asked Tim to build a small wall along the front of the berm, something stylish and 18-24" high. It would go about 60 ft across the front of our lot, from near the driveway to our large (50 ft) Madrona tree.

Last week we ordered up 5 tons of basalt boulders ($190), mainly 1/2 and 1 man sized with some smaller stuff for chinks. In addition, I picked up about 3/4 ton of greenish glacier mist boulders ($120), which appear to be some sort of metamorphic greenstone. The guys at these landscape places (Blake Sand and Gravel, this time) are completely brain dead when it comes to rock type. Glacier Mist, Greenstone. At least they both start with G and have about the same no. of letters. Granite and basalt, those they know. Perhaps slate and sandstone, but past that point they don't have a clue. Good enough for contractor work as they say.

Anyway, Tim put three days into the wall and has it about 95% complete at a cost of about $800 rock included. We'll need to get a couple of yards of top soil to back fill the wall, then my lovely gardener can get on with planting the ground cover. Just a little diversion from the real task at hand--get the house finished and move into it.

Sunday, February 28, 2010

Multitasking Week 2 (Day 480)

This seems to be the mode now. Lots of tasks going on at the same time, so nothing actually appears to be happening. Brian came back for more trim work, of which there is lots. Lets figure this out. He and Nancy are working on the vertical grain (VG) fir, which trims out most of the doors and windows downstairs. I count 13 doors and jambs. Nancy finished the windows (mostly) in the winter, so we won't deal with those. Each door has 6 pieces of trim: 2 headers and 4 side pieces. That means there are 78 pieces of vg fir to sand (three times) and apply polyurethane (3 times). So then you have 468 actions (sand and paint). Add the doors and jambs (26 total). Its about a weeks work for Brian, which is good for him but bad for the pocketbook. But who said progress is cheap (was a liar).

So what the heck did I do while the worker bees were making honey. On Monday I trimmed out the ladder opening for the man cave and prepped the windows in the cave for painting. On Tuesday I did some landscaping with Tim, planning and excavating for a rock wall in the front of the house. In the afternoon I was off to Sequim to pick up some more tile (sauna), paint, and 1200 pounds of greenstone boulders (hey, a geeeologist just can't have enough rocks on his property). On Wednesday, Nancy and I went to the Seattle Home Show to check out new stuff, but mainly to find metal hand rails for the two porches in the front of the house. Needed to find someone who was willing to paint them to match the house window trim, and we did. So this summer we'll get them ordered and installed. Its not a code issue because the porches are only 24" high (30" is the code requirement for railings). We also went to IKEA, which is the Costco of home furnishing and house decorating. Scored two sinks that were very reasonably priced, for a change.

Thursday was a complete writeoff in terms of the house. Had a Finance Committee meeting for Kala Point and got appointed (with my approval) to be the new CFO of our homeowners association. Not a big job now, but in July there are budgets to prepare. You know what they say: if you want to get something done, ask a busy person (BINGO). After a much needed lunch with the COOKS Group, wine and beer included, I was in the appropriate mindset to meet with the Port Townsend Pacific Marine Science Center, which I'm active in— in terms of Geology. I'm organizing a wine lecture and tasting in May as a fundraiser for them, so there are all sorts of decisions to make in terms of venue, budget, wines to be tasted, and publicity. I've tagged my old buddy Scott Burns of Portland to do the lecture--what a guy, and he is free. Looking for 200-250 winos for the lecture; send any you know that have $25 my way.

By Friday, I was anxious to get back on house jobs. I unboxed the IKEA farm sink that Nancy bought for the pantry. No problem says the instructions, just drop it into their specially configured sink base, which we don't have (and didn't want). Ok, just a few modifications to make. Like, cut the front and back of the cabinet away, build some new supports for the now butchered cabinet, and recut the face panels to wrap around the farm sink. I think I spent about 6 hours on this little chore, which (if I'd had paid to have done) would cost more than the sink. Enough bitching. It turned out great and its ready to place, as soon as Bill McCutcheon finishes the wood counter tops.

Saturday was back on tile. Someday last week I cut and placed the remaining tile in the sauna, so all I need was some time with my lovely spouse to do the grouting. Saturday it was. We were speaking to each other when we started the grouting, and even when we finished. Small miracle. Mission accomplished in 4 hours, but on Sunday we'll wet mop all the tile, hand clean it with rags, and apply the grout sealer. At this point we'll have about 60% of the floor tile finished in the house. Left to do are the master bath and upstairs bath floors (about 200 sq ft) and three shower stalls. They will be the killers, but we only need one shower operable in order to move in.

Subcontractors and Suppliers

  • Balco Excav. (land clearing, Bill Snyder)
  • Bill McCutchen's Mill (cedar trim)
  • Blake Tile and Stone, Sequim (Judy Reno, Eldorado Stone, Tile)
  • Bob Brown Plumbing (Bob & Josh Brown)
  • Boise Cascade joists (from Carls)
  • Carl's Building Supply (Mike, Melissa, Michele, Terry & Lawrence)
  • Castlerock Landscaping (Tim Hamm, Sequim)
  • Cotton RediMix (concrete and gravel)
  • Craighead Electric (Gary Estes)
  • Custom Hearth (propane fireplaces), Pousbo
  • Daltile (Seattle, Wedi board)
  • Discount Cabinets of Washington (Sequim)
  • Discovery Bay Materials (gravel, top soil)
  • Earl Kong (professional forester, PT))
  • EcoHaus (Amer. Clay Plaster, cork flooring)
  • Ellis Construction (Gary and Troy Ellis, framing)
  • Evergreen Products (Drywall, Sequim)
  • Fergusons, Seattle (Plumbing fixtures, Bud Allen Wright)
  • FInlandia Saunas (Tigard, OR)
  • Fitzgerald Concrete (driveway, Mike Fitzgerald)
  • Four Corners Nursery (trees, Port Hadlock)
  • Frank Feltes Custom Drywall and Painting (drywall and painting)
  • Frank Ward and Wayne Jobst (Stone masons)
  • Fredricks Appliances (Redmond, all appliances)
  • Giraffe Gutters (Dan Shaw, Chimicum)
  • Glass Etchings by Perrett (Jerry Perrett)
  • Hadlock Building Supply (bits and pieces)
  • Hardiboard, siding, backer board (from Carls and Home Depot)
  • Henerys Hardware (Cabot stain, misc. fasteners)
  • Hi-Tech Electronics (Audio & Media, Port Angeles)
  • Hide-A-Hose (Joseph, A-B Vacuum, Puyallup, WA)
  • Home Depot (electrical & plumbing supplies, interior paint)
  • Home Storage Solutions (John Plake, PT)
  • Hope Roofing (Pabco Paramont Advantage shingles)
  • Jim's Tool Time (J. Quandt, misc. carpentry)
  • K&D Concrete (Don McNeese)
  • Kitchen and Bath Studio (Shelly Little, cabinets)
  • Levi's Energy Services LLC (radiant design, vents, propane piping)
  • Meta Marble and Granite (travertine), Seattle
  • Michaelangelo (sepentinite), Seattle
  • Mikael Brostrom (Structural Engineer)
  • Mills Interiors (wood flooring, some tile)
  • North Coast Electrical (Electrical Supplies)
  • Olympic Garage Doors (Sequim)
  • Penisula Flooring (carpet)
  • Penisula Shower and Mirror (Sequim)
  • PexSupply (online plumbing and radiant supplies)
  • Puget Sound Power (and Atelco installers)
  • Richard Berg Architects (Richard and Darlene)
  • Richard Gifford Construction (septic, dry wells and grading)
  • Richerts Marble and Granite (countertop fabricators)
  • Seattle Lighting (lighting fixtures)
  • Secret Gardens Nursery (Sheila Piccini)
  • Shine Quarry (basalt for landscaping)
  • Sierra Pacific Windows (Rob Sorg)
  • Simpson Doors (from Carls)
  • Simpson Strong Tie (fasteners & hold downs)
  • Stewart Excavating (Mark Stewart, foundation)
  • Sunshine Propane (propane and tank)
  • Therma-Tru Doors (from Carls)
  • Tracy's Insulation (batts and blow in)
  • Trex Decking (from Carls)
  • Trussworks (roof trusses, Carl's)
  • Velux (Skylights and Solar tubes, Carls)
  • Versalam beams (from Carls)
  • Warmboard (Bruce Hull)
  • Wisbo Aquipex, Taco Pumps, Polaris tank (Sunshine Propane)

Followers

About Me

My photo
Professional geologist (USGS, 1972-2008), amateur home remodeler and now builder. Interested in sailing, all things involving salt water, woodworking, and food in general. Owner of Paleo Seis Surveys LLC, consulting in Quaternary geology and geological hazards.