Visitors to Date:

blog counter

Building a House in Kala Point, Port Townsend, WA

Building a House in Kala Point, Port Townsend, WA
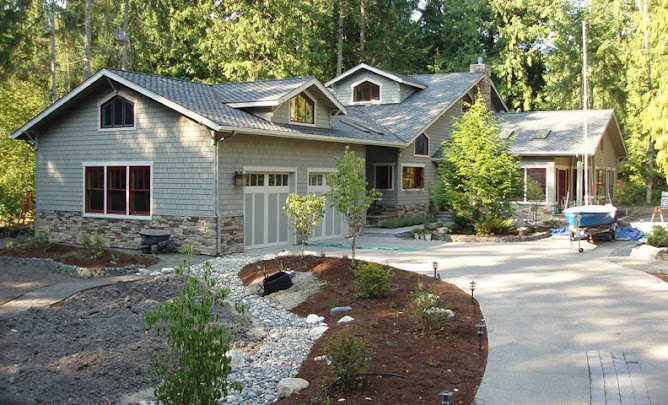
A running narrative of first-time builders of their retirement home in Port Townsend, WA (NE corner of the Olympic Pennisula, 60 miles NW of Seattle). Follow us as this adventure unfolds in late 2008 and beyond. 18 months under construction, we moved in on May 25th, 2010. Photo taken August 15, 2010.

Search This Blog

Wednesday, May 27, 2009

Multitasking (Day 224 of 273)

Multitasking—That's where you do several things at once, and none of them are what your supposed to be doing. For me that is Electrical, but some other things have been getting in the way. As you know from the header, we're at Day 224 of 273 and are only about 50% done so its looking like we'll have to extend our building schedule for about an extra 3 months. If I had 6 hands and three brains it might be a different story.

So the last week Nancy has been painting window and door trim with oil based paint (Cabot OVT, Cinder color). This is being driven by wanting to get the outside of the to a more finished state. One member of the architectural committee has already commented about our recent lack of progress, but he's only looking at the outside. They are oblivious to all the plumbing and electrical work that has happened and needs to be finished before we can move to the insulation and drywall, which are paid jobs that will go fast.

Over the weekend (a holiday for normal people) I finished mounting all window and door trim for the lower half of the house. We're getting ready to lay the Hardiboard on the back sides of the house, so all the trim and corner boards, and porch need to be in place. Troy Ellis (Gary's son) and I will hang the Hardiboard on Fathers Day, but at least I get to use my new nail gun (thanks Nancy and First Federal). Next I'll have to get the corner trim painted and nailed up. This provides a transition from the Hardiboard to shingles on the back corners of the house. There are also horizontal band boards: a basal one that the Hardiboard rests on and a belly board (about 10 ft up the sides) for the transition from Hardiboard to shingles above.

In preparation for the siding, I shot a level line around the whole house. This will provide a guide for the top of the rock and wood sill on the front of the house, and a guide for the siding on the back sides. I stapled up 30# felt (tar paper) as an underlayment for the rock, then will add a layer of metal mesh for the mortar that will hold the rock veneer to the house. With the felt up, the house is starting to take on more shape and feel.

So, instead of ploughing ahead with electrical it looks like we need to spend another week on the trim, paint, and exterior. The weather has been wonderful: 60's dry, with a lite rain every 4-5 days. No complaints in that department.

Gerald and Dottie Lee (Chicago) are stopping by this weekend on their way to a cruise to Alaska. Gerald was my best man 37 years ago, and we haven't seen them since 1994, when we stopped in Chicago on the way to the Adirondacks (Timbles place). Should be fun--and no building this weekend.

Monday, May 18, 2009

Lights on, anyone home? (Day 215 of 273)

Before you can run wiring for the lights, it turns out that you have to decide where those buggers are going to be. So, I started putting up the recessed cans (6" diameter lights) in the ceilings. These are the most affordable way to light a house and they're very discrete. In volume, the housings cost about $8 each, but then the trim kit (what you see) ranges from $5-25 each.

Nancy and I modified architect Berg's original lighting plan to our needs and whats. It turns out that we'll have about 50 recessed cans in the house. The highest concentration will be in the pantry (8), but don't forget about the kitchen, 2 bedrooms, 2 closets, and 3 baths. For the two rooms with vaulted ceilings, we used a version of recessed can for slopes. No big deal, they just cost 5 times as much ($38 each). We bought a dozen of these, which runs the total for overhead lights up to 60. Hell, electricity is cheap and we'll use the new CFL bulbs to save a few watts.

Now we need to make some more expensive decisions, specifically for directed and specialty lighting. For directed lighting, we need high intensity halogen spots (kitchen counter, hanging art pieces, etc) and for specialty lighting its the bigger ticket items, like hanging glass fixtures over tables and the kitchen island. We've looked at few lighting stores in Seattle and haven't been taken with any particular style or look yet, but we need to finalize this before I install the overhead boxes from which these lights will hang.

At the notorious Potato Bake (a Kala Point fund raiser chaired by my associate home builder), we met an interesting women named Karen Hoeve who lives about 2 blocks away. She is an interior decorator who specializes in Craftsman (Art and Craft style) houses, particularly lighting and color selection. BINGO. We invited her over last night to see some of her work and have a glass of wine; what a character and live wire. Hopefully she'll have some ideas upfront before we run the budget into the ground with consulting fees.

So, this week the main job is to install the overhead electrical and switches, all wire 14 gage wire. Meanwhile, Nancy has been hand painting our window and door trim with oil based paint (latex is for wimps), and I've been nailing it up. When all the trim is up, we'll be ready to start hanging Hardiboard with Troy Ellis, our framer's able son. Of course, I still have to build a little porch and steps for the back of the house door, so you don't walk out and break your neck from the 2 foot drop to grade. That little porch will take me a couple of days to do, since I have to pour a little footer for the 4x4 posts to rest on. Looks like we need 10 days in a week to get this house finished. We're already toying with the idea of asking for a 3 month extension on our Kala Point building permit, which would push the 273 days out to 365. You read it here, first.

Saturday, May 2, 2009

Man Cave Wired (Day 214 of 273)

Little bit late with this blog; for some reason work is getting in the way of blogging. Nevertheless, we're onto the electrical work in a big way. Gary Estes has been here and we discussed the general plan: he's doing the "get electrocuted stuff" and I'm doing the hole drilling, wire pulling, and box installs.

So it took a week of work on and off to wire the garage, but there was training time and other chores in there too. I installed four 220 v lines (table saw, compressor, welder, etc) and about 12 outlets. I think there are 6 circuits for these. Then I put in the overhead lighting on 2 circuits. Overall it wasn't bad, but it was slow. It will go faster in the main house area now that I know what I'm doing. One of the bigger problems is deciding how to get wire to all the places. You don't want to drill through trusses and try to avoid the big lumber (like 4 x 6 beams), so there is come creative routes from switches to lamps.

Wire sizes: This is pretty straightforward. For overhead lighting we use 14-2 wire (white). This means 14 gage with two wires and a ground. Wire gages are ass backward. 14 is smaller than 12, and bigger than 16. Sort of think about it as no. of wires that can fit in an inch, i.e., 14 gage is roughly 1/14th inch thick. 14-3 has three wires and one ground and is used for 3 way switches (we'll have a dissertation on this subject once I've passed my qualifiers).

For the plug in receptacles (110 v), we use 12-2 wire (orange). If you need GFI protection (as in garage by code), you install a GFI receptacle in the first outlet and everything downstream is protected. GFI receptacles are used where water within 3 feet of outlet, or where there might be standing water on the floor (garage). You can put as many as 8-12 outlets on a single circuit, since they figure you can't be running more than a couple of tools simultaneously.

For the 220 v. lines, we use 10-2 wire and have a single receptacle per circuit. For example, the 3- HP motor on my intended table saw would draw 25-30 amps at 110 v (too much for 12-2 wiring), but only draws half that amperage at 220 v, so you can supply power with 10-2 wire on a 20 amp circuit breaker. Problem solved, just more wires going to separate places.

For the front end of the electrical system, we have an assemblage of panels and shut offs. Power comes in the house from the street (ground transformer) through 00 cable (1 1/4 inch thick, 220 volts, 3 cables) and uses a piece of rebar tied to the foundation for a ground. This cable will be underground in 4 inch gray PVC conduit, then enters the garage wall through a 90° bend (sweep) that we placed in the concrete footer. Then it goes up and into the meter box, which is within the garage framing. The meter is externally mounted and gets read electronically from the street. From the meter box power is routed to a main shut off panel (interior) and then goes to two panels: one 200 amp in the garage (for boy toys) and one 200 amp in the basement for the house and girl toys (ovens, lights, etc).

After completing the garage and my basic wiring test (now I'm a rank amateur apprentice electrician), we took a week off to visit Denver and northern New Mexico on a mixed business trip and vacation. Managed to get our chili pepper tongues recalibrated and see a half dozen Denver couples for dinner and drinks. A successful trip, except for the excess baggage (personal weight gain) on the way back.

Now we've moved into the main house, putting up receptacle boxes and overhead (6" can) lights. 48 so far, with a few more smaller ones to be decided for lighting art work or specific parts of rooms, such as the kitchen counters and island.

Sunday, April 26, 2009

Factory Direct (Day 193 of 273)

For the last 6 months I've been watching an ad on Craigslist (not a masseur) for sawn cedar shingles. We plan on siding the front of the house with shingles and I had calculated that we have about 2400 sq. ft to cover. As with all shingles, they are sold in bundles, 4 to a square (nominally at 100 sq. ft). So we'd need 24 squares. But its a little more complicated. For cedar shingles, the minimum exposure for each shingle is usually 5", which gives 100 sq. ft to square. However, if you run the exposure at 6" the coverage goes up to 120 sq. ft per square. 6" exposure will look better on this house because its rather tall and will have a coarse rock belt line below the windows.

Therefore, we needed 20 squares (80 bundles) to cover the front and south sides of the house. We'll use Hardiboard planks (lap style) on the back side since they paint up well and handle moisture pretty well. I ordered 200 pieces from Carl's the other day, which should cover 1400 square ft. The price on this material works out to about $1/sq. ft, which is cheap for almost any kind of siding. Anyway, back to the shingles. Carl's best price on the shingles (all No. 1, blue label, blah, blah, blah) was $220 + tax for a square. That works out to almost $240 a square, but delivery is included (3 miles).

The Craiglist ad is for the A&A shake mill in Forks, WA, about 120 miles west of us and deep up in the rainforest of the Olympic Mountains. Interesting little town, currently known as the setting for the teen-flick Twilight, but I digress. Anyway, these little mills are on the brink of closure with wood demand and prices down almost 25% the last few years. They're dealing to stay alive. Their current price as $130/square (down from $145 last year) with no tax (don't ask) and 2% off for cash. Delivery would be about $280 from Forks, which works out to $14 a square. So my net would be roughly $145/square straight from the mill, no middle man. It was a deal I couldn't turn down. The garage of the new house is full of shingles and cedar trim now. Paint (stain) is on hand, so the brushes will be coming out soon.

Monday, April 20, 2009

Red, White and Blue (Day 187 of 273)

After weeks of ABS and its messy black cement, we're onto the the relatively clean job of installing the domestic water piping. Until a few years ago this meant ordering hundreds of feet of 3/4" (supply) and 1/2" (distribution) copper pipe, getting out your gas torch, and soldering it all together. I used to be a pro at this, but the last few years I've lost my touch and am actually intimidated by the whole process. To add to my angst, copper has become very expensive with China eating pipe like noodles—they're even buying mines in Peru to get guaranteed resources. Same strategy with cement and steel. They expect to build 40,000 miles of highway in the next decade, which is equal to ALL the highways in the USA.

Alas, Pex to the rescue. This plastic pipe has been about for about 30 years, and is used extensively in Europe. I think its introduction and acceptance in the USA has been impeded by the plumbers unions, mainly because its just too easy to install. Denver doesn't allow it, but the International Building Code (and Port Townsend) does. Whatever the reason, I'll leave the little bit of copper work we'll need to Bob Brown and do all the plastic piping my self. I started with the Pex on Wednesday (5 days ago) and had most of it done by Sunday evening.

We're running three main lines (i.e. zones). No. 1 is the hot water supply, which will be a closed, circulating loop. What I mean is that there will be a little pump & timer on the line that automatically circulates hot water every 10± minutes at the times of the day that hot water is used. For example, in our house hot water is used for showers in the am, for cooking (mainly dinner) and for laundry. Anyway, with hot water always in the main loop, any faucet is only 3-4 ft away and you should have fully hot water in 10-20 seconds. I used red Pex for this--makes sense (duh). What do you think about that, Mr. Sailboat? I know it takes 2 minutes (and wastes 3-4 gals of water) to get hot water to the shower next to Nancy's old bedroom in California (but you guys have way too much water anyway).

The second line is the cold water supply, but only for non-drinking purposes (showers, laundry, toilets, etc). I used blue Pex for this. We've isolated this cold water to eventually accommodate a water softener or high-tech filtration system which we might need, but aren't sure. The third line is the cold water potable supply (kitchen sinks and outside hose bibs). I used white (clear) Pex for this. We don't want to drink softened water or put it on the yard plants. However if we get a filtration system, then we'll just replumb the two cold water lines together and all is well.

So there you go: Red, White and Blue plumbing—quite patriotic . It has a Steve Cooley feel to it.


Contrary to my preconceptions, the domestic water part of the plumbing is way easier than the hard pipe waste and vent plumbing. The Pex flexs and can make gentle bends: you can bend the 1/2" Pex into a radius of about 4" and 8" for the 3/4" Pex. So you can snake it into and out of walls and floor joists and only need to drill holes about 1" in diameter, which you're permitted to do anywhere in an engineered joist. I have a variety of little plastic fittings such as elbows, tees, and connectors. You can have three 1/2" lines off a 3/4" line, so most bathrooms have a 3/4" line the passes beneath it with the shower, and vanity and toilet coming off that line.

The only ringer in this process is the Pex expander tool. This device (see picture of blue box) is used to expand the pipe so the fittings will fit. You put a collar on the pipe, and insert the expander and start pumping. It felt like I'd been to the gym when I got home the first day. Most homeowners would never have one becasuse they aren't for rent (only sold to Pex certified installers). But after installing 2,200 ft of Pex in the Warmboard, I felt pretty qualified so I ordered one from Pex Supply. After I'm done with the house, I plan is to sell it after to my radiant heating guy (Levi Ross, with lifetime occasional-use clause) or on Craigslist. It was $300 new, so if I get $150-$200 for it I'm way ahead.

Sunday, April 19, 2009

Drill Baby, Drill (Day 186 of 273)

Yes, I'm a big fan of Sarah Palin, aka "the Drill Baby" from Laska. Just think, if McCann had been elected, Sarah would be VP, and James Watts would be back as the Secretary of Inferior. I would have had to stick around the USGS just to keep an eye on these three amigos from hell. But I digress.

I had to drill some long holes for the plumbing the other day, so I unwrapped my heretofore unused Cully 18" Ship Auger (1 1/8" diameter). Strapped that baby to my Makita angle drill, and powered it up. The task at hand was drilling through a 2"x6" nailed to a 4" thick Versalam then through a Boise BC5000 engineered joist 3" behind. I wonder if Richard Berg or Mikael Brostrom have ever been behind the business end of this sort of drilling machine. Did I mention that the target was 9 1/2' off the floor.

So up the ladder I go with my two friends, Culley and Makita. I planted the bit, aimed it along the plumbing line and powered up. This bit chewed through the wood like a golden retriever going for a tennis ball. Within 20 seconds I was in clear air with wood chips everywhere. Mission accomplished. Did I forget to mention that if the bit hits something hard (like a nail) and binds up it will break your wrist(s). No broken wrist this time.

There was lots more overhead drilling that day, but mostly feeble targets like 2x6s and joists. Packed up for the day and headed home, feeling sort of proud of myself. Well by that evening I shoulders were a little sore, and by this morning I couldn't lift my arms above my shoulders. Fortunately Dr. Advil was in the room and we had a serious meeting: take 4 tablets three times a day and find something easier to do today. Looks like Sunday will be spent sweeping and cleaning up. More battles to fight next week. Drill Baby, Drill.


Next week: Yep, Gary Ellis built it and I'm boring holes in this house like a termite. Drilled through a series of 2x6 studs that sandwiched a 4x6 post and managed to get the drill firmly buried. Took about an hour to dig it out, but I got a hole all the way through it as shown in the second photo. Success comes slowly. Looks like an electricians job is about 1/2 drilling, 1/4 pulling wire, and 1/4 hooking it all up. I pulled my first wire on Monday; a series of four 240-volt lines for the garage using 10-2 wire. Also, Gary Estes (electrician) installed the meter and subpanels on Monday and I helped him pull 100 ft of No. 0 three-cable wire from the garage through the house an into the basement. The coil of wire weighed about 150 pounds and acted like an anaconda when we unrolled it. Yes, unroll or you're going to have a mess on your hands. We'll have a little tutorial on wire sizes later (gauge 0 is really big and 20 is really small, go figure).

Thursday, April 16, 2009

Hide A Hose (Day 184 of 273)

No this isn’t some kinky sex game from college (get your mind outta the gutter Cooley), but rather a neat central vacuum system that we’ve seen at home shows for several years. Hide A Hose (http://www.hideahose.biz/index.html) is a typical central vacuum system but its unique twist is the retractable hose. Central Vacs are popular because they are powerful and built into the house, either initially or as a retrofit. Those that have them commonly complain about the frickin hose, which can be 20-50 ft long plus the power head. Moving it around then storing it is a problem. Did I mention that its a local company, home grown and flourishing in Monroe, WA just across the water on the dark side of the sound.

Hide A Hose solved the problem by allowing the hose to retract into the vacuum tubing. Quite ingenuous, and pricey ($2500). But when the chief cook and dust demon (aka the Decision Maker) for the new house says that’s what she wants, what are you going to do ? (order it, and the urinal).

Since the central vac is built out of plastic piping (thin wall PVC), now is the time to install the system. In addition to the tubing, each wall inlet and toe kick pan is powered, so it makes since to do this right before the electrical goes in. Mike from Monroe (Hide A Hose installer) is coming over next week to do the job if we accept their estimate. I’d love to do it myself: if you don’t care about a warranty you can buy all the parts over the internet. Dr. Olsen of Denver installed his and he says it really sucked (the old house). However, to protect their margins, Hide A Hose and their dealers hide behind the warranty vale. Don’t even get me started on the whole Wolf, SubZero MSRP thing.

So for several thousand dollars (which everyone has too much of these days), they’ll install the tubing, power ports and central vacuum all in a day (see how hard it is). Then when the drywall and painting is complete, they come back to install the face plates and test the system. Seems pretty simple. Maybe I should become a dealer for them in Port Townsend (none here now). I could couple it with my mobile knife-sharpening business, and wrap it all under the “Slice and Suck” moniker (or We Slice, You Suck). Ken, are you looking for a good investment?

Monday, April 13, 2009

PPP (Propane Piping Plan, Day 181 of 273)

Interspersed with the plumbing chores last week, I worked with Levi Ross on the propane supply lines. There is no natural gas on the Olympic Peninsula, so your only choices for heating are propane (a derivative of natural gas) or electric. Propane is less efficient but priced better than electric, and it has its detractors. Mainly it’s storage and refilling, but also the fact that burning propane generates water (vapor). At full tilt, our propane boiler makes a quart of water every hour, so during the winter I suspect that we’ll make a couple gallons of water per day. Since the boiler is in the basement, we’ll dump the water into the sump pump basin (20 gals in the floor), then pump it up and out of the house, along with any water that has collected from the perimeter drain line.

We’re planning on a 500 gallon propane tank. 250 gal is more typical, but the rates are better on 500 gals and you only fill it half as often. Tanks (fuel bottles) are either above ground (leased or you own) or buried (you own), which is what we plan to use. The 500-gal tank is about 10 ft by 3 ft in diameter (think small submarine), so you have to dig a big hole, something like 12’ long by 4’ wide and 5’ deep. All that you see is a rounded top (the snorkel) where you fill the tank.

The hole for the tank and trench over to the house will be dug later this year along with the septic tanks, but for now we needed to place the propane pipe within the house. The basic strategy for placing parts in the house is least flexible to most flexible. You start with concrete and wood, then do to ABS and steel pipe, then finish up with electrical (extremely flexible). If you do a whole house vacuum, like us, that goes in after the steel pipe.

For all gas lines within the house you use 3/4” steel pipe for the main supply line, then T off it with 1/2” for the gas appliances. Levi brought over his pipe cutter and threader, and had 50 ft of pipe delivered. In addition he had a large supply of short threaded pipe (2”-12” pieces) and fittings (elbows, Ts, and plugs) plus shutoff valves.

We laid out the pipe, figured drops and risers around immovable objects (like beams and posts) then started cutting pipe to size. It took us about 8 hours to hang and connect the black steel pipe in, then another couple of hours to hook up the flexible gas pipe. You use the flexpipe to connect the appliances to the steel pipe, with a shutoff valve at the downstream end. The photo on the left shows the stub in for the Wolf rangetop.

We have a gas rangetop in the kitchen, two gas fireplaces, and a 60 gal boiler (hot water heater). The main fireplace is a see-through model (first introduced to us by home builder Steve Titus in Denver). The photo on the right shows the flex pipe which will connect to the base of the fireplace.

In addition, I’ll have Levi put a T on the outside line for a gas BBQ if we decide to add on in the backyard. Next thing to do at my end is to install the fireplaces in their framed boxes and either put the vent pipes in or hire it out. Will probably pay for this since we are running behind schedule and time is worth more than money right now.

Saturday, April 11, 2009

Wasted and vented, thank god (Day 179 of 273)

Its Sunday morning and I'm going over to the Church of the Holy ABS (not abstinence). Two more waste pipes to connect and this house will be able to transport a substantial waste unit (i.e. turd) from one of our three toilets to the perimeter of the house. Don't worry, we'll connect the whole shebang to the septic system when it gets built out in the summer (almost the last thing done).

I've learned a few lessons and fixed my screwups when Bob Brown (plumber) has been gracious enough to point them out. In the last couple of weeks I've been finding my own mistakes, and caught them in the layout stage so there hasn't been too much cutting and patching. Two things fooled me early on. 1) Tight bends are allowed only on vents (its only gas), so on fluids you use moderate bends (sweeps) for going down and long sweeps for going flat or changing direction horizontally. 2) Sinks are different than vanities wash basins. Sinks carry solid waste (coffee grounds, vegetable matter, etc), but wash basins are just for gray water, unless your cat has taken to shitting in them. In that case you need to train them to use the toilets. So for sinks the vertical exit lines are 2" pipe rather than 1.5". This caused me some grief and ripouts. As I've said in the past, the ABS pipe is cheap and what's time to a pig (a Pete Rowlyism). But that's all gray water under the bridge, as they say.

I finished plumbing the ultimate man-feature, a urinal for the garage. So you can build kayaks or do other projects all day long, drink beer, and never have to leave the garage (or enter the feminine sanctuary of the house) to take a leak. I suspect its the best $175 I've ever spent.

It was a mild day, so late in the afternoon Nancy and I had a picnic (wine and appetizers) on the beach. Four minutes from the house and we saw the bald eagles that nest there. Nancy's taken a liking to them, perhaps more than to me.

Saturday, April 4, 2009

Let there be voltage (Day 169 of 273)

On Friday (April 4th), we met with Gary Estes of Craighead Electric in Port Townsend. We got a line on Gary from Kyanne Anderson (see Day 14 blog), who built a house with her husband Roger over at the other sanctuary called Cape George Estates (another gated community, about 5 miles SW of Port Townsend). Kyanne did all her own wiring, so why couldn't we? We'll see.

Anyway, Gary is a friendly guy and a bit reserved; however, when he found out that I was a Mac aficionado he really opened up. He's the head of the local (Chimicum) chapter of the MUG (Mac Users Group), so now we had a common bond. Gary is going to lay out the wiring scheme (much like a the diagram for a wiring harness in a car), give me a materials list (first cut) and put the electrical panels in (a bit beyond my ability). He'll probably start in 2 weeks and we'll wire the garage first as a primer for my taking on the main house. After walking through the house and discussing our general needs and wants, we made some basic decisions and agreed to locate all the switched and outlets. We cut out pieces of poster board (3 colors) for the electrical boxes and stapled them to the walls. As we move about the house we'll jigger them around and see if the scheme makes sense. I don't understand the wiring of 3-way switches so we'll get a tutorial for these and other common practices in the garage.

I sent Gary the electrical plan that Darlene had drawn in AutoCad and exported as a pdf. Opened this in Adobe Illustrator and made a bunch of modifications on the basis of what we knew we wanted to change. Resaved the document and sent it to Gary. He uses a simple cad drawing program and uses my drawing as a template (underlay). Then he sketches out the wiring diagram coded with wire type. Who thought I'd become a mechanic for a giant auto that doesn't move (call it Kala Point Car). He also sent along the materials list and I opened an account at North Coast Electrical, a large supply house in Bremerton that delivers to our area (for free) several times a week. He says the prices will be as good as or better than Home Depot and we'll get first quality items (I presume this means no Chinese outlets or switches). Here's the list. Just for yucks, note that we'll start with 2,750 ft of wire (a bit more than a half mile). Pulling all that through 1" holes should be fun.

Michael-

Here is a list of material to get you started on your project. I left off the bigger wire, because that can be purchased by the foot either locally or at Home Depot.

1- bag, tan wirenuts
1- bag, green wirenuts
1- case of single gang nail-on boxes
15- 2 gang boxes
2- 3 gang boxes
5- Single gang face nail boxes
3- Adjustable single gang face nail boxes
48- IC-22 recessed cans (lights)
10- 3-0 nail-on boxes
10- 3-0 boxes w/ 16" bar hangers
10- 3-0 boxes w/ 24" bar hangers
500- Viking 100 staples
100- Viking LL staples
100- Viking 131 staples
1000'- 14-2 NMB wire
1000'- 14-3 NMB wire
250'- 12-2 NMB wire
250'- 12-3 NMB wire
250'- 10-3 NMB wire
1000'- Cat5E wire (grey)
1000'- RG6 coax
x- single gang data rings
x- Arlington exterior outlet (in-use box) for Hardyboard
x- Arlington exterior outlet (in-use box) for Stone
1- Panasonic bathroom fan
1- Aldes VS whole house fan system (4 vents, one fan)

That's all I can think of right now. Couldn't remember where the stone stopped, or I'd give you #'s for the Arlington boxes. I didn't see phone, data, or cable on your plan, so I have X for data rings. 1,2,3 or more connections can go to a single data ring using various plate configurations. Also, you may want to consider a centralized data panel. We can talk about that later. If you are considering running computer ethernet wiring, you may want to get a 1000' box of blue Cat5E also. Gary Estes, Craighead Electric.

Saturday, March 28, 2009

ABS Everywhere (Day 161 of 273)

Its time for a little tech talk for my geochemist friends out there (listen up Michele Tuttle).
ABS—Acrylonitrile butadiene styrene (ABS) ((C8H8· C4H6·C3H3N)n) is a common thermoplastic used to make light, rigid, molded products such as low-pressure piping (http://www.ppfahome.org/abs/absgeneral.html). This is the black tubing and fittings that you'll see at Home Depot, etc. Comes in 4 common sizes (inside diameters): 1.5", 2", 3", and 4". I've used all but the 4", which isn't common for houses. However, don't be fooled about the pipe diameters. 1.5" really is 1.9" outside diameter (OD), which is the dimension you'll need to drill most of the holes through your studs. Likewise, 2" pipe is 2.375" OD and 3" pipe is 3.5" OD. This is especially important when you are buying hole saws (bits), such as the Big Hawg Hole Saw (Milwaukee).

ABS pipe and fittings are bonded together by means of chemical fusion. Solvents contained in the cement soften and dissolve the surfaces to be joined. Once the pipe and fitting are assembled, a chemical weld occurs. This weld strengthens over time as the solvents evaporate. My experience is that you have 30 seconds max to move or realign glued up pipe. By the end of the day you'll have black, cement-covered hands. It you screwed up, get out the saw and cut away. The up side is that ABS pipe is cheap and easy to cut with a chop saw. The first photo is of a special musical instrument that I created which attaches to the toilet in the guest bath. Good tunes!

So far I've used about 250 ft of 1.5" pipe, 120 ft of 2" pipe, 70 ft of 3" pipe, and a gaggle of fittings. Most of the vent piping is done as is the waste piping above the floor. I'm leaving the fun part for last, the waste piping below the floor, which means in the crawl space. This will be mainly 3" (main line) and 2" pipe. The key thing here is to maintain an uniform grade of 1/4" per foot on the pipe, as you all well know from previous postings to this blog. So the pipe either has to go within the floor joists, or more commonly has to be hung below the joists.


On Friday, I called Bob Brown, my plumbing adviser. Nice guy, stops by to give me the OK on my work. I had laid out all the piping to be installed on the floor, and some assemblies that were glued up but not hung yet (this was a mistake). I screwed up on several counts. My biggest mistake was using an occasional vent part for drainage. The vent elbows and T's have sharp bends, but since they only convey gas there's nothing to get hung up on. Conversely, the drainage parts have medium radius curves (elbows and sanitary Ts) for vertical drops and long-sweep curves for horizontal turns. Herein lie my problems. Looks like I'll be cutting out some glued up ABS and substituting the correct fitting.

Another problem was caused by my failure to discriminate between sinks: vanity (i.e., toy sinks) and kitchen sinks (the real thing). Kitchen sinks get all sorts of things down their drains, and thus require 2" piping. Vanities carry soap and water, so they only need 1.5" piping. The only sink I'd actually assembled was the one in the pantry. No big deal, but I need to cut out the offending parts and drill a larger hole down through the floor. More importantly, Bob's checking kept me from screwing up the three other real sinks in the house: the kitchen and prep sinks and the garage sink. If I'd glued up these in 1.5" pipe and fittings, I probably would have waisted a days labor and $100 in parts.

Now that I'm mastering the art of solid plastic piping (ABS), I may move onto PVC and potato guns. I figure if I get some nice big cylindrical Idaho russets and 10" of 3" PVC, I can probably lob a spud onto the Navy ships parked out in Townsend Bay. How does that sound "Sailboat."

Sunday, March 22, 2009

Cooking with propane (Day 155 of 273)

After countless hours of internet research, showroom visits, cooking demos, and endless blogging, Nancy—aka Kitchen Connosisseur Extraordinaire—ordered our appliance package on Sunday. We had dropped Tom off at the airport and went into Seattle to finish this little detail.

Over the years, we'd been to all the major appliance dealers in the Seattle area. Now, we're not talking Kenmore or GE here, but a little higher up the chef's food chain. Wolf and Viking were vying for her attention, but I'd hear occasional mention of Blue Star, Electrolux, DCS, and Fisher Paykel at times. Let me tell you, this girl should qualify for a Masters degree in PA (professional appliances). Now its time to pay for her graduate work.

We'd had estimates on our various packages from Albert Lee, Nielsons, CrossRoads, and many others in the Seattle area. What broke the log jam was a visit to the Seattle Home Show in February. All the big dogs were there, but few were dealing. Go figure—worst economy in 75 years, people out of work, and home construction/sales in the toilet. You think you could get a $100 off a several thousand dollar appliance from Wolf, Sub Zero, or Viking. Nope, these manufacturers have entered into the little shell game known as protected MSRP (manufacturers suggested retail price). Surely, some dealer would cut us a deal—nope. If someone in town starts cutting prices on the protected "upper" appliance lines, the distributors will cut them off (much akin to losing your ticket on the Gravy Train).

Anyway, we talked to a single-store company known as Fredericks Appliance Center in Redmond, which is best known as the home of Bill Gates little company. They've got an unassuming store front, but lots of good products. Their rent is low and they don't advertise much, so they reportedly have a lower overhead than the big dogs. Well deal they did. They protected the prices on Nancy's beloved 36" Wolf rangetop and 30" double ovens, but cut the fat off the Kitchen Aid french-door refrigerator, Best hood and blower, Bosch dishwasher, and Whirlpool Duet Sport washer and dryer. In addition, we qualified for a $300 discount on the Wolf appliances (a rare factory incentive), got a $100 gift certificate from the store (which we used right then and there), and they threw in a $150 microwave (for the pantry) and a $1000(?) full-size wine refrigerator (Haier, a Chinese brand, probably cost $300 in bulk). Nevertheless, before the rebates and freebies they had beat the big dogs by a pile of $$. So we got out the plastic and made the deal happen. They'll hold the appliances until the end of July, deliver the package to PT for $125 (RT = 150 miles and 2 ferry rides), and start the warranties at the time we occupy the home (a little know secret in the industry).

So after years of research and countless notes, quotes and dotes, we've got our appliances ordered. Next up is the kitchen cabinets, which will come from the Kitchen and Bath Store (Shelly Little) in Port Townsend. She needs all the kitchen appliance specs to lay out the cabinets in CAD, so now she has them and we've made a deposit, which officially starts the process. We need the cabinets in mid July and they take 5-6 weeks to build, so we've got a couple month buffer which I'm sure will evaporate like sweat off a chili-pickers back.

Friday, March 13, 2009

On to the plumbing (Day 146 of 273)

Yeap, things have really slowed down now that we're the only ones working on the house. Sprinkle in two weeks of work on geology and a trip to Idaho Falls, and its hard to see much progress. However, we've finished the Tyvek, put the water shield (Grace Vycor) on the remaining windows, swept and vacuumed numerous times and cleaned up the remaining debris around the house. I'm sure we could get an award for cleanest house under construction in Port Townsend.

I started on the vent lines for the waste part of the plumbing. The vent lines go up from each fixture (sink, tub, shower, and toilet), get linked together and daylight through the roof. Not rocket science, but new enough for me that I'm only making glacial speed in terms of progress. Finished the master bath this afternoon and Bob (Snowboard) Brown came by to check on me (I call, he bills at $70/hr to look, fix, or advise). I don't call often. I had it all right except an upside down sanitary tee. Now you ask, just what the hell is a sanitary tee (femine health product, golf product for the germophobic golfer, etc). Well its a pipe that makes a T intersection, but sweeps to one side or the other so that the little turds or hairballs slide through and don't get lodged there, hence the term "sanitary." Don't fool yourself, there's nothing sanitary about a waste system.

This weekend I'll take a whack at the upstairs waste lines, which involve 4 devices: Shower (1.5" line), sink (1.5" line), bath tub (1.5" line), and toilet (3" line). The downstream path is Sink joins the Toilet line (main line). That line goes under the floor within joist space, then turns and dives down to the soffit in the family room. After about 10 ft it is joined by the secondary (feed) line which starts at the shower and joins the bath tub. After waste is collected from these four devices into the master (3") line, it goes about 5 ft then dives straight down (call this Mr. Twister's Turd Ride) past the first floor and into the crawl space. From there it goes 25 ft S at 1/4" per foot (the magical drop rate, see Day 26 blog) and exits the house, hopefully. If your karma is correctly adjusted, all will function well. However I wonder about the Coriolis Effect (see Wikipedia) and whether waste turns right better than left in the northern hemisphere. None of our lines go North, and most go South, so only time will tell. Perhaps one of my mechanically oriented colleagues (like Yogi) can shed some light on this problem.

After all the vent lines are complete, I'll concentrate on the real waste lines, starting from top to bottom. Maintaining a proper grade is the key point, plus making sure you use a long sweep (radius) junction when waste is entering one line from another. Also, two 45° bends are better than one 90° bend; less chance of a chunky bit hanging up.

When all the vent and waste lines are finished (end of March?) well cap all the open lines and pressure test the system by filling it with water through the uppermost vent (second story roof). This will be a low pressure test, but any leaks will become quickly apparent. If so, out comes the pipe saw, new fittings, and cement. The good thing about ABS pipe is its easy to install and rip out, and relatively cheap, so there is no reason to get your undies in a knot over this stuff.

After we clear the pressure test well go on to the domestic water supply, which will be much like the PEX work I did in January. I bought the magical PEX expansion tool so its just a simple matter of mapping out the supply line routes, drilling a couple hundred holes and pulling the pipe: red for hot and blue for cold. More on this later. I'm off to Los Alamos National Laboratory to make sure the place doesn't leak plutonium like a sieve in the next big earthquake on the Parajito fault zone.

Friday, March 6, 2009

Halftime: House 14, Machette 7 (Day 136 of 273)

Today is Saturday, March 6th — Day 136, one-half the way through our allowed 273 days to build the Kala Point house. I suspect we're 1/3 done, so we're behind by about one month. So be it. Some things that get hired out, like the drywall and insulation will go fast (each in about a week), so we might be able to catch up a bit and still move into the house in August. If not, we'll try to stay in the rental house on a month to month basis, and pay for labor we planned to contribute (so called sweat equity). Nancy has decided on the cabinet supplier (Kitchen and Bath Shop, Port Townsend; Shelly Little--a neighbor) so they took measurements this week and she'll work up the final order for the kitchen cabinets and island. We bought a vanity, sink, and faucet for the guest bath from them, which was a demo unit and priced right. Just need to store it for 6 months, but one less decision to make in the long run.

The construction business is still slowing down up here. The Ellis guys are lined up for two houses in advance, and Gary says he'll stay busy through the summer, but then ?? who knows. Carl's laid off a few more people, and Crystal our favorite lumber-yard girl, left for a better job down in the ship yards. She had a liking for wooden boats so this will be a better place for her, all 110# dripping wet. Good luck Crystal. If Melissa or Terry leaves were in deep yogurt.

Saturday, February 28, 2009

Roof on, windows in (Day 129 of 273)

Not much to report this week except the roof is on and the Sierra Pacific windows and doors are in. Ellis Construction has moved on to their next house, a 4000 sq. ft house in Port Ludlow (read Atheron CA or Genese CO for comparison). They'll be there for 2 months, or around May 1st. As I've mentioned before, I can't say enough good things about Gary and Troy—quality guys who work quietly, quickly, and with quality outcomes.Here are a few photos of the house.

Its appearance won't change for a while, until we start the siding which is several months off. The last two photos are of the main entrance with a small porch overhang to protect the front door and the sunroom with a larger (4' x 10') porch. Just to the right is the master bedroom and the bathroom (at the back). When I finish my geology consulting job in Idaho Falls (a god awful place to be in the winter) I hope to get back to basics (plumbing and painting) this next week. I'll be in charge of turd management (offically known as plumbing waste lines) and Nancy is in charge of painting (the beautification process).

Saturday, February 21, 2009

Windows going in, roof going on (Day 123 of 273)

This past week has been pretty busy at the house site. Gary and Troy (Ellis Construction) were finishing off various internal walls that were left for later (when they focused on drying in the house), and putting the skylights in. The roofers had the shingles loaded to the roof, all 20,000 pounds of it. That brought back memories of our roofer in Denver, Peter Douglas of Convenant Roofing (Ann, there's the name you need). Peter worked mainly alone and didn't get things done as fast as most crews. So he ordered the shingles and they came before the rip off was done. The delivery guys asked me where to put the shingles, so on the ground they went (at least they were in the back yard). So for the next three weeks, Peter hauled bundles of shingles up and onto our 12:12 roof in Denver. Talk about a mule; never complained a bit and typically was signing show tunes when he was roofing. But I digress.

The roofers started nailing on Wednesday, after using a propane blowtorch to melt the frost on the roof. They laid about 600 square ft (of 4000) and all the valley flashing. On Thursday, when I arrived they were onto the back of the house but took off at noon. Friday was the same way. So I asked their supervisor what was going on. He said they'd cut back on staff and eliminated overtime, so the crew only had enough hours left to work half days on Thursday and Friday. Monday will be a new pay period, so I expect that they'll be done roofing by next Tuesday night, which means the job will have taken a week for 3 guys. Not bad considering how heavy and stiff these shingles are. And did I mention the roof looks great and we love the color.


On Thursday and Friday, Gary and Troy started installing the Sierra Pacific windows. I helped with a couple of the heavy ones, but mostly tried to stay outta the way. They had to reframe a couple of the openings since we'd made changes that weren't on the plans or were read wrong from the plans (its that 3/6 vs 36 notation thing).


I finished up the psuedo Warmboard project and ran all the piping down to the basement, so we're ready to hook up the system and pressure it a few weeks. All is well, for now. Michael as a consulting geology job for the Idaho National Laboratory in early March, we we'll have to leave the house alone and concentrate on generating a little revenue. Plumbing is the next mission, starting around March 9th. Cheers.

Monday, February 16, 2009

Getting Laid in the Love Nest (Day 118 of 273)

Now, I know where all of your dirty little minds are right now, and that's in the wrong place. The psuedo-Warmboard is getting laid in the second story part of the house, aka the "Love Nest."

Nancy and I sliced up about 20 sheets of 5/8" AC plywood into 11 3/8" wide strips and I've been fastening them down in a grid pattern for the Pex tubing (see Day 92 blog). With the 5/8" Pex between the strips, the Pex is on 12" centers, just like the Warmboard. I laid all 80 strips (8' long, with miscellaneous filler pieces) in about 8 hours. It was easy, but my knees took a hit (hello Dr. Advil). Today I started the custom routing of the 36 return loops (ends) and the plunge holes (where the tubing goes downstairs), which will take 6-8 hours considering how feeble carpenter is. We'll have 2 heating loops upstairs, each about 280 ft long (300 ft is the max) in a third zone for heating. We wanted to be able to heat the Love Nest when and if needed, so Levi added a third manifold and Taco pump (1/40 hp) on the basement heating panel. I also had him add temperature gauges (old analog style) for the outgoing and returning radiant fluids, since I like gauges and data (old geologists never die, they just loose their data).

Gary Ellis loaned me his standup screw gun. What a tool. It loads 50 drywall screws per plastic strip and feeds them like machine gun bullets. 20 strips and 1000 screws to a bucket. Started screwing down the aforementioned strips (11 3/8"), and drove a screw in each side every 12-16". Did the whole bucket and floor in 75 minutes, including misfires, which equates to 133 screws a minute. Not bad for an old fart. All my screwing is done for a while.

It'll take a week of part-time days to route the ends and lay and caulk the tubing, which I bought from PexSupply, currently my favorite place to spend $$ on the internet. I'm buying a Pex Expander Tool ($300) for making all the connections with the hopes of selling it used on the internet (Craigslist) or to Levi Ross, who has started his own radiant consulting business.

Saturday, February 14, 2009

Putting a wrap on it (Day 116 of 273, Valentines Day)

Yeap, its Valentine Day and we're slaving at the house. Only a half day, and the weather was good enough for Cupid to do his thing. The framers have a few days left, but we need to put the Tyvek (millipore, fabric and plastic wrap) on the house so they can put the windows in. We managed to get the lower 9' on today, and I'll need some extra help on the upper half since Nancy doesn't do ladders real well. We are using hammer tackers (3/8" staples) and put 4000 staples in the bottom 9', which used a bit less than two rolls (9' x 100', ca. $155 each ouch).
The Tyvek is amazingly strong; you can't tear it with your hands and need a sharp razor knife to cut it. Supposed to keep the water out and let any vapor behind it (like lumber drying out) move through the micropores in it. Sounds like science fiction, but we'll see. The roofers are scheduled to start on Wednesday (Feb. 18th) and there are still some things that need to be finished by then. I have to layout the waste-water vent pipes and drill the roof penetrations so they can put the caps on; we still have to decide about a fan (size and location) in the Love Nest, and figure out where the 50,000 CFM fan for the Wolf stove is going to exit the house (I exaggerate, its only 900 cubic ft/minute, which will probably suck your hair up into the hood if you are standing too close). The Velux skylights started going in last Friday (5 of 7) and the solar tubes (2) need to be located for roof penetrations. None of this takes long, but requires a bit of thought so you don't screw up downstream. Off to a Valentines Day Party at the Clubhouse tonight: red wine and dark chocolate. There goes my gout. Did I mention that Nancy and I met 39.5 years ago at breakfast on the first day of our junior year at San Jose State. Dehydrated eggs; suprised we even talked to one another after that gourmet feast. Cheers.

Saturday, February 7, 2009

Roofing bid accepted (Day 109 of 273)

Once the committee made a decision to accept our roofing choice, we needed to select a roofing company. You'd think that this is straightforward, but not always. In Denver the least expensive roofing estimate we got for the old house was about $7500, and the most expensive (of 5 bid) was about $13,500. All the same materials and specs, so it pays to shop around. We ended up using the $7500 guy because he was the only one the crawled all over the roof and was willing to discuss the job in detail. Other than being a bit slow and singing show tunes on the rooftop, we were entirely satisfied with Peter Douglas (Covenant Roofing). Now that house had 2500 sq ft of roofing on a 12:12 pitch and one dormer. It was a complete tear off and redeck, and used 30 yr shingles (not the best, but pretty good for the purpose of resale).

On the new house we have about 4200 sq. ft of roofing at a 5:12 pitch (much easier to climb on). The underlayment (#30 tar paper) is already done ($1500), so the bids we got were for the Pabco Paramont Advantage (TL, 50 yr, 495#/sq.), with is comparable with the GAF Grand Canyon and CertainTeed Presidential TL shingles. The bids included all valley flashing (24" metal), sidewall flashing, and installation of the roof jacks (vents), exhaust vents, and skylights (9).

Our preferred roofer came in high, as he predicted so this presented a bit of a dilemma because we really liked the guy (Eric). He'd said that he had never got a roofing job in Kala Point because he was too expensive (compounded with the shingle cost). Eric bid about $17,800 for the job.

The second most expensive bid came from another likable guy, Joe Bartlett of Port Ludlow, a tony little village down the water. Boats, seaplanes and retired executives come to mind. Bartlett bid $15,124 and might have come down $100 because he overestimated the number of skylights by one. No matter, he was outbid by two others.

The second least expensive bid came from some guys in Port Orchard, down near Bremerton. C&M Construction (Cloise and Mike). They prepared a very complete estimate and had good refs (voted N. 1 contractor in S. Kitsap for 2008; but who voted?). Anyway they came in at $13,517, a pretty good price.

The least expensive bid was from the local, big-dog roofing company, Hope Roofing. I had figured they'd be high (big building, lots of employees, etc.), but they weren't. I wanted to use a local company to keep our bucks in the area. At first the bid of $13,192 was the low one, but then I noticed (yes, read the fine print) that they wanted an additional $125 for flashing of each skylight and chimney. At 9+1, that amounted to $1250 (+tax = a total of $1355) which pushed the real estimate up to $14,547. I found the additional amount unwarranted, since we purposely selected Velux QFS skylights, which are self-flashing and very easy to roof on top of. So, Steve Ford waived the skylight flashing cost and we settled for the original low bid of $13,192.

Assuming that they install 42 squares of roofing, the cost will be $314 per square. Add on the $36 per square cost for the underlayment, and we netted out at $350 per square. Sounds like a hell of a lot of money to keep rain off your heads, but the Denver house came out at $300 per square with the tear off and a much lesser grade shingle (ca. half the cost).

So if you're looking to roof or reroof in the near future, these numbers should help. Roofers are a bit hungry right now (they all came right out and got bids to me in a few days), and shingle prices are steady, not increasing like last summer (remember that asphalt is the dregs in the petroleum distillate chain and oil was @ $140 bbl). I suspect that we could roof a new house outside of Kala Point for about $250/square with a good double-layer shingle (GAF Sequoia or Presidental, or Pabco Paramont). We'll call that additional $100 a square (or $4200) one of the costs of living in a lovely, but covenant-controlled community. We could have opted for wooden shingles or cement tiles at $25,000+, or slate at $75,000-$100,000, but then we wouldn't be having any kitchen appliances and Nancy would be a widow.

Thursday, February 5, 2009

Cedar Mill running (Day 107 of 273)

Boy, what a nice day. The sun is out and the thermo broke 55°F Wed. afternoon; warmest day since Thanksgiving. Nancy and I wandered down to Bill McCutchen's saw mill (see previous post, Day 98) to watch him cut the raw wood for our trim. In exchange for felling a dozen large cedars from a neighbors lot (clearing for future house), he gets the wood for our job. I took a bunch of pictures for the Mr. Bills (the wood cutter and my father-in-law). Wood doesn't get any fresher than this, smells great and looks good. The process is as follows. He drags a log (up to 21 ft long and 34" diameter) to the side of the mill, and the mill lifts it up onto the bed. He levels the log with hydraulic lifts so its center line is parallel to the cutting plane, then has at it. The bark comes off first, then 1x slices until he is down to solid wood. He was getting 12" x 20' slices from this log. After the log is trued up on all four sides, he starts cutting 5/4 (1.25") slabs. This will be dried and ripped to the proper size. We need some 8", 6", and a ton of 4" for door and window trim, as well as 1x6 T&G (tongue and groove) for the soffit. I suspect we'll end up buying about $2000 of cedar trim for the house, which will save us $450 over Carl's prices, and we're even buying local. One extra thing to mention. When all the windows and exterior doors are installed, Bill will come over, measure all the windows and doors, and cut the trim to size in his shop. That way he'll make the best use of the wood, and we'll only pay for what he delivers. I figure that this little freebie will save me a week of trim cutting.

Monday, February 2, 2009

Dancing with the Roof Divas (Day 104 of 273)

I knew it was too good—two weeks of dry weather and we're about ready to get "dried in". Eric (potential roofer) put tar paper (30#) on the main house and second floor, and will complete the job on the weekend after Gary gets the garage and mudroom/sauna roof decking on. Eric mentioned that there was a new roofing material that we might look at since it is easier (read less expensive) to put down owing to a new layout pattern, yet it meets the stringent TL requirements of the Kala Point Architectural Committee (lots of retired guys without much to do I guess). We're OK with the idea of a committee, it keeps the houses from looking like they belong in the Berkeley Hills.

So last fall we had to decide on the brand and color of our roofing when we submitted our permit to the committee. We had two choices of asphalt composition roofing: GAF Grand Canyon ($185 and 450# per square) and Certainteed Presidental TL (similar price). The TL is the give-away term, which I've just realized. TL = triple laminate. They really want everyone to have a classic wooden shake roof, but times are changing and these roofs are a known fire threat. So they've allowed "shake like" roofs that have a lot of relief (topographic, not monetary). There is a metal roof with a shake-like appearance and granules, but it looks like dog and is expensive. There is cement tile shake, but its heavier and monotonous. Most owners are going to the TL asphalt shingles. Another key term in the roofing requirements is "earth tone." Now, being a geologist all my career in the SW US, I know what earth tones are: browns, grays, some reds, etc. Not green (flora) or blue (sky). Their idea of earth tone is black or brownish black or grayish black; specifically nothing with green, blue, or reds. Slate is probably OK (but it has all the aforementioned colors) since it cost an arm and a leg, but we won't even do there. So I see a battle ahead.

We filed an amendment to our building application with the committee, and they'll hear it at their monthly meeting tomorrow (Wed.). We're asking for Pabco (brand) Paramont Advantage (model) in Driftwood or (the dreaded) Antique black. Runs about $135 and 495# a square (110 ft2), so its a bit cheaper and a bit heavier. Eric estimates that the labor will be 2/3rds as much as for the two accepted brands owing to the layout pattern. I think the black is a no-brainer for them, but driftwood (browish gray) is a bit touchy. Maybe they need to drive across about 100 miles of Mancos shale (yes Tuttle) in the 4 Corners area to see what an earth tone really is. I figured the Driftwood color would grab them by the cojones, seeing as we have tons of it down at the Kala Point beach. Then again, we're not building a beach house so that's probably a weak argument. Jeff Knott (of driftwood fame), we need your debating skills out here.

Anyway, if they don't have a quorum for the meeting tomorrow no decision will be rendered (as they do with fat), so this could go on for a while. Meanwhile, I'd like to make hay (or roof) while the sun shines. Say tuned for Machette versus the Roof Devils—Chapter 2, then Chapter 3—The Pacific Northwest Monsoon Season Arrives.

P.S. We attended the Arch. Committee meeting this morning (always a good thing to do) and after some jostling, they agreed to the Pabco shingles and the Pewter Gray color, which was about half way between the Black and Driftwood colors that we had suggested. So it was a compromise, all in the spirit of the new Obama administration (just think of the committee as the Republicans and us as the Democrats and the roofing as a $13k miniversion of the $1,000,0000,000 spending-stimulus package.) One more roofing bid and we're ready to pick a subcontractor and roof away.

Saturday, January 31, 2009

4 & 8 barrel manifolds (Day 102 of 273)

Hey Blew-by-You, bet you thought I was going on a tirade about those gas-guzzling pre-fuel injection cars you are so found of——Not. Instead, we're talking about water distribution.

Levi Ross (formerly of Sunshine Propane) started building the radiant heating system this week. I had routed all the supply and return tubing through the subfloor and arranged the bundles of Pex tubing by zones (3) and loops (11 total). Mounted a 4'x8' sheet of plywood to the basement wall to mount all the paraphernalia on painted it a less than appetizing Forest Green (Craig, this compliments the Forest Service Brown shingles on your old house). Hey, we're not making artwork here, just heat.The manifold system consists of 2 8-port tubes (one with shutoff valves) and 4 4-port tubes (2 with shutoff valves). There are pumps for each zone, but only two are installed (one is in the hands of UPS Ground delivery service right now). All this stuff is interconnected with 3/4 and 1" copper pipe, skillfully brazed together by Levi. The water heater is a 60 gallon Polaris with a stainless steel liner (read $4000). This baby is 95% efficient, so we're going to wring most of the BTUs out of that propane. (Natural gas is not available on the Olympic Peninsula). Interestingly, propane generates 1 gal of waste water (from the cooled exhaust gas) per hour when the heater is running full tilt, so the heater is close to the floor drain and sump basin. We'll keep that sump pump exercised pretty well, especially in the winter.


The big white PVC pipe to the left (east) of the heater is the an air intake, and the muffler-like sausage is an air filter. It seems that little buggers (mosquitoes, gnats, etc.) have a liking for propane and will fly down the pipe and roost on the wire-mesh flame spreader. After a while you have a nice coating of roaster buggers and poor heat transmission. The round cylinder at the top is an expansion tank for the radiant heating fluid (water). As I mentioned before, the domestic water comes off the same system but this won't get built out for a while. For now, Levi's about done. Once all the parts are connected and open pipes are plugged, we'll do an air-pressure test and see if we have any leaks. If so, out comes the pipe cutter and Pex connectors. No worries, everything can be fixed.

Tuesday, January 27, 2009

Roof decking going on (Day 98 of 273)

Well we're almost 100 days into this project, which is supposed to be finished in 9 months (273 days) according to the Kala Point Architectural Committee. The problem is that they haven't showed up on site with rakes, shovels or hammers, so I don't feel particularly obliged to meet that deadline. More important is the fact that our house rental lease expired on August 18th, 2009, so that is when the crows will come to roost. We've budgeted $385k for construction of the house (= net from the Denver house) and our Quicken account says we've spent about $200k so far. Can't really tell if we're on budget or not, but I'm sleeping OK so we're probably OK. The high dollar-density purchases are still out there: appliances, flooring, doors, and fixtures so have to keep an eye on the checkbook. Whatever is left goes for a driveway and landscaping.

All the major framing is done. In the photo to the left, Lonnie is securing the barge rafters (the ladder-like overhang on gable ends of the house) with another type of Simpson bracket. One every foot (with 8 screws), so no overkill here. Gotta watch out for those rogue NW Pacific hurricanes. Now the roof decking is going on. It is 5/8" OSB (actually its 19/32" to make life complicated), which we upgraded to the minimum code mandated 1/2" (7/16ths). Do you know of anything else that is labeled one sized and delivered smaller. 2x4s are 1.5x3.5. Its like buying a pint of your favorite lager and getting 13 oz. Anyway, we'll have a stiff roof to drive several thousand nails into. We're interviewing roofers this next week so that we can get it really watertight before the monsoon season hits (now until June).
The photos show the roof rafters (2x12s) on the bedroom/sunroom and decking on the 2nd floor and over the kitchen/sauna area. Notice the gable "love nest"; as previously mentioned naming rights are still available. The garage roof will be built next week; roof trusses should arrive on Friday morning. Beca of NW Trusses came over on Wednesday and measured all the critical things, then went back and fine-tuned the truss plan. She managed to make the room above the garage (lets call it the boat loft for fun) big enough to build an 18 ft kayak or canoe in, so I'm happy. The garage and mudroom roof gets built over the decking that already in place.

Last weekend I scouted out a local sawmill at the advice of Gary Ellis. Its a small shop owned by Bill McCutchen about 15 miles to the south out in the forest. He's been a fisherman in Alaska, then a contractor in PT, and now is running his own mill. He reminds me of a cross between Bryan Frahm (Hobie sailor and Kansas farmer) and Benjamin Bufford "Bubba" Blue (Forrest Gump's shrimper friend). Bill eats, drinks and breathes wood—any kind. But he mainly cuts and mills Western Red Cedar, as well as some fir, madrona, and local hardwoods. I toured the wood ranch and checked out his new mill. Sort of a gigantic Alaskan saw mill. This thing is pneumatically assisted, so it can lift a 20' long 34" diameter log onto the mill. Then the saw gets pulled thru the log, cutting progressively lower and wider into the log. For us, he's cutting 420 ft of 5/4 x 8 S3S cedar, which will go as facia board (this is the vertical facing piece that bounds the roof and to which the gutters connect). If we're pleased with the quality, we'll order more for the window and door trip. His price is pretty good, about 20% less than the commercial wood offered by Carl's and its of a comparable quality, and LOCAL.

Monday, January 26, 2009

Garage walls up, rafters going on (Day 97 of 293)

Last week Gary moved his shop (site-built stand for the Makita 10" chop saw) from the garage to the front yard so that the garage walls could be built and stood up. I enlarged the garage doors (lots of size options) at the last minute from 7'h x 9'w to 8' x 9'. Seems like there were lots of times I could have used taller doors in Denver, so now we have it. The added expense for larger doors are nominal, and it helps to fill the high garage profile better.

The garage walls went up in about a day, then they started on the roof rafters. Most of these are site built from 2"x12" boards, which were amazingly straight and not too knotty (sorry Jeff). Even the 20'ers are pretty good (thanks to Carls). They put the rafters over the bedroom/sunroom wing up first, then nailed in three types of hold-downs, all so-called hurricane (earthquake here) clips: Simpson H1, H2.5T, and H3s. LET IT BLOW, BABY. More business for that company, and now I see that they have the market on double-wall stove pipe, so even more $$ are headed there way. Simpson (SSD) is currently trading at $21.37, down 20% in the past year.

[For Ken, Steve C, and Colleen: Simpson Manufacturing Co., Inc. (SSD: NYSE; Basic Materials/Steel) is primarily a holding company. Through its subsidiary, Simpson Strong-Tie Company Inc. (SST), the Company designs, engineers and manufactures wood-to-wood, wood-to-concrete and wood-to-masonry connectors, SST Quik Drive screw fastening systems and collated screws, stainless steel fasteners, and pre-fabricated shear walls. The Company's subsidiary, Simpson Dura-Vent Company, Inc. (SDV), designs, engineers and manufactures venting systems for gas, wood, oil, pellet and other alternative fuel burning appliances. SST is the Company's connector products segment. SDV is the Company's venting products segment. SST's Anchor Systems product line is included in the connector product segment. SST Anchor Systems offers a line of adhesives, mechanical anchors, carbide drill bits and powder actuated tools for concrete, masonry and steel.]

On Friday, they put up the rafters over the kitchen/pantry area and over the back of the second-floor complex. (Is is variously known as the Olsen, Cooley, Hart, and Lee Rooms, the final decision being determined at the August naming-rights auction.) The front (W) side of the second floor complex carries a dormer over the "love nest", so they have some more big beams to place there before finishing off the rafters. This morning (Monday) they started framing the main kitchen wall (3 side by side windows centered over the sink). I expect that most of the rafter-built roof will be finished by Thursday (Day 100!), then on we go to the roof trusses over the mudroom/sauna and garage. Then the house will have its final roof form; oh boy.

Subcontractors and Suppliers

  • Balco Excav. (land clearing, Bill Snyder)
  • Bill McCutchen's Mill (cedar trim)
  • Blake Tile and Stone, Sequim (Judy Reno, Eldorado Stone, Tile)
  • Bob Brown Plumbing (Bob & Josh Brown)
  • Boise Cascade joists (from Carls)
  • Carl's Building Supply (Mike, Melissa, Michele, Terry & Lawrence)
  • Castlerock Landscaping (Tim Hamm, Sequim)
  • Cotton RediMix (concrete and gravel)
  • Craighead Electric (Gary Estes)
  • Custom Hearth (propane fireplaces), Pousbo
  • Daltile (Seattle, Wedi board)
  • Discount Cabinets of Washington (Sequim)
  • Discovery Bay Materials (gravel, top soil)
  • Earl Kong (professional forester, PT))
  • EcoHaus (Amer. Clay Plaster, cork flooring)
  • Ellis Construction (Gary and Troy Ellis, framing)
  • Evergreen Products (Drywall, Sequim)
  • Fergusons, Seattle (Plumbing fixtures, Bud Allen Wright)
  • FInlandia Saunas (Tigard, OR)
  • Fitzgerald Concrete (driveway, Mike Fitzgerald)
  • Four Corners Nursery (trees, Port Hadlock)
  • Frank Feltes Custom Drywall and Painting (drywall and painting)
  • Frank Ward and Wayne Jobst (Stone masons)
  • Fredricks Appliances (Redmond, all appliances)
  • Giraffe Gutters (Dan Shaw, Chimicum)
  • Glass Etchings by Perrett (Jerry Perrett)
  • Hadlock Building Supply (bits and pieces)
  • Hardiboard, siding, backer board (from Carls and Home Depot)
  • Henerys Hardware (Cabot stain, misc. fasteners)
  • Hi-Tech Electronics (Audio & Media, Port Angeles)
  • Hide-A-Hose (Joseph, A-B Vacuum, Puyallup, WA)
  • Home Depot (electrical & plumbing supplies, interior paint)
  • Home Storage Solutions (John Plake, PT)
  • Hope Roofing (Pabco Paramont Advantage shingles)
  • Jim's Tool Time (J. Quandt, misc. carpentry)
  • K&D Concrete (Don McNeese)
  • Kitchen and Bath Studio (Shelly Little, cabinets)
  • Levi's Energy Services LLC (radiant design, vents, propane piping)
  • Meta Marble and Granite (travertine), Seattle
  • Michaelangelo (sepentinite), Seattle
  • Mikael Brostrom (Structural Engineer)
  • Mills Interiors (wood flooring, some tile)
  • North Coast Electrical (Electrical Supplies)
  • Olympic Garage Doors (Sequim)
  • Penisula Flooring (carpet)
  • Penisula Shower and Mirror (Sequim)
  • PexSupply (online plumbing and radiant supplies)
  • Puget Sound Power (and Atelco installers)
  • Richard Berg Architects (Richard and Darlene)
  • Richard Gifford Construction (septic, dry wells and grading)
  • Richerts Marble and Granite (countertop fabricators)
  • Seattle Lighting (lighting fixtures)
  • Secret Gardens Nursery (Sheila Piccini)
  • Shine Quarry (basalt for landscaping)
  • Sierra Pacific Windows (Rob Sorg)
  • Simpson Doors (from Carls)
  • Simpson Strong Tie (fasteners & hold downs)
  • Stewart Excavating (Mark Stewart, foundation)
  • Sunshine Propane (propane and tank)
  • Therma-Tru Doors (from Carls)
  • Tracy's Insulation (batts and blow in)
  • Trex Decking (from Carls)
  • Trussworks (roof trusses, Carl's)
  • Velux (Skylights and Solar tubes, Carls)
  • Versalam beams (from Carls)
  • Warmboard (Bruce Hull)
  • Wisbo Aquipex, Taco Pumps, Polaris tank (Sunshine Propane)

Followers

About Me

My photo
Professional geologist (USGS, 1972-2008), amateur home remodeler and now builder. Interested in sailing, all things involving salt water, woodworking, and food in general. Owner of Paleo Seis Surveys LLC, consulting in Quaternary geology and geological hazards.