Its mid October, the heat is on in the house , the leaves are falling, and most of the outside landscaping is done for now (still need lawn and shrubs in the front yard). So now its time to turn our attention back to the guts of the house, specifically the upstairs. Its pretty much like it was when we moved in with the exception that I'd spent a week painting windows and trim up there. We'll have guests up there in 2 weeks, so that's my current window of opportunity to make some progress.
In mid Sept, we had Mills Interiors (Bainbridge Island) deliver the flooring for upstairs. We ordered 550 sq. ft of 4" wide select white oak, quarter sawn (rift). This cut of wood is more stable than regular oak. We made this choice because of the radiant heating upstairs, which is a knockoff of the more expensive Warmboard we used elsewhere. In Sept, I'd moved the flooring bundles upstairs and stickered it to dry. After a month, my moisture meter showed about 7%, so it was time to nail it down. Mike Mills came by this week and laid most of it; all of the main floor and the bed platform, but didn't a long enough piece of bullnose to finish the one step up to the platform. So we have all but about 25 sq. ft laid. Surprisingly, we had 30-40 sq. ft left over, so I think I'll buy a bit more to finish off the closet (70 sq. ft) instead of using carpet.
Now its my turn to get into the bathroom and lay the porcelain tile. I'll extend the oak to under the door, and butt it up against the tile so this seam is largely hidden. The porcelain should go fast. Its a simple pattern using 12" x 12" and 6" x 6" tiles; about 60 sq. ft total. So compared to the other floor tiling in the house, this should be a piece of cake. (I probably shouldn't even say that.)
Also this week, we had Steve and Jere from Discount Cabinets of Washington (Sequim) come over to layout the bath cabinets. I'd already made the drawings, so it was a matter of confirming measurements and making a list. By the time Nancy got home, we had the cabinet sizes defined and it was a matter of picking the drawer face type (a dozen choices), wood type (four) and stain (probably a dozen). It took all of 90 seconds—damn this is getting easy.
Not really, but we went with quarter-sawn white oak to match the flooring, natural finish to match the floor, and Puritan style doors (simple Shaker) to match the others in the house. There are five cabinets on order: two 24" sink bases, and intervening 12" 4-drawer cabinet, and a 24" 4-drawer cabinet on the left (door) side. These will provide a 21" deep base for the rock counter top that we selected from the remnant pile at Richert's Granite and Marble, our favorite fabricator in the area (they are sailors, by the way).

The counter top is Mesabi Black Granite, which translates to a very coarse-grained gabbro or something like that. It has a honed finish, rather than polished, which gives the rock a whole different feel. We'd first seen honed granite in Vera Markgraf's Colorado mountain home and liked it for its rustic feel. The color comes out as dark gray, which will coordinate with the small black tiles interspersed with the green marble we'll use in the shower and tub.
Above the counter top, we'll have one wall-hung cabinet for towels and sheets and a wide mirror. We'll use the same strategy for the mirror as downstairs. We ordered 2 extra filler strips from the cabinet company. They'll be 3" side and 8 ft long, just enough to make the frame for a 3' x 5' mirror. Last time we made two cherry mirrors, 18" x 24" with beveled mirrors for about $200, which is a fraction of the cost from either the cabinet company or a furniture company. Even better, they match the cabinets perfectly.
Building a House in Kala Point, Port Townsend, WA
Search This Blog
Friday, October 22, 2010
Saturday, October 2, 2010
Shitty Day (Day 703)
I have a slightly funny story for you all. I've been paving and landscaping as you know (geology seems sort of mundane when you're doing such work), but yesterday morning everything turned to shit--literally. Nancy used the toilet and when I went in, it wasn't quite right. So I added to the pile (pun intended) and flushed away. Not much happened. Crap, I'd unloaded my closet snake at our garage sale before we left Denver. So off to the rental store, came back and snaked away to no avail. The toilet drained down in 15 minutes so it wasn't a complete blockage. Went outside and snaked the Kelly fitting (a clean-out fitting to go in or out on the line). No relief.
OK, go further downstream. Took off the primary septic tank cover and oops. Full of the BROWN to the brim. That's no good. Took the 3rd tank's cover off, the supposedly gray water pump tank and it was full. Not good. Looked like nothing was flowing, or in our case was being pumped to the septic drain field.
I know that this is not very interesting to you all, but maybe you'll have a septic system someday. Called my septic guy, no answer on the cell or home. (Turns out he took a job teaching at the local high school because business has been so slow for the last year). I called our septic designer (Suzanne Martin), and no reply. Called her office at (Miller Bay Water, Poulsbo), reached her dad and got a new phone no. Called, left a message and then a return call in about 1/2 hr.
She came over in a jiffy, said she probably knew what the problem was, and DID. When we had the septic inspection last winter, she said to be sure and turn the power on (and pointed to the control box at the rear of the house) when we got ready to use the system (i.e. move in). I logged that in my spongy brain. We moved in May 15th and turned the power on downstairs, along with many other circuit breakers.
So, it seems like we've been showering, laundering and crapping away in bliss for 4 months. This filled the 3 tanks to the brim (some drainage occurred out of the system by gravity) but yesterday the level got high enough that there was no where for new stuff to go.
Suzanne flipped on the power at the outside controller box and about 30 seconds later the pump put 45 gallons of gray water out into the drain field. It will continue to do this every 3 hrs until everything gets back to normal levels, in about 3 days. Then it reverts to normal mode and doses the field (technical jargon for pumping) with 45 gallons every 4 hours for a total of 270 gal per day. The daily total is dictated by the number of bedrooms in the house x 120 gals usage/bedroom per day. So our max. pumpage per day is 360 gals, nominally 270. However, since we only have a two bedroom house and a single couple living in it, our normal inside house water usage is probably about 100 gals a day. So once we get past this backup crisis, we should be back to normal, with 2-3 pump cycles per day. Now you know more than you need too about pressure-type septic systems.
Friday, October 1, 2010
Paver Patio Going Down (Day 702)
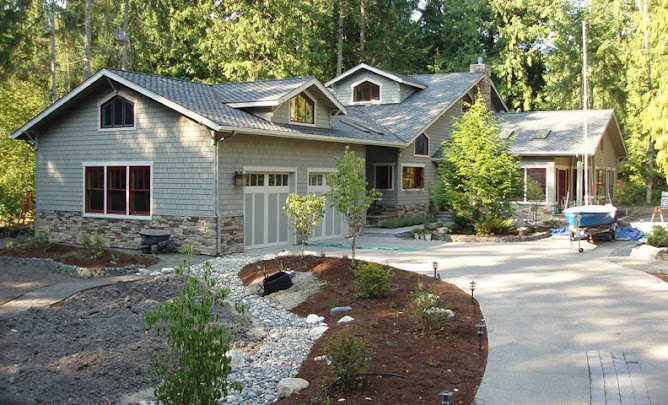
Winters coming (too soon) so why not get that patio finished. Yeah, it'll be a good place to hang out in January during our occasional snowstorms. Actually, I'd hoped to do it earlier in the year but other stuff got in the way.
We'd considered having Tim Hamm (Castle Rock Landscaping) put in a flagstone patio, but then had second thoughts. The main distraction of a natural rock patio is potential unevenness and weird stuff sprouting up between the small to large gaps between pieces. Secondly, to get nice big thick pieces of rock you have to lay out a small fortune. If set in sand, the rock should be 1-2" thick. Quartzite and other suitable (slatey) rocks go for 20-30¢ per pound ($400-$600/ton), and we were in for a couple tons to do this job. Not to say anything about horsing around several hundred pound pieces.
You can get away with thinner pieces (1/2 - 1") but these should be set in concrete. Well, when you go to the expense of laying a concrete slab, the patio becomes something of a Taj Mahal feature. In the long run we went for Dublin cobble (rounded) pavers from Belgard. They sell all sorts of pavers in a variety of colors. We selected a 3-piece mix: equal numbers of smalls (1/3rds), mediums (2/3rds), and larges (fulls). Each pallet has about 10 layers, each with equal amounts of each size. We ordered 2.5 pallets, enough to do about 275 sq. ft of patio (roughly 11' x 25').
Tim brought the pavers over in a couple pallet loads and we off-loaded them at the end of the day after he had finished some other Kala Point work. Since starting on our house last fall, ALL of his work has been in Kala Point or the Vineyards (our old rental subdivision), so this area has turned out to be pretty good for him. To bound the patio on the street side, Tim built another wall, this time around a mounded area (patio island) about 12-18" high. The plan was to plant some large shrubs and smaller rhodies on the island as a visible break from the driveway and street. That way we'll have some added privacy when we're dining or entertaining on the patio.
After leveling the patio area (shovel and rake, long board and level), I covered the area with landscape fabric to repel weeds (and blackberries, which come up everywhere) and held it down with large nails. Then Tim and I picked up three cubic yards (7500#) of 1/4" minus crushed basalt. This is everything that passes the 1/4" screen, and its a good base for patios. We wheelbarrowed and raked it into place, then ran a long board across the top to level it in a rough sense.
We rented a plate compactor, which is a vertical vibrator attached to a steel base plate. Fire that baby up and off you go. It really compacts material, and we did the whole patio in about an hour. Another shot at leveling with a long 2x6 board, then a final compaction. We ran out of time that day, but it conveniently rained over the weekend to keep everything in place.
Today (Mon. 9/27) we started laying pavers like mad men. I'd worked out a 6-paver pattern over the weekend, and printed up some copies for us to work from. In 5 hours we managed to lay 2 whole pallets of pavers (216 sq. ft), move some rocks in the basalt walls back and forth along paver edges, and prepare to cut a couple dozen pavers for irregular margins or where the sewer-line clean out pokes through the patio (can't cover up this important puppy).
We'll need to get some more base rock, the other half pallet of pavers (due next Monday), and form a rounded edge that parallels the rock wall that borders the patio. All in all its going pretty well, about 80% done and just in time for Octoberfest; that would be a perfect way to break it in.
PS (10/5). Tim and I finished up yesterday. We left the gravel walk out, expanded the patio to the rock wall and made cut (curved) edges on the two ends. Looks great, relatively flat and level, and nice and stable. Now we'll hose it down and continue to fill the gaps (tiny) between the pavers with fine sand. This helps to lock the pavers in place.
Subscribe to:
Posts (Atom)
Subcontractors and Suppliers
- Balco Excav. (land clearing, Bill Snyder)
- Bill McCutchen's Mill (cedar trim)
- Blake Tile and Stone, Sequim (Judy Reno, Eldorado Stone, Tile)
- Bob Brown Plumbing (Bob & Josh Brown)
- Boise Cascade joists (from Carls)
- Carl's Building Supply (Mike, Melissa, Michele, Terry & Lawrence)
- Castlerock Landscaping (Tim Hamm, Sequim)
- Cotton RediMix (concrete and gravel)
- Craighead Electric (Gary Estes)
- Custom Hearth (propane fireplaces), Pousbo
- Daltile (Seattle, Wedi board)
- Discount Cabinets of Washington (Sequim)
- Discovery Bay Materials (gravel, top soil)
- Earl Kong (professional forester, PT))
- EcoHaus (Amer. Clay Plaster, cork flooring)
- Ellis Construction (Gary and Troy Ellis, framing)
- Evergreen Products (Drywall, Sequim)
- Fergusons, Seattle (Plumbing fixtures, Bud Allen Wright)
- FInlandia Saunas (Tigard, OR)
- Fitzgerald Concrete (driveway, Mike Fitzgerald)
- Four Corners Nursery (trees, Port Hadlock)
- Frank Feltes Custom Drywall and Painting (drywall and painting)
- Frank Ward and Wayne Jobst (Stone masons)
- Fredricks Appliances (Redmond, all appliances)
- Giraffe Gutters (Dan Shaw, Chimicum)
- Glass Etchings by Perrett (Jerry Perrett)
- Hadlock Building Supply (bits and pieces)
- Hardiboard, siding, backer board (from Carls and Home Depot)
- Henerys Hardware (Cabot stain, misc. fasteners)
- Hi-Tech Electronics (Audio & Media, Port Angeles)
- Hide-A-Hose (Joseph, A-B Vacuum, Puyallup, WA)
- Home Depot (electrical & plumbing supplies, interior paint)
- Home Storage Solutions (John Plake, PT)
- Hope Roofing (Pabco Paramont Advantage shingles)
- Jim's Tool Time (J. Quandt, misc. carpentry)
- K&D Concrete (Don McNeese)
- Kitchen and Bath Studio (Shelly Little, cabinets)
- Levi's Energy Services LLC (radiant design, vents, propane piping)
- Meta Marble and Granite (travertine), Seattle
- Michaelangelo (sepentinite), Seattle
- Mikael Brostrom (Structural Engineer)
- Mills Interiors (wood flooring, some tile)
- North Coast Electrical (Electrical Supplies)
- Olympic Garage Doors (Sequim)
- Penisula Flooring (carpet)
- Penisula Shower and Mirror (Sequim)
- PexSupply (online plumbing and radiant supplies)
- Puget Sound Power (and Atelco installers)
- Richard Berg Architects (Richard and Darlene)
- Richard Gifford Construction (septic, dry wells and grading)
- Richerts Marble and Granite (countertop fabricators)
- Seattle Lighting (lighting fixtures)
- Secret Gardens Nursery (Sheila Piccini)
- Shine Quarry (basalt for landscaping)
- Sierra Pacific Windows (Rob Sorg)
- Simpson Doors (from Carls)
- Simpson Strong Tie (fasteners & hold downs)
- Stewart Excavating (Mark Stewart, foundation)
- Sunshine Propane (propane and tank)
- Therma-Tru Doors (from Carls)
- Tracy's Insulation (batts and blow in)
- Trex Decking (from Carls)
- Trussworks (roof trusses, Carl's)
- Velux (Skylights and Solar tubes, Carls)
- Versalam beams (from Carls)
- Warmboard (Bruce Hull)
- Wisbo Aquipex, Taco Pumps, Polaris tank (Sunshine Propane)
Followers
About Me
- Kala Point Builder
- Professional geologist (USGS, 1972-2008), amateur home remodeler and now builder. Interested in sailing, all things involving salt water, woodworking, and food in general. Owner of Paleo Seis Surveys LLC, consulting in Quaternary geology and geological hazards.