
 |
| Left Side Cabinet |
 |
| Right Side Cabinet |
 |
| Walnut mantle and rock top |
 |
| Whole wall, weird angles are a result of stitching 3 pics together |

|
| Left Side Cabinet |
|
| Right Side Cabinet |
|
| Walnut mantle and rock top |
|
| Whole wall, weird angles are a result of stitching 3 pics together |
 Plywood is another matter. At Edensaw, our local quality wood supplier (mainly to the marine and furniture businesses around PT), 1/2" and 3/4" two-sided, A-grade cvg fir plywood goes for about $125-145 per sheet. YIKES. Even 1/4" ply for the back of cabinets is nearly $100 per sheet, so you can see how a cabinet can eat up some serious money quickly. There are less expensive options, like using one-good sided plywood, melamine 1/4" ply for backing, etc. but you end up with an IKEA looking cabinet when you're done. Conversely, its a bit comforting to know that you'll be saving thousands (yes $1000's) of dollars in professional labor if you have the woodworking skills and tools.
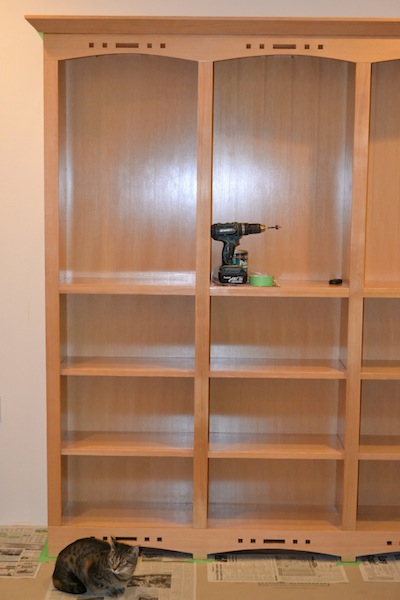
 The tops and bottoms of the cabinets are trimmed out with a craftsman-style detail that I picked up from a coffee table in this same room. It has a series of square holes (spacing is 1-1-1-1-3-1-1-1-1) centered in each bank of the cabinet, with an arched base. To finish the whole unit off, I built a piece of crown molding that matches that used on the kitchen cabinets. After 2 years of building, I'm actually starting to understand you can integrate a concept by carrying themes and styles throughout the house, furniture and art items. So we have a Craftsman house trimmed with cvg fir, salmon, and ginkgos. We added LED lighting bars (12" long,$30 @ IKEA) behind the face trim at the tops of the cabinets, with a remote control device between the outlet and lighting. Just flick on the small remote and you get some nice mood-lighting on the glass shelves.
 This heater takes 220v, which I had previously installed during the electrical rough in (4 strand no. 8 copper cable). Gary Estes (Craighead Electric) came over to consult on the heater and finished hooking up the garden shed to the house electrical and the 30 amp line from the generator (in the shed) back to the house. So now, if we have an extended power outage, I can fire up the generator in the shed, flip the breaker on the basement electrical panel and power the house (up to 7kw) until electricity is restored. 7kw will run most of the house, with the exception of heat-generating appliances (the double oven and sauna).
 This last week I've been building the benches for the sauna. I was going to use clear cedar or fir for this, but it was just too expensive. Carl's had some Batu boards for decking, which were half the price of the other alternatives. I'm not exactly sure what Batu is, but I call it Asian mahogany. [The Internet says "Batu closely resembles the rich classic look of Mahogany. Heartwood from Batu for decking ranges from a medium red to a deep red / brown with purple tinges and often has resin canals with white contents in concentric lines on end surfaces which produce a warm and visually striking effect. The texture is moderately fine and grain is typically interlocked. Its ideal for exterior use, so it should be well suited for the sauna."]
 A couple years ago I bough an old tiller at the local antiques store with the intent of making it a coat rack in the new house. However, I found another coat rack that I liked better, so this tiller has found a happy home in the sauna as a towel rack. Above it is a water-proof bulkhead lamp and to the right is a temp/humidity gauge.
 About a year ago I had some aluminum ones fabricated at a marine shop in PT. Seemed about right, but they required drilling a couple holes into the island rock for each standoff. This bothered me to no end, and then when we got the standoffs back from the paint shop they didn't even look attractive. $750 down the rat hole--boy that hurt. So back to square one. Finally, I thought back to the corbels that Jim Quandt made for the roof overhangs and decided that wooden brackets would probably go well with the island cabinets.
 Down to Edensaw, our local exotic woods warehouse (and I mean warehouse!). They have just about any type and size board you'd ever want. OK, lets get some quarter-sawn red Oak to match the cabinets. I selected a nice 8' board, 2" thick and about 6" wide. I drew up some plans for the brackets, printed them full scale, and took them to Bill McCutchen to fabricate. Bill has lots a great power tools, including a portable saw mill (he made all the facia, soffit, and T&G cedar for the house). Bill said no problem, and about a month later we had 3 nicely shaped and sanded solid oak brackets Total cost about $100, so I felt better about the wasted metal ones.
 Jerry made a few suggestions, and we went back and forth a few times. We settled on four salmon swimming across the bar, with some sea weed and gravel to complete the scene. Jerry made up a sketch, we approved it, and then he made the full size drawing. He ordered the glass from Seattle (16" x 72") and it arrived in a couple weeks (ca. $345). Then he coated the bottom of the glass with an adhesive backed rubber sheeting (ca. 1/16" thick), laid the paper template on top and rubbed the pencil drawing onto the backing. Then the image is tidied up and its ready for the sandblasting process.
 His bread and butter are small art objects like sushi plates, serving trays, and wall hangings. The heaviest blasting is done first, and the lightest is done last. In the end you have a gorgeous bias-relief image underneath the bar top. You'll have to see it to really appreciate this little piece of art in our house.

| Category | $500,000 | % | Comments |
| Architectural |
| 4.4 | No interior details |
| Structural engineering |
| 1.5 | Highest EQ haz code |
| Land surveys |
| 0.4 | Boundary and topo |
| Building permits/fees |
| 2.1 | County and HOA |
| Cut trees, clear land |
| 1.2 | 60 trees, 0.6 acre |
| Pre-Build Expenses | $48,000 | 9.6 |
|
| Sub Total (Cumulative) | $48,000 | 9.6 |
|
| Excavating and regrading |
| 1.5 | 280 yds removed |
| Foundation & basement |
| 7.3 | 750 sq ft basement |
| Pre-Framing (Cumulative) | $44,000 | 8.8 |
|
| Sub Total (Cumulative) | $92,000 | 18.4 |
|
| Framing Labor |
| 8.9 |
|
| Framing lumber |
| 9.8 |
|
| Windows, skylights, solar tubes (36) |
| 3.6 | Installed tubes |
| Doors (27) and locks |
| 2.8 | Installed some doors, all locks |
| Garage doors & openers |
| 0.6 | Good deal |
| Dried In (Cumulative) | $128,500 | 25.7 |
|
| Sub Total (Cumulative) | $220,500 | 44.1 |
|
| Radiant flooring system (Warmboard) | $29,675 | 5.0 | Did all Pex tubing |
| Roof, gutters, drywells |
| 2.7 | Laid drywells |
| Siding and shingles |
| 1.3 | Painted & hung 8,000 |
| Plumbing |
| 1.3 | Did all rough in |
| Electrical |
| 3.4 | Did ½ of labor, hung all fixtures |
| Central Vacuum System |
| 0.4 | In the wall |
| Propane tank and piping |
| 0.9 | 500 gal, buried |
| Air exchange and power vents, range hood |
| 0.5 |
|
| Rock facade (exterior) |
| 1.4 | Eldorado Stone |
| Fireplaces (2 gas) |
| 1.4 | Propane |
| Fireplace rock and mantles |
| 0.2 | Did all labor |
| Insulation |
| 1.0 | Fiberglass batts, 6-12” |
| Drywall |
| 3.0 | 5/8" in garage |
| Painting (all) |
| 1.3 | Did all trim & exterior painting |
| Pre-Finishing (Cumulative) | $119,000 | 23.8 |
|
| Sub Total (Cumulative) | $339,500 | 67.9 |
|
| Plaster (Amer. Clay) |
| 0.2 | Did all plastering |
| Interior trim |
| 0.7 | CVG Fir or Primed FJ Pine |
| Tile: flooring and showers |
| 1.7 | Laid all tile |
| Wood flooring |
| 2.8 | Finished upstairs |
| Carpentry (labor) |
| 0.5 | Cheap @$20/hr |
| Cabinets (4 rooms) |
| 6.9 | Installed all units |
| Countertops (rock, 4 areas) |
| 2.2 | Big ticket items |
| Wood counters (maple, 2 areas) |
| 0.2 | Bargain |
| Closet storage |
| 0.8 |
|
| Appliances (all) |
| 2.9 | Top end package |
| Lighting fixtures (all) |
| 1.2 |
|
| Bath (1) and showers (3) |
| 1.0 | Frameless, 3/8” glass (3) |
| Plumbing fixtures |
| 0.9 | Kohler and better |
| Sauna (wood and heater) |
| 0.3 | Did all labor |
| Septic System |
| 2.3 | Pressure type, 3 bath |
| Interior Finished (Cumulative) | $123,000 | 24.6 |
|
| Sub Total (Cumulative) | $462,500 | 92.5 |
|
| Driveway |
| 1.4 | Exposed aggregate |
| Decks |
| 0.4 | Trex, 4 areas |
| Water conditioner |
| 0.6 | Kinetico |
| Tools and tool rentals |
| 1.3 | Paid for themselves |
| Electricity, propane, trash and sanitation |
| 0.3 | Expenses during building |
| House Complete (Cumulative) | $20,000 | 4.0 |
|
| Sub Total (Cumulative) | $482,500 | 96.5 |
|
| Landscaping |
| 2.7% | Did all plantings and paths |
| Garden Shed |
| 0.8% | Finished after Rough In |
| Exterior (Cumulative) | $17,500 | 3.5% |
|
| TOTAL EXPENSES | $500,000 | 100.0% |
|
Almost 10% of the bucks were spent before a shovel was turned in the ground. However, changes really started with the tree felling, stump removal and brush clearing.
By the time we were ready for the Ellis boys to nail wood together, we had spent almost 19% of the hypothetical half million. The next real threshold is when a house is dried in (framed and secured), which takes up to the 44% point, or roughly $220k. By then, you're wondering when and when the rest of the money is going to mystically appear in your bank account.
By this point, we started to take on some jobs and reduce labor costs. This phase is what I call the owner-go-slow period. Its when you have visions of savings buckets of cash by doing such trival tasks as the rough-in plumbing and electrical (probably a 6 month delay over having it done). Yeah you save money, but you having to do apprenticeships in both trades. Thank god we had patient and helpful subs for both that kept us on the straight and narrow. The shingle dipping and hanging process was sort of tortureous, especially for the Dipping Lady. Who thought 8,000 shingles would take very long to hand dip—everyone said it was the way to do it , and had obviously never done it themselves or they were just having a giant laugh on us. Anyway, by the time the house was ready for the Kala Point HOA stamp of approval, we'd been building for 12 months and spent 2/3rd of the dwendling hypothetical half mil.
Next came the really labor intensive process for me (Michael) because I wanted to do it all. You'd think that after a year of this and 60 under my belt, I'd have thought a bit more about it. But I'm a type A guy who can't stand to be idle. So I took on the doors, trim, all the tile floors and 3 tiles showers, the plastering, and a host of other things. Now that I'm a fairly skilled home builder, I know that I'd never build another one (at my age). If I was 40, I might try 2 or 3 over a 20 year period. A good/bad thing about building your "one and only house" is that you really can't compromise on anything, or you would be haunted by it for the rest of your pre-Alzheimer life.
Best and Worst
Some good things we did in terms of building the house:
In retrospect, its been a fun, educational, fulfilling, tiring, and expensive adventure. Nancy and I managed to stay married through it all (some don't), and both of us are happy with the result. There are a few things we'd do differently if we had to do it over again, but won't. Little mistakes become Architectural Features, each of which have an interesting story behind them. Now we need to start relaxing a bit more, enjoying the house with friends and neighbors, and getting out to know the Pacific Northwest better. That's it for this blog . . . unless something really noteworthy should happen.
