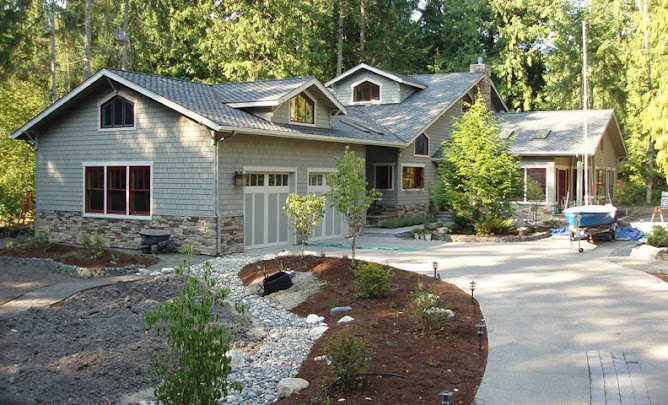
Its appearance won't change for a while, until we start the siding which is several months off. The last two photos are of the main entrance with a small porch overhang to protect the front door and the sunroom with a larger (4' x 10') porch. Just to the right is the master bedroom and the bathroom (at the back). When I finish my geology consulting job in Idaho Falls (a god awful place to be in the winter) I hope to get back to basics (plumbing and painting) this next week. I'll be in charge of turd management (offically known as plumbing waste lines) and Nancy is in charge of painting (the beautification process).
Building a House in Kala Point, Port Townsend, WA
A running narrative of first-time builders of their retirement home in Port Townsend, WA (NE corner of the Olympic Pennisula, 60 miles NW of Seattle). Follow us as this adventure unfolds in late 2008 and beyond. 18 months under construction, we moved in on May 25th, 2010. Photo taken August 15, 2010.
Search This Blog
Saturday, February 28, 2009
Roof on, windows in (Day 129 of 273)
Its appearance won't change for a while, until we start the siding which is several months off. The last two photos are of the main entrance with a small porch overhang to protect the front door and the sunroom with a larger (4' x 10') porch. Just to the right is the master bedroom and the bathroom (at the back). When I finish my geology consulting job in Idaho Falls (a god awful place to be in the winter) I hope to get back to basics (plumbing and painting) this next week. I'll be in charge of turd management (offically known as plumbing waste lines) and Nancy is in charge of painting (the beautification process).
Saturday, February 21, 2009
Windows going in, roof going on (Day 123 of 273)
On Thursday and Friday, Gary and Troy started installing the Sierra Pacific windows. I helped with a couple of the heavy ones, but mostly tried to stay outta the way. They had to reframe a couple of the openings since we'd made changes that weren't on the plans or were read wrong from the plans (its that 3/6 vs 36 notation thing).
I finished up the psuedo Warmboard project and ran all the piping down to the basement, so we're ready to hook up the system and pressure it a few weeks. All is well, for now. Michael as a consulting geology job for the Idaho National Laboratory in early March, we we'll have to leave the house alone and concentrate on generating a little revenue. Plumbing is the next mission, starting around March 9th. Cheers.
Monday, February 16, 2009
Getting Laid in the Love Nest (Day 118 of 273)
Nancy and I sliced up about 20 sheets of 5/8" AC plywood into 11 3/8" wide strips and I've been fastening them down in a grid pattern for the Pex tubing (see Day 92 blog). With the 5/8" Pex between the strips, the Pex is on 12" centers, just like the Warmboard. I laid all 80 strips (8' long, with miscellaneous filler pieces) in about 8 hours. It was easy, but my knees took a hit (hello Dr. Advil). Today I started the custom routing of the 36 return loops (ends) and the plunge holes (where the tubing goes downstairs), which will take 6-8 hours considering how feeble carpenter is. We'll have 2 heating loops upstairs, each about 280 ft long (300 ft is the max) in a third zone for heating. We wanted to be able to heat the Love Nest when and if needed, so Levi added a third manifold and Taco pump (1/40 hp) on the basement heating panel. I also had him add temperature gauges (old analog style) for the outgoing and returning radiant fluids, since I like gauges and data (old geologists never die, they just loose their data).
Gary Ellis loaned me his standup screw gun. What a tool. It loads 50 drywall screws per plastic strip and feeds them like machine gun bullets. 20 strips and 1000 screws to a bucket. Started screwing down the aforementioned strips (11 3/8"), and drove a screw in each side every 12-16". Did the whole bucket and floor in 75 minutes, including misfires, which equates to 133 screws a minute. Not bad for an old fart. All my screwing is done for a while.
It'll take a week of part-time days to route the ends and lay and caulk the tubing, which I bought from PexSupply, currently my favorite place to spend $$ on the internet. I'm buying a Pex Expander Tool ($300) for making all the connections with the hopes of selling it used on the internet (Craigslist) or to Levi Ross, who has started his own radiant consulting business.
Saturday, February 14, 2009
Putting a wrap on it (Day 116 of 273, Valentines Day)
The Tyvek is amazingly strong; you can't tear it with your hands and need a sharp razor knife to cut it. Supposed to keep the water out and let any vapor behind it (like lumber drying out) move through the micropores in it. Sounds like science fiction, but we'll see. The roofers are scheduled to start on Wednesday (Feb. 18th) and there are still some things that need to be finished by then. I have to layout the waste-water vent pipes and drill the roof penetrations so they can put the caps on; we still have to decide about a fan (size and location) in the Love Nest, and figure out where the 50,000 CFM fan for the Wolf stove is going to exit the house (I exaggerate, its only 900 cubic ft/minute, which will probably suck your hair up into the hood if you are standing too close). The Velux skylights started going in last Friday (5 of 7) and the solar tubes (2) need to be located for roof penetrations. None of this takes long, but requires a bit of thought so you don't screw up downstream. Off to a Valentines Day Party at the Clubhouse tonight: red wine and dark chocolate. There goes my gout. Did I mention that Nancy and I met 39.5 years ago at breakfast on the first day of our junior year at San Jose State. Dehydrated eggs; suprised we even talked to one another after that gourmet feast. Cheers.
Saturday, February 7, 2009
Roofing bid accepted (Day 109 of 273)
On the new house we have about 4200 sq. ft of roofing at a 5:12 pitch (much easier to climb on). The underlayment (#30 tar paper) is already done ($1500), so the bids we got were for the Pabco Paramont Advantage (TL, 50 yr, 495#/sq.), with is comparable with the GAF Grand Canyon and CertainTeed Presidential TL shingles. The bids included all valley flashing (24" metal), sidewall flashing, and installation of the roof jacks (vents), exhaust vents, and skylights (9).
Our preferred roofer came in high, as he predicted so this presented a bit of a dilemma because we really liked the guy (Eric). He'd said that he had never got a roofing job in Kala Point because he was too expensive (compounded with the shingle cost). Eric bid about $17,800 for the job.The second most expensive bid came from another likable guy, Joe Bartlett of Port Ludlow, a tony little village down the water. Boats, seaplanes and retired executives come to mind. Bartlett bid $15,124 and might have come down $100 because he overestimated the number of skylights by one. No matter, he was outbid by two others.
The second least expensive bid came from some guys in Port Orchard, down near Bremerton. C&M Construction (Cloise and Mike). They prepared a very complete estimate and had good refs (voted N. 1 contractor in S. Kitsap for 2008; but who voted?). Anyway they came in at $13,517, a pretty good price.
The least expensive bid was from the local, big-dog roofing company, Hope Roofing. I had figured they'd be high (big building, lots of employees, etc.), but they weren't. I wanted to use a local company to keep our bucks in the area. At first the bid of $13,192 was the low one, but then I noticed (yes, read the fine print) that they wanted an additional $125 for flashing of each skylight and chimney. At 9+1, that amounted to $1250 (+tax = a total of $1355) which pushed the real estimate up to $14,547. I found the additional amount unwarranted, since we purposely selected Velux QFS skylights, which are self-flashing and very easy to roof on top of. So, Steve Ford waived the skylight flashing cost and we settled for the original low bid of $13,192.
Assuming that they install 42 squares of roofing, the cost will be $314 per square. Add on the $36 per square cost for the underlayment, and we netted out at $350 per square. Sounds like a hell of a lot of money to keep rain off your heads, but the Denver house came out at $300 per square with the tear off and a much lesser grade shingle (ca. half the cost).
So if you're looking to roof or reroof in the near future, these numbers should help. Roofers are a bit hungry right now (they all came right out and got bids to me in a few days), and shingle prices are steady, not increasing like last summer (remember that asphalt is the dregs in the petroleum distillate chain and oil was @ $140 bbl). I suspect that we could roof a new house outside of Kala Point for about $250/square with a good double-layer shingle (GAF Sequoia or Presidental, or Pabco Paramont). We'll call that additional $100 a square (or $4200) one of the costs of living in a lovely, but covenant-controlled community. We could have opted for wooden shingles or cement tiles at $25,000+, or slate at $75,000-$100,000, but then we wouldn't be having any kitchen appliances and Nancy would be a widow.
Thursday, February 5, 2009
Cedar Mill running (Day 107 of 273)
trim. In exchange for felling a dozen large cedars from a neighbors lot (clearing for future house), he gets the wood for our job. I took a bunch of pictures
for the Mr. Bills (the wood cutter and my father-in-law). Wood doesn't get any fresher than this, smells great and looks good. The process is as follows. He drags a log (up to 21 ft long and 34" diameter) to the side of the mill, and the mill lifts it up onto the bed. He levels the log with hydraulic lifts so its center line is parallel to the cutting plane, then has at it. The bark comes off first, then 1x slices until he is down to solid wood. He was getting 12" x 20' slices from this log. After the log is trued up on all four sides, he starts cutting 5/4 (1.25") slabs.
This will be dried and ripped to the proper size. We need some 8", 6", and a ton of 4" for door and window trim, as well as 1x6 T&G (tongue and groove) for the soffit. I suspect we'll end up buying about $2000 of cedar trim for the house, which will save us $450 over Carl's prices, and we're even buying local. One extra thing to mention. When all the windows and exterior doors are installed, Bill will come over, measure all the windows and doors, and cut the trim to size in his shop. That way he'll make the best use of the wood, and we'll only pay for what he delivers. I figure that this little freebie will save me a week of trim cutting.
Monday, February 2, 2009
Dancing with the Roof Divas (Day 104 of 273)
So last fall we had to decide on the brand and color of our roofing when we submitted our permit to the committee. We had two choices of asphalt composition roofing: GAF Grand Canyon ($185 and 450# per square) and Certainteed Presidental TL (similar price). The TL is the give-away term, which I've just realized. TL = triple laminate. They really want everyone to have a classic wooden shake roof, but times are changing and these roofs are a known fire threat. So they've allowed "shake like" roofs that have a lot of relief (topographic, not monetary). There is a metal roof with a shake-like appearance and granules, but it looks like dog and is expensive. There is cement tile shake, but its heavier and monotonous. Most owners are going to the TL asphalt shingles. Another key term in the roofing requirements is "earth tone." Now, being a geologist all my career in the SW US, I know what earth tones are: browns, grays, some reds, etc. Not green (flora) or blue (sky). Their idea of earth tone is black or brownish black or grayish black; specifically nothing with green, blue, or reds. Slate is probably OK (but it has all the aforementioned colors) since it cost an arm and a leg, but we won't even do there. So I see a battle ahead.
We filed an amendment to our building application with the committee, and they'll hear it at their monthly meeting tomorrow (Wed.). We're asking for Pabco (brand) Paramont Advantage (model) in Driftwood or (the dreaded) Antique black. Runs about $135 and 495# a square (110 ft2), so its a bit cheaper and a bit heavier. Eric estimates that the labor will be 2/3rds as much as for the two accepted brands owing to the layout pattern. I think the black is a no-brainer for them, but driftwood (browish gray) is a bit touchy. Maybe they need to drive across about 100 miles of Mancos shale (yes Tuttle) in the 4 Corners area to see what an earth tone really is. I figured the Driftwood color would grab them by the cojones, seeing as we have tons of it down at the Kala Point beach. Then again, we're not building a beach house so that's probably a weak argument. Jeff Knott (of driftwood fame), we need your debating skills out here.
Anyway, if they don't have a quorum for the meeting tomorrow no decision will be rendered (as they do with fat), so this could go on for a while. Meanwhile, I'd like to make hay (or roof) while the sun shines. Say tuned for Machette versus the Roof Devils—Chapter 2, then Chapter 3—The Pacific Northwest Monsoon Season Arrives.
P.S. We attended the Arch. Committee meeting this morning (always a good thing to do) and after some jostling, they agreed to the Pabco shingles and the Pewter Gray color, which was about half way between the Black and Driftwood colors that we had suggested. So it was a compromise, all in the spirit of the new Obama administration (just think of the committee as the Republicans and us as the Democrats and the roofing as a $13k miniversion of the $1,000,0000,000 spending-stimulus package.) One more roofing bid and we're ready to pick a subcontractor and roof away.
Saturday, January 31, 2009
4 & 8 barrel manifolds (Day 102 of 273)
Tuesday, January 27, 2009
Roof decking going on (Day 98 of 273)
We've budgeted $385k for construction of the house (= net from the Denver house) and our Quicken account says we've spent about $200k so far. Can't really tell if we're on budget or not, but I'm sleeping OK so we're probably OK. The high dollar-density purchases are still out there: appliances, flooring, doors, and fixtures so have to keep an eye on the checkbook. Whatever is left goes for a driveway and landscaping.All the major framing is done. In the photo to the left, Lonnie is securing the barge rafters (the ladder-like overhang on gable ends of the house) with another type of Simpson bracket. One every foot (with 8 screws), so no overkill here. Gotta watch out for those rogue NW Pacific hurricanes. Now the roof decking is going on. It is 5/8" OSB (actually its 19/32" to make life complicated), which we upgraded to the minimum code mandated 1/2" (7/16ths). Do you know of anything else that is labeled one sized and delivered smaller. 2x4s are 1.5x3.5. Its like buying a pint of your favorite lager and getting 13 oz. Anyway, we'll have a stiff roof to drive several thousand nails into. We're interviewing roofers this next week so that we can get it really watertight before the monsoon season hits (now until June).
The photos show the roof rafters (2x12s) on the bedroom/sunroom and decking on the 2nd floor and over the kitchen/sauna area. Notice the gable "love nest"; as previously mentioned naming rights are still available. The garage roof will be built next week; roof trusses should arrive on Friday morning. Beca of NW Trusses came over on Wednesday and measured all the critical things, then went back and fine-tuned the truss plan. She managed to make the room above the garage (lets call it the boat loft for fun) big enough to build an 18 ft kayak or canoe in, so I'm happy. The garage and mudroom roof gets built over the decking that already in place.
Last weekend I scouted out a local sawmill at the advice of Gary Ellis. Its a small shop owned by Bill McCutchen about 15 miles to the south out in the forest. He's been a fisherman in Alaska, then a contractor in PT, and now is running his own mill. He reminds me of a cross between Bryan Frahm (Hobie sailor and Kansas farmer) and Benjamin Bufford "Bubba" Blue (Forrest Gump's shrimper friend). Bill eats, drinks and breathes wood—any kind.
But he mainly cuts and mills Western Red Cedar, as well as some fir, madrona, and local hardwoods. I toured the wood ranch and checked out his new mill. Sort of a gigantic Alaskan saw mill. This thing is pneumatically assisted, so it can lift a 20' long 34" diameter log onto the mill. Then the saw gets pulled thru the log, cutting progressively lower and wider into the log. For us, he's cutting 420 ft of 5/4 x 8 S3S cedar, which will go as facia board (this is the vertical facing piece that bounds the roof and to which the gutters connect). If we're pleased with the quality, we'll order more for the window and door trip. His price is pretty good, about 20% less than the commercial wood offered by Carl's and its of a comparable quality, and LOCAL.
Monday, January 26, 2009
Garage walls up, rafters going on (Day 97 of 293)
Wednesday, January 21, 2009
Mikey's Thermoboards (Day 92 of 273)
1) Electric wall or baseboard heaters: Cheap to buy, expensive to operate and can be noisy (like at the rental house).
2) Hot water baseboard heaters: these can be attractive, a bit expensive, and require much hotter water (ca 160-180°F) than we'll be making in the basement (120°F for Warmboard). So that means buying a second water heater (boiler really), and that doesn't make any sense to us.
3) Radiant heating—Staple up. There are various companies that make systems for heating your space by stapling radiant tubing below the subfloor and insulating the joist cavity. The idea is that the heat moves up and through the floor: early versions were simply hot-water tubing attached to the subfloor. Now they prefer to use aluminum plates or sheets to spread the heat out, which works pretty well. The heat source (pipe) is still 1.5" away from your feet, but wood has an R value of 0.7-1.4/inch, so there isn't much resistance. These plates screw to the bottom of the subfloor and provide a track for the tubing. Typical products are include Joist Trak by Wirsbo ($2/sq. ft) and Thermofin C heat transfer panels ($3.50 sq. ft) by Radiant Engineering. The materials are commonly priced at about $6-10 a square foot, which is as much as the clearly superior Warmboard we used downstairs ($215 per 4'x8' sheet = $6.72 sq. ft). One problem with staple up is you need to snake 300 ft of semi-rigid Pex through holes in the floor joists, joist blocking, and any headers. You use 8" spacing, so 300 ft of pipe (max length per loop) only covers 200 sq. ft of floor. Plus all the work is overhead with ladders, which isn't pretty when middle-aged folks are involved.
4) Radiant heating—Above floor. In retrospect, we probably should have used the Warmboard upstairs too since the other (inferior) commercial products are nearly comparable in price. However, we went past that fork in the construction road several months ago and there's no point in looking back (sorry Bruce Hull, our Warmboard guy). Nevertheless, other above-floor options are out there. Two prominent ones are Quik Trak panels by Wirsbo and Raupanels by Rehau. The Quik Trak panels are 7" by 48 and screw down onto the subfloor. They price out at about $4/sq. ft (currently on sale). One problem with these is that they use 5/16" HePex O2-barrier tubing which is not compatible with co-mingled radiant and domestic water system. Same goes for the Raupanels, which are lower tech. The are basically 8" x 48" plywood panels with a groove routered down the middle for the Pex. The ends are pre-routered returns, so when its all laid out and screwed down it looks like a less eloquent version of Warmboard, but priced at about $11/sq. ft. The attractive part about above floor heating is how easy the tubing goes down. So I got thinking about a 4th option, which I like to call Mikey's Thermoboards.
4) Thermoboards (aka poorman's Warmboard). This is a hybrid version of Raupanels made out of 5/8" plywood. Technically, the piping gets laid out just like the Warmboard, but it doesn't have a continuous bonded-aluminum upper face. I'll rip 11 3/8" wide panels out of the 5/8" AC plywood (longways, 4 panels per sheet, ca. $35 each or about $1 sq ft.). The 1/2"AquaPex tubing (5/8" OD, $0.37/ft mail order) will go between the panels, for a finished width of 12" per panel. For the returns, I'll cut 12" x 48" panels from plywood, screw then down and use the router templates and bit that Warmboard supplied to make the return channels for each pipe run. I'll put a layer of aluminum under the panels (heat transmission) where I want it a bit warmer (bathroom) and cover the tubing with 10"-wide aluminum (comes in rolls, like the stuff they extrude gutters from now days). I can staple the aluminum down with my new airgun (Porter Cable from Tool King in Denver; it has a compressor, stapler, finish nailer and brad nailer; $229) and screw the panels in place with 1 1/8" drywall screws (ca. 800). Lots of labor, but like Pete Rowley (ex-USGS) was fond of saying "what is time to a pig." When you install the finished flooring, be careful to not nail through any of the aluminum or piping, and all is well (same goes with the Warmboard). The aluminum runs about $1 a square foot, so I think the finished Thermoboards (without tubing in them) will price out at $2.50 a sq. ft, which is 2/3rds to 1/4th the price of commercial options. Did I mention the No. 1 reason to build your own house: You can easily justify every tool you'd want to buy (new table saw comes next week, oh boy).
By the way, we've got a daytime security system in place. It has high-gain audio capability, search and retrieve options, and the ability to incapacitate intruders. It operates during working hours and is fueled by bacon, treats, and lunch scraps: a pretty efficient unit named Coal. He's Gary's buddy and worksite dog. He grew up on the job and, in fact, Gary has turned down framing jobs for people that aren't particularly fond of dogs.
Monday, January 19, 2009
Framing upstairs (Day 90 of 273)
On Friday they got the second floor exterior finished, and we're waiting for two large overhead beams to arrive on Monday. The big one is a 26-ft long 6 3/4" x 21" Gluelam and the shorter one (first floor bedroom) is a 22-ft long 5 1/4" x 18" Versalam. The gluelam is basically a sandwich of 2x6s, 14 of them glued together on their broad side. It weighs about 750 pounds, whereas the smaller Versalam only weighs 500 pounds.
So today is Day 90 of the build, which puts us at about 25% into our allowed 9 month (273 day) schedule. So far, so good. Once the roof is on (late February), the weather won't be a real factor and it should be getting warmer. Days are already noticeably longer (sunset at 4:30 pm) and by the vernal equinox on April 21, we'll have 12 hrs of sunlight ( fog permitting).
Monday, January 12, 2009
Making changes on the fly (Day 83 of 273)
Today the upper floor package should arrive from Carls. This includes about 30 floor joists, all the framing timber and some massive Versalam beams. The one that extends above the fireplace and supports the upstairs bedroom is 6"x16" and about 24 ft long. Looks like there might be a problem moving it around and lifting it into place. I put an order in for a sky crane and space hook. Stayed tuned.
THE BLIND CARPENTER
A blind carpenter walks into a lumber mill and shouts out, "I am a blind carpenter and I need a job."
The foreman walks over to the blind carpenter and says, "If you're blind, how can you work in a lumber yard?"
The blind carpenter says, "I can tell any piece of lumber by it's smell."
The foreman says "O.K. I'll give you a test and if you pass the test, you've got a job."
The foreman takes the carpenter over to a table and says, "I will put some lumber on a table in front of you and you tell me what it is."
The foreman then puts a piece of lumber on the table and says, "Ready!"
The carpenter bends over and takes a deep sniff moving his head from one side to the other. He says "That's a number two pine, two by four, eight foot long."
The foreman says, "Duh! That's right, but pine is easy to tell by the smell and I think you guessed the rest. Here's another piece of lumber for you to identify."
The foreman puts a piece of lumber on the table and says, "Ready!"
The blind carpenter bends over and takes a deep sniff moving his head from one side to the other and says, "This is a tough one, please turn it over so I can smell the other side."
The foreman does this and says "Ready!"
The carpenter takes another deep sniff moving his head from side to side. He then says, "That's a clear heart redwood, four by four, six foot long."
The foreman is amazed and says "That's right, but I still think you're just lucky and still guessing. If you get this one right you got a job."
The foreman then goes into the office and asks his secretary to help him stump the blind carpenter by taking off all of her clothes and laying down on the table. She takes off her clothes walks out of the office and lays face down on the table. The foreman says, "Ready!"
The blind carpenter takes a deep sniff moving his head from side to side. He looks puzzled and takes another sniff and says, "This also is a tough one, please turn it over so I can smell the other side."
The foreman gestures with his hand to the secretary, she rolls over, and the foreman says, "Ready!"
The blind carpenter moves his head from side to side again looking puzzled. He sniffs one more time, looks surprised, and says, "I got it. That's a shit house door off a tuna boat."
He got the job.
Thursday, January 8, 2009
The Blue Hole (Day 79 of 273)

When Nancy and I stayed at the Lake Quinault lodge last year, we were fasinated by their totum-pole rain gauge. It is a 20-ft-tall pole with a sliding gauge. In August they'd had 7 ft for the 2007 year, and in November they got 12 inches in one day. The rain comes into the lake so fast it can escape through the narrow natural spillway, to the lake can rise 8-10 ft overnight, inundating the campgrounds. All the houses and permanent structures are built at least 10 ft above the spillway elevation. Great place to visit, and the lodge is a USPS historic lodge.
Port Townsend gets about 17-18" of annual precip, as we do at Kala Point 5 airline miles south of town. We are in the south center of the Blue Hole. The Komo (Seattle TV Ch. 4) website (http://www.komonews.com/weather/faq/4306627.html) has a good discussion of the Blue Hole, but highlight the town of Sequim because it has the least rainfall (14") of all the towns. There is catcus growing on south facing slopes in Sequim, so they have a Denver-like climate without the snow and >80°F temps. However, you know what they say about Sequim. That's where the old folks go . . . to visit their parents. Enough said.
Wednesday, January 7, 2009
Dancing with the Subs (Day 78 of 273)
So today we'll try for a few more loops (4 of 9 to go). I bought a 20' x 30' tarp and a bunch of bungees and rope last night, hoping to tent over the next loop. That way we'll only have to clean and dry each section once. That the plan—let's see what Sub 3 has in mind. By the way, the forecast is for 10-20 inches (yes inches not cm) of rainfall in the Olympic Mtns for Wed and Thursday. They are about 50 miles SW of us, so we are praying for the famous Blue Hole to save us.
P.S. Thursday. I called Jason back to the jobsite to help me, since Nancy had to work today (I call it her day off when she works downtown). It rained in the am, so we constructed a tent over the floor and pressed on. Managed to get loops 6 & 7 done before lunch, then the wind came up and whipped the 20' x 30' tarp around like a bandana. However, that was followed by sun and dry weather, so we laid the last two loops (8 & 9) in record time. Finished about 4 pm, and spent the rest of my day cleaning up all the paper towels (5 rolls) and empty caulking tubes (52) that we scattered hither and yond. So, as of today (Jan. 8th), the house is back in the hands of Ellis Construction. Friday (tomorrow) is the framer's weekly construction meeting, which we've been invited too, at the Spruce Goose Cafe—7 am prompt. If we don't show up there will be a lot of owner/builder jokes told.
Sunday, January 4, 2009
Fast framers afoot (Day 75 of 273)
Once assembled, the three framers attach jacks to 12'-long 2x4s. The bottom of the 2x4s are nailed to blocking on the floor, and the jack is hooked to the top of the wall. The wall is wedged up a bit, and the jacking begins (Tony, these jacks are a variety of our famously dangerous Handyman jacks we used at the USGS). The sunroom wall went up first. Two jacks and about 5 minutes later it was in place. Next was the massive (58 ft. long) north wall. Three jacks and 10 minutes of jacking and it was up. Two shorter walls also went up, all in about 6 hours on Friday. The only glitch was a brain fart that Troy had. He'd left the plastic gas can next to the end of the long wall and when they jacked it up, the plywood skirt got caught on the can and compressed it. So they had to dig the gas can out, but put a hole in it in the process. No biggie, Home Depot has lots of them.
Monday they'll finish the exterior walls (but not garage, thats next) and tie them all together. Then its time for Nancy and I to do the Pex thing. We spent the weekend cleaning up the Warmboard. The channels were filled with frozen sawdust, nails and other construction flotsam, so this was quite a treat. The Pex is pretty rigid and isn't supposed to be installed below 40°F. The forecast is for warming weather, so we hope that around Tuesday and Wednesday well put all the radiant (Wisbo) tubing in place, but that's another blog.
Tuesday, December 30, 2008
And It did . . . (Day 70 of 273)
On Monday (first-day back), the temps were in the 40s, the generator was a chugging, and the nail guns were a firing. The power company still hasn't shown up to connect the temporary power; something about being over in Seattle dealing with all the downed trees and power outages (none over here). Gary and crew put most of the 45 floor joists in place, and finished them off this morning. Our soon-to-retire inspector (one-eyed Frank) spent 0.5 minutes inspecting the subfloor framing (all was well), and the Warmboard arrived at 9:30 am as requested (thanks again Mr. Carl). I made two trips to Carl's for more nails, some miscellaneous hardware, and various fittings. Did you know that a galvanized 1/2" x 7" bolt costs $4.25?; no, neither did I. Then I needed 6 torx screws (3/16" x 7"), which are sold in boxes of 50 for $70 (1.40 each), but I didn't need 50, just 6. So off to McHenerys (the McGuckins of Port Townsend), who sell them by the piece ($2.00). No big deal, just another bargain-searching expedition. I suspect that I spend 50% of my time looking to save $2 on some trival parts and 10% of my time accepting subcontracts for tens of thousands of dollars.
By the early afternoon, Ellis and crew had about 40 sheets of the Warmboard down, with 24 to go. They are being very careful, aligning the grooves and keeping them all in a row (Bruce Hull and Barry LaDuke of Warmboard would be pleased). We have four types of patterns: S (straight), L (left), R (right), and D (double). The Warmboard Co. does the design work and makes a layout sheet for us and the guys lay them down like gigantic Legos. It it all comes out right we'll use up all the sheets and have 7 loops (in 2 zones) to lay Pex pipe in.
Levi our hydronics expert recently went rogue and formed his own company (Levi's Energy Services LLC. We'll still deal with him as a subcontractor thru Sunshine Propane, but he's getting out there on his own for greater fame and profit (can't blame him in this business environment). Levi is a great guy: today he delivered the 2300 ft of Pex, all the manifold fittings and assorted pieces, and loaned us a tubing handler (roller contraption), heat gun, and electric caulk gun (no squeezing needed, Nancy
Tomorrow I’ll do all the custom routering of the Warmboard. This means using their templates to route connecting lines where neeed, and using a 1" drill to penetrate the plywood where the Pex needs to go into the basement.
Since the temps will be in the 40s when we lay the pipe this weekend, we'll need to heat it up a bit to bend it into the corners and to make the dives into the subflooring. Snow and freezing temps are the last thing we need now. It should be an interesting process. We’ll vacuum and wipe out the channels in the Warmboard, then I’ll roll out the tubing (ca. 300 ft for each loop). Nancy will put a 1/8" bead of Silicon caulk in the channel and I'll follow with the tubing, hammering it in place as we go. The bitter ends of the tubing need to extend into the basement far enough to attach to the manifolds, which is the heart of the radiant heat distribution system.
Friday, December 19, 2008
Let it snow, let it snow . . . (Day 59 of 273)
Well, Colleen of Denver wanted to know how and where the house sits on the lot. The lot is 200-240 ft deep and about 100 ft wide (0.6 acres), or about 4 x larger than the one that we had our house on in Denver. Its heavily treed on the back (E) left (N) side, but open to the right (S) and street side (W). We only left a few trees on the lot since most of it is occupied by something (house, garage, driveway, septic fields (front and rear-reserve), buried propane, and septic tanks. We build some low mounds in the front that will provide a visual break from the street, when vegetated.We'll get good south sunlight from about 10 am to 6 pm in the summer, but just a bit in mid day in the winter because the sun only rises to about 20° above the horizon at noon. Makes you feel like you're living way north. The latitude here is about 47.5°, or 8 degrees north of Denver. Conversely, its still dusk at 10 pm in the summer, a great time to go down to our beach and poke around.
The house is 58 ft x 48 ft (N and E sides) and the garage is 30 ft x 26 ft. So the depth of the house is pretty long at 88 ft. The garage is set back about 75 ft from the street, with a long curving driveway. Those weird inclined lines on the image are the septic drains (5) in the front yard. We'll probably plant some type of ground covers in this area, since we're not interested in mowing or maintaining a lawn (sound familar Mackey).
Its still snowy and cold (26°F) today (Friday), so the framers are contemplating a Hawaiian vacation (or at least the sauna and hot tub at the rec center. Its not supposed to warm up until Christmas Day, so we won't miss any good weather while we're in the Bay Area. Merry Christmas.
Tuesday, December 16, 2008
Saw's sawing, hammer's nailing (Day 56 of 173)
On the heels of a terrible snow storm (2 inches, 28°F), Gary Ellis and his son Troy started the framing. They were there promptly at 7:30 am (daybreak here) and we off loaded my newly acquired Dewalt 7000W generator and fired it up. I bought this puppy over the weekend from a guy in Mt. Vernon, which is north of Everett and east of the Sound. Found it on Craigslist (no it isn't stolen) for $950, about 1/3 of the new price. He used it for 4 hours for backup power, then decided he didn't really need it. We have enough voltage to power all the Christmas lights in Kala Point.
About 8 am, Carls delivery truck arrived with $12000 of lumber for the subfloor framing, beams, sill plates and floor joists. He skidded the load off next the house and promptly got stuck. Troy pulled him out with their 4x truck and all was well. By lunchtime Gary and Troy had all the sill plates cut, drilled and bolted down and were starting on the Versalam beams, which run across the basement and crawl spaces. Next comes the 3" Versalam rim joists around the perimeter of the house, and then the floor joists, 2" x 11 7/8" BCI 5000s (these details are for Steve T).Overkill you say— no just solid to resist Mother
Nature's impending M8 earthquake Cascadia subduction zone earthquake (thanks Steve, Alan, Bob, and Sam, all USGS EQ research guys).I managed to do some minor jobs (nuts on bolts) and chase down missing parts and lumber. By the end of the day everyone was pretty cold, but its starting to look like a house will rise from this spot. I've included some representative pictures of the subfloor framing and sill plates, and that cute little generator that is bound to drive my neighbor crazy in the morning. Notice the picture of a sill plate riddled with bolts. This is the "Ode to Mikael" at the front entrance, where we planted a Geo Washington dollar for good luck (see the Putzmeister, Day 42).
By Tuesday pm, Gary and Troy had all the sill plates bolted down, all six 5 1/4" Versalam beams in place, and were working on the rim joists (3" Versalam). These will take a while since they need to be attached to the sill plats with a Simpson A23 bracket (L-shaped angle bracket), about 150 in total. Thank god for nail guns.

The left photo shows a 12' long beam under the sauna, a header (beam) in the crawl space opening, and a 26' beam over the basement and under the main living area. The photo on right shows the whole 48 ft of the main beam. It came in 2 pieces, probably about 300 pounds each! Gary and Troy horsed in into place by themselves.It looks like we're down for a while. It snowed again on Wednesday and Thursday and is staying cold. So I suspect the framers will lay off a while. I'd like to be back from Christmas break (Bay area for a week) when the cold Warmboard goes down. In addition, the installation notes say that the Pex piping needs to be laid at 40°F or higher, which is isn't even close to right now. Gary has another framing job behind ours, so he's motivated to finish, whereas we'd like to get a better weather window to lay the Pex done.
Subcontractors and Suppliers
- Balco Excav. (land clearing, Bill Snyder)
- Bill McCutchen's Mill (cedar trim)
- Blake Tile and Stone, Sequim (Judy Reno, Eldorado Stone, Tile)
- Bob Brown Plumbing (Bob & Josh Brown)
- Boise Cascade joists (from Carls)
- Carl's Building Supply (Mike, Melissa, Michele, Terry & Lawrence)
- Castlerock Landscaping (Tim Hamm, Sequim)
- Cotton RediMix (concrete and gravel)
- Craighead Electric (Gary Estes)
- Custom Hearth (propane fireplaces), Pousbo
- Daltile (Seattle, Wedi board)
- Discount Cabinets of Washington (Sequim)
- Discovery Bay Materials (gravel, top soil)
- Earl Kong (professional forester, PT))
- EcoHaus (Amer. Clay Plaster, cork flooring)
- Ellis Construction (Gary and Troy Ellis, framing)
- Evergreen Products (Drywall, Sequim)
- Fergusons, Seattle (Plumbing fixtures, Bud Allen Wright)
- FInlandia Saunas (Tigard, OR)
- Fitzgerald Concrete (driveway, Mike Fitzgerald)
- Four Corners Nursery (trees, Port Hadlock)
- Frank Feltes Custom Drywall and Painting (drywall and painting)
- Frank Ward and Wayne Jobst (Stone masons)
- Fredricks Appliances (Redmond, all appliances)
- Giraffe Gutters (Dan Shaw, Chimicum)
- Glass Etchings by Perrett (Jerry Perrett)
- Hadlock Building Supply (bits and pieces)
- Hardiboard, siding, backer board (from Carls and Home Depot)
- Henerys Hardware (Cabot stain, misc. fasteners)
- Hi-Tech Electronics (Audio & Media, Port Angeles)
- Hide-A-Hose (Joseph, A-B Vacuum, Puyallup, WA)
- Home Depot (electrical & plumbing supplies, interior paint)
- Home Storage Solutions (John Plake, PT)
- Hope Roofing (Pabco Paramont Advantage shingles)
- Jim's Tool Time (J. Quandt, misc. carpentry)
- K&D Concrete (Don McNeese)
- Kitchen and Bath Studio (Shelly Little, cabinets)
- Levi's Energy Services LLC (radiant design, vents, propane piping)
- Meta Marble and Granite (travertine), Seattle
- Michaelangelo (sepentinite), Seattle
- Mikael Brostrom (Structural Engineer)
- Mills Interiors (wood flooring, some tile)
- North Coast Electrical (Electrical Supplies)
- Olympic Garage Doors (Sequim)
- Penisula Flooring (carpet)
- Penisula Shower and Mirror (Sequim)
- PexSupply (online plumbing and radiant supplies)
- Puget Sound Power (and Atelco installers)
- Richard Berg Architects (Richard and Darlene)
- Richard Gifford Construction (septic, dry wells and grading)
- Richerts Marble and Granite (countertop fabricators)
- Seattle Lighting (lighting fixtures)
- Secret Gardens Nursery (Sheila Piccini)
- Shine Quarry (basalt for landscaping)
- Sierra Pacific Windows (Rob Sorg)
- Simpson Doors (from Carls)
- Simpson Strong Tie (fasteners & hold downs)
- Stewart Excavating (Mark Stewart, foundation)
- Sunshine Propane (propane and tank)
- Therma-Tru Doors (from Carls)
- Tracy's Insulation (batts and blow in)
- Trex Decking (from Carls)
- Trussworks (roof trusses, Carl's)
- Velux (Skylights and Solar tubes, Carls)
- Versalam beams (from Carls)
- Warmboard (Bruce Hull)
- Wisbo Aquipex, Taco Pumps, Polaris tank (Sunshine Propane)
Followers
About Me
- Kala Point Builder
- Professional geologist (USGS, 1972-2008), amateur home remodeler and now builder. Interested in sailing, all things involving salt water, woodworking, and food in general. Owner of Paleo Seis Surveys LLC, consulting in Quaternary geology and geological hazards.