
Its Saturday, Halloween, and I'm hoping for treats not tricks. It rained buckets in Seattle yesterday, but not a drop fell on us in Port Townsend so I made some real progress in terms of painting the exterior of the hose. As you'll recall, all the shingles are up on the back of the house and now we need to get paint on them (upper level) and Hardiboard (lower level).
I fired up the "Ken Olsen Spray Tech 2120" rig, its a real monster. Feeds from a 5 gal bucket through a 50 ft hose. After reading the manual, I went to PT and got a replacement spray tip and a swivel extension, which saved my bacon. The extension is 3 ft long and allows you to spray a vertical pattern 10 ft high, so I didn't need to operate off a ladder on top of the scaffolding. I actually felt safe for a change. Anyway, after getting the rig set up and loaded with paint, I sprayed the entire north-facing section of the house (a triangle, 48 ft long and 12 ft high) in about 10 minutes! Then I back rolled it all (forces the paint into the shingles) with a 9" roller. I used a 6" foam roller to squeeze paint into the porous ends of the shingles so they'd be painted too. After about an hour, I reshot all the shingles with a light coat and back rolled it all a second time. Start to finish was about 4 hours, including a hour to clean up the sprayer. We're using oil-based stain (Cabots), so clean up is more complicated than latex.
Today, Darrell Olson (not a relative of Kens, but should be) is coming over so we can move all the scaffolding around to the back side of the house. Then I'll spray those shingles, break down the scaffolding, and start spraying the Hardiboard from ground level on Sunday. The weather forecast is for mild temps (50s) and decreasing rain through Wednesday, which is our current deadline for completing the exterior. Its looking like we'll be in for a treat ($1000 refund), not a trick (fines) from the Architectural Committee.
Nancy and I are starting our new careers as amateur landscape gardeners. A local nursery (Secret Gardens) is having their end of season sale through today, so yesterday we went down and picked out 7 trees and a dozen scrubs in exchange for a M-note. At 35% off, it'll save us some bucks, but plants are expensive if you want a yard that doesn't look Lilliputian. The idea is to get the bigger plants in the ground now so their roots will get established over the winter, then add foliage in the spring. The trees include a giant redwood, birch, 2 western red cedars, a colorful maple, and 2 flowering dogwoods. Now the trick will be to keep the deer from eating all the new growth in the spring. I'm thinking paint ball gun so we can scare and mark the vandals in one pull of the trigger.
Building a House in Kala Point, Port Townsend, WA
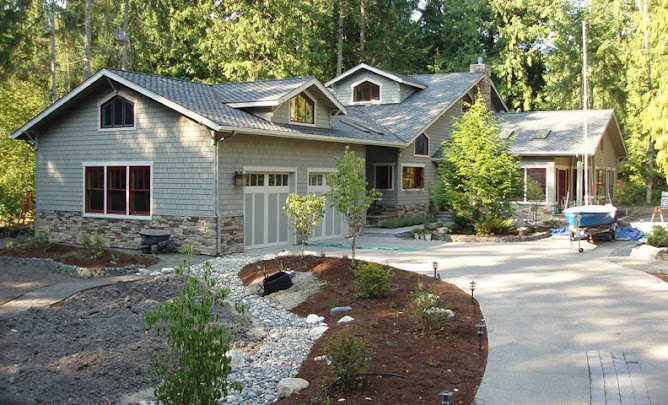
A running narrative of first-time builders of their retirement home in Port Townsend, WA (NE corner of the Olympic Pennisula, 60 miles NW of Seattle). Follow us as this adventure unfolds in late 2008 and beyond. 18 months under construction, we moved in on May 25th, 2010. Photo taken August 15, 2010.
Saturday, October 31, 2009
Wednesday, October 28, 2009
Back in the Saddle (Day 367)
Well, not much has happened for two weeks. We took a break from building, partly for rest and partly because we had two trips planned. Did the GSA meeting in Portland for a long weekend, worked two days getting ready to paint the exterior, then headed off to Denver for a final trip.
The USGS wanted me to clean out my office on the off chance they might hire someone new, some day. One day of work and mission accomplished. Threw away the leftovers from a 35-year career, shipped 4 parcels to myself, one to Jeff Knott, and gave the other good stuff away. Then Ken Olsen had his 60th birthday so we couldn't miss that, followed by the Hobie Fleet Fall Party and a chance to see Steve and Judy. On Sunday we scooted off to South Dakota to see son Tom , Jenn, and the kids, then back in 24 hours. Returned home on Tuesday to find out that we'd had a couple inches of rain and more on the way. So, slow it goes for now. Next and final deadline is Nov. 5th for the exterior. If the sun shines, the airless sprayer is coming out and paint will be a flying onto the shingles and then the Hardiboard. Can't wait to finish this part of the project; then we can concentrate on the interior during the winter months. New move in date is May 1st, god, weather, and bank willing.
Nancy and I are agonizing over a basic paint color for the walls and ceilings. We'll narrow it down to 3 color choices tomorrow, then get 3 oz. samples from Home Depot and see which of the 3 we like the best. We need to coordinate the basic color with the American Clay plaster, the kitchen cabinets, red birch flooring and the fir trim (both of which will be natural). If we don't like the color, we can always repaint at a later date. Frank is scheduled to shot the whole house (but not garage) next week, so the paint has to be on site by Monday evening. It will take about 60 gals to do the whole house, then another 5 gallons for accent colors that we'll roller on at a later date.
Meanwhile, more pavers are on the way for the front walk, I'm looking at basalt boulders for some short walls that we need for landscaping, and we have to pick out a bunch of trees while the fall sales are on. No problem finding ways to spend money right now.
The USGS wanted me to clean out my office on the off chance they might hire someone new, some day. One day of work and mission accomplished. Threw away the leftovers from a 35-year career, shipped 4 parcels to myself, one to Jeff Knott, and gave the other good stuff away. Then Ken Olsen had his 60th birthday so we couldn't miss that, followed by the Hobie Fleet Fall Party and a chance to see Steve and Judy. On Sunday we scooted off to South Dakota to see son Tom , Jenn, and the kids, then back in 24 hours. Returned home on Tuesday to find out that we'd had a couple inches of rain and more on the way. So, slow it goes for now. Next and final deadline is Nov. 5th for the exterior. If the sun shines, the airless sprayer is coming out and paint will be a flying onto the shingles and then the Hardiboard. Can't wait to finish this part of the project; then we can concentrate on the interior during the winter months. New move in date is May 1st, god, weather, and bank willing.
Nancy and I are agonizing over a basic paint color for the walls and ceilings. We'll narrow it down to 3 color choices tomorrow, then get 3 oz. samples from Home Depot and see which of the 3 we like the best. We need to coordinate the basic color with the American Clay plaster, the kitchen cabinets, red birch flooring and the fir trim (both of which will be natural). If we don't like the color, we can always repaint at a later date. Frank is scheduled to shot the whole house (but not garage) next week, so the paint has to be on site by Monday evening. It will take about 60 gals to do the whole house, then another 5 gallons for accent colors that we'll roller on at a later date.
Meanwhile, more pavers are on the way for the front walk, I'm looking at basalt boulders for some short walls that we need for landscaping, and we have to pick out a bunch of trees while the fall sales are on. No problem finding ways to spend money right now.

Wednesday, October 14, 2009
Spray Away (Day 355)
Its Wednesday, Oct. 13. Approaching the one year date for the house, having felled the trees on our lot on Oct. 23, 2008. Doesn't seem that long, but then again there were some cold rainy days last winter that I'd prefer to forget.
This week I need to finish laying the shingles on the back of the house, but the hard part is finished now. I think there are about 3 bundles (75 sq. ft) left to hang. Then I need to spray all the shingles (above) and then the hardiboard (below). The paint goes on fast (like a gallon a minute), so most of you time is spent in preping the windows and vents, and moving scaffolding. If the weather holds, this should be done in a week or so.
The drywallers are done. Frank's no. 1 daughter put plastic over all the windows and installed doors in the house and will finish the garage this morning. Then daughter no. 2 will be by to clean up all the debris and mud boxes (about 20) before they shoot the PVA paint on the walls. PVA is a primer with vapor barrier in it. (Poly Vinyl Acetate is a professional primer sealer for new construction and all unpainted interior drywall and texture coatings. A proprietary formula that includes acetate instead of the usual acrylic which is an improvement for sealing out moisture and odors. Designed for the professional painter and for the quality conscious consumer. Formulated for excellent adhesion, even sealing and holdout, it provides a uniform foundation for alkyd or latex paint.) After this is dries, Frank will roll up his drywall texture machine (cement mixer with a pump on it) and start shooting the texture on all the walls that will get painted. Three walls will be left alone: 2 for American Clay plaster and one for the rock fireplace surround. So, if all goes well, the house will be back in our hands by Friday night. Off to Portland for the GSA meeting, where there is a special session to honor Michael's career in geology and a dinner to roast him. This is something that Jeff Knott cooked up—apparently its easy to impress (or fool) him since he's from LA. It'll be a welcome break from the house, an opportunity to see Portland and some old friends (including Bill and Mary Scott).
When we get back into the house on Tuesday, it'll be time to start spraying all the walls with another coat of primer (not PVA) and the finish coat of paint, which will be backrolled. That ought to be quite a workout for the old arms, but the house will start to look finished with color inside. If we paint all the drywall, that would be 16,000 sq. ft. I'm figuring 15,000 sq. ft at 250 sq ft/gal will require 60 gals of primer, 50 gals of the basic color paint, and 10 gals of highlight colors. At $15-20 a gallon (average), the paint bill will probably run $1800 to $2400. However, Home Depot offers contractor prices to everyone if you purchase $2500 or more. You need to set up an account, give them a materials list (paint, backer board, mortar, some tile, electrical outlets, etc), and they'll give you a bid at reduced rates (ca. 5-10% off). At those prices, paint and electrical suppliers can't complete. We'll see how it goes. Right now we're in a race between the checkbook, the end of the year (for taxes and income), and completing the house. I suspect the checkbook will lose.
This week I need to finish laying the shingles on the back of the house, but the hard part is finished now. I think there are about 3 bundles (75 sq. ft) left to hang. Then I need to spray all the shingles (above) and then the hardiboard (below). The paint goes on fast (like a gallon a minute), so most of you time is spent in preping the windows and vents, and moving scaffolding. If the weather holds, this should be done in a week or so.
The drywallers are done. Frank's no. 1 daughter put plastic over all the windows and installed doors in the house and will finish the garage this morning. Then daughter no. 2 will be by to clean up all the debris and mud boxes (about 20) before they shoot the PVA paint on the walls. PVA is a primer with vapor barrier in it. (Poly Vinyl Acetate is a professional primer sealer for new construction and all unpainted interior drywall and texture coatings. A proprietary formula that includes acetate instead of the usual acrylic which is an improvement for sealing out moisture and odors. Designed for the professional painter and for the quality conscious consumer. Formulated for excellent adhesion, even sealing and holdout, it provides a uniform foundation for alkyd or latex paint.) After this is dries, Frank will roll up his drywall texture machine (cement mixer with a pump on it) and start shooting the texture on all the walls that will get painted. Three walls will be left alone: 2 for American Clay plaster and one for the rock fireplace surround. So, if all goes well, the house will be back in our hands by Friday night. Off to Portland for the GSA meeting, where there is a special session to honor Michael's career in geology and a dinner to roast him. This is something that Jeff Knott cooked up—apparently its easy to impress (or fool) him since he's from LA. It'll be a welcome break from the house, an opportunity to see Portland and some old friends (including Bill and Mary Scott).
When we get back into the house on Tuesday, it'll be time to start spraying all the walls with another coat of primer (not PVA) and the finish coat of paint, which will be backrolled. That ought to be quite a workout for the old arms, but the house will start to look finished with color inside. If we paint all the drywall, that would be 16,000 sq. ft. I'm figuring 15,000 sq. ft at 250 sq ft/gal will require 60 gals of primer, 50 gals of the basic color paint, and 10 gals of highlight colors. At $15-20 a gallon (average), the paint bill will probably run $1800 to $2400. However, Home Depot offers contractor prices to everyone if you purchase $2500 or more. You need to set up an account, give them a materials list (paint, backer board, mortar, some tile, electrical outlets, etc), and they'll give you a bid at reduced rates (ca. 5-10% off). At those prices, paint and electrical suppliers can't complete. We'll see how it goes. Right now we're in a race between the checkbook, the end of the year (for taxes and income), and completing the house. I suspect the checkbook will lose.
Tuesday, October 6, 2009
Day of Reckoning (Day 347)
Well, Monday was the day of reckoning (9 month + 2 month extension) in terms of the Kala Point Architectural Committee, which meets today (Wednesday morning). I'm sure our house will be the topic of much discussion since we didn't exactly make our "finished on the outside" deadline. But from the attached photo, it looks done to me. (PS, don't look in back). The concrete driveway is curing and the forms come off tomorrow, so there won't be any visible signs of construction. If that doesn't satisfy the committee, then screw them. Nancy has been painting around the exterior doors and window in preparation for the BIG SPRAY JOB, which is a week or two away. I've been hanging more frickin shingles, and painting them around the edges so we can mask off the other stuff. I included Darlene's (Richard Berg Architects) 3-D sketch for comparison to what actually got built. Not bad if we say so.


Pouring the driveway was an education in itself. Call it Concrete 102, whereas the Foundation was Concrete 101. My professor was Mike Fitzgerald, a 60s'ish bearded biker with a big old soft spot for dogs (especially German Shepards) and Miller Genuine Draft beer. I came highly recommended but I had a hard time reaching him (was in divorce court then on a road trip--think Easy Rider). Anyway, he gave me a price, then we negotiated. I guess the guy liked us since we were doing a lot of the work ourselves, so we cut a deal involving some labor on my part & cash. Apparently, he's not inclined to make many more fiscal donations to the ex. After the deal was made, I called him and said I'd also like to pour a little pad for a shed in the back before the driveway went in. I formed it up and put the wire mesh and rebar in place. He came out, helped pour it and finished it off. I asked him what I owed him and he wouldn't say, but in the long run a case of Miller evened the score.
About the driveway concrete. Normally, you'd spec a standard concrete mix. That is 5 bags of cement per yard (cubic) and 3/4" aggregate (crushed is best). However, in Kala Point exposed aggregate driveways are popular and look really good. The downside is they are more expensive and sweeping them off is a pain, so most everyone has one of those hideously noisy leaf blowers. Looks like I'll be buying one, perhaps the electric (quieter) version. Our formula for the exposed aggregate went this way: 6 sacks of concrete, pea gravel (<3/8"), fiber, and heat. The fiber acts as a binder for strength and heat, in the form of sodium phosphate, quickens the initial cure so the concrete can be worked in cool weather. After the mud is poured (concrete talk), you spray the surface with sugar water to retard the curing of the surface. Coke, 7Up, molasses, etc. all work, but sugar water is cheap and easy to make. Depending on the mud mix and amount of heat added, it'll take 2-5 hours for the mud to set up enough to get on it. Then you take a stiff brush and hose and wash away the top layer of cement, thus exposing the aggregate. The result is a pebbly, dark concrete surface. Easier on the eyes and it has good traction.
Mike told me to negotiate the concrete price with our local supplier (to remain anonymous, for soon to be obvious reasons). So I made a visit to the local mix master, and you'd think I'd stepped into the 60's. A bunch of 60-70 year old guys in a plywood shack, chewing. I suspected that there was a poker game going on in an adjacent room. After a few warm up comments, I asked my familiar question: What sort of a deal can I get. Well, he said, for multiple loads I can get 5% off, and if I pay cash I can get another 8.4% off (that's exactly the same rate as the tax, what a coincidence). Well, I ordered 24 yards and went away smiling. When I went to pay yesterday, I handed over $2500 in cash, the mix master tore up the load tickets, and we called it even. No receipts, just like 24 yards (48 tons) of concrete evaporated.
So it pays to negotiate, ask a few questions, and be willing to supply the green stuff. If I'd used my first concrete guy, the bill would have been about $10.8k for labor and tax and another $2.8k for concrete, for a total of $13.6k. That's quite a driveway, I'd say. In the end, we spent $4.6k for labor, $20 for a case of Miller, and $2.5k for concrete, for a total of $7.12k. That makes up a bit for the $37k foundation last November at full price.
PS. We stayed away from Wednesday's committee meeting, but later on a neighbor came by and said that since we were so close to making the deadline that the committe had granted us another month extension. (Nov. 5). That was easy, but we're still not done with the shingles and painting. However, Nancy has dipped her final shingle (about 5,000), everything from here on will be sprayed thanks to Ken Olsen and his old airless sprayer (Happy Birthday, Ken). We've asked for a 6 month extension on the rental house (until May 1), and figure it will take most of that time to complete the interior (paint, trim, doors, hardwood floor, tile, showers, cabinets, and final electrical). The new schedule gives us some breathing room and time off to travel to California after Christmas and maybe a little side trip to warm water. Oh boy, we'll need it. Ciao for now.


Pouring the driveway was an education in itself. Call it Concrete 102, whereas the Foundation was Concrete 101. My professor was Mike Fitzgerald, a 60s'ish bearded biker with a big old soft spot for dogs (especially German Shepards) and Miller Genuine Draft beer. I came highly recommended but I had a hard time reaching him (was in divorce court then on a road trip--think Easy Rider). Anyway, he gave me a price, then we negotiated. I guess the guy liked us since we were doing a lot of the work ourselves, so we cut a deal involving some labor on my part & cash. Apparently, he's not inclined to make many more fiscal donations to the ex. After the deal was made, I called him and said I'd also like to pour a little pad for a shed in the back before the driveway went in. I formed it up and put the wire mesh and rebar in place. He came out, helped pour it and finished it off. I asked him what I owed him and he wouldn't say, but in the long run a case of Miller evened the score.
About the driveway concrete. Normally, you'd spec a standard concrete mix. That is 5 bags of cement per yard (cubic) and 3/4" aggregate (crushed is best). However, in Kala Point exposed aggregate driveways are popular and look really good. The downside is they are more expensive and sweeping them off is a pain, so most everyone has one of those hideously noisy leaf blowers. Looks like I'll be buying one, perhaps the electric (quieter) version. Our formula for the exposed aggregate went this way: 6 sacks of concrete, pea gravel (<3/8"), fiber, and heat. The fiber acts as a binder for strength and heat, in the form of sodium phosphate, quickens the initial cure so the concrete can be worked in cool weather. After the mud is poured (concrete talk), you spray the surface with sugar water to retard the curing of the surface. Coke, 7Up, molasses, etc. all work, but sugar water is cheap and easy to make. Depending on the mud mix and amount of heat added, it'll take 2-5 hours for the mud to set up enough to get on it. Then you take a stiff brush and hose and wash away the top layer of cement, thus exposing the aggregate. The result is a pebbly, dark concrete surface. Easier on the eyes and it has good traction.
Mike told me to negotiate the concrete price with our local supplier (to remain anonymous, for soon to be obvious reasons). So I made a visit to the local mix master, and you'd think I'd stepped into the 60's. A bunch of 60-70 year old guys in a plywood shack, chewing. I suspected that there was a poker game going on in an adjacent room. After a few warm up comments, I asked my familiar question: What sort of a deal can I get. Well, he said, for multiple loads I can get 5% off, and if I pay cash I can get another 8.4% off (that's exactly the same rate as the tax, what a coincidence). Well, I ordered 24 yards and went away smiling. When I went to pay yesterday, I handed over $2500 in cash, the mix master tore up the load tickets, and we called it even. No receipts, just like 24 yards (48 tons) of concrete evaporated.
So it pays to negotiate, ask a few questions, and be willing to supply the green stuff. If I'd used my first concrete guy, the bill would have been about $10.8k for labor and tax and another $2.8k for concrete, for a total of $13.6k. That's quite a driveway, I'd say. In the end, we spent $4.6k for labor, $20 for a case of Miller, and $2.5k for concrete, for a total of $7.12k. That makes up a bit for the $37k foundation last November at full price.
PS. We stayed away from Wednesday's committee meeting, but later on a neighbor came by and said that since we were so close to making the deadline that the committe had granted us another month extension. (Nov. 5). That was easy, but we're still not done with the shingles and painting. However, Nancy has dipped her final shingle (about 5,000), everything from here on will be sprayed thanks to Ken Olsen and his old airless sprayer (Happy Birthday, Ken). We've asked for a 6 month extension on the rental house (until May 1), and figure it will take most of that time to complete the interior (paint, trim, doors, hardwood floor, tile, showers, cabinets, and final electrical). The new schedule gives us some breathing room and time off to travel to California after Christmas and maybe a little side trip to warm water. Oh boy, we'll need it. Ciao for now.
Saturday, October 3, 2009
Tape and Mud (Day 343)
 The commentors say "No blogs for a week, they must be busy." You got it right. The extended deadline for the exterior of the house is Monday, Oct. 5th and there is still a bunch to do—mainly shingling. However, the driveway is formed out and will be poured the 5th and 6th. The hand-dipped shingles on the master bedroom wall are hung, but I still have to finish high up in the mudroom porch, which means putting the scaffolding up on the porch (a bit tricky). I've started the back, big wall for shingles and laid a fifth of it yesterday in 4 hours, so there is a couple more days work left there. The Giraffe guys put on the gutters and look good (gutters are off white and downspouts are gray, in photo with the Vespa). I connected the downspouts to the perimeter drain system, so now the rain goes directly to the dry wells (the peanut filled holes) instead of along the side of house and on the siding.
To be finished on the exterior, we have to paint all the raw shingles and Hardiboard (a week) with Ken Olsen's HD sprayer, hang 5 exterior light fixtures (1/2 day), finish the mudroom porch shingles and soffit boards and trim out the two skylights (2 days), and move all the construction stuff to the rear of the house, where it can't be seen. Looks like we'll finish all that about the time the drywall is complete, weather permitting. Its starting to get cooler and rainier—Fall is definitely here.
Inside the house its a mess. The drywall hangers have gone and the scrappers (2 young girls) got all the drywall scraps out of the house and off to the dump (5 pickup loads full; not so environmentally friendly, but gypsum is a natural earth product). Then they patched the paper covering all the floors (basement and garage too). The mudders arrived on Wednesday and started in with ernest. These two guys really fly through a house.

 First they did all the overhead seams and right-angle corners, then the wall seams. The second day they did the corners (mostly rounded) and base mouldings, and yesterday they did the overhead transistions; seams that are at lesser angles in the ceilings. This takes a special tape product that is 6" wide plastic with a flexible middle. Anyway, they'll hit the nail holes and any other uncovered spots today, so the tape and first coat will be done. Then there is a second coat, several day wait, and a finish coat and sanding. ETF is Tuesday Oct. 12th, if the hunting season doesn't get in the way. BTW, the finishers get $0.20 per square foot from the DW contractor, so they'll net about $3200 for the finishing work, whereas the hangers got $0.18 per square foot ($2880). You can see the pecking order already. Plus finishing DW is a lot less work and more craft than hanging it.
Thursday, September 24, 2009
Say Uncle (Day 334)
Remember when you were a kid and someone had you in a half Nelson, telling you to "Say Uncle." Well, we said uncle this week on the dreaded shingles. With about 28 bundles (3000 shingles) left to dip, Nancy and I decided to finish off the master bedroom part of the house with dippers and then hang and spray the remainder of cedar shingles on the upper backside of the house, were no one will ever see them (from the road).
 So this week, I've been banging them up, post haste and she's started to dip a couple bundles to complete the bedroom area. Today I'll finish the S & E sides of the second story part of the house, and will just have the big kahuna gable section left (N side). This is the part of the house that rises 27' above ground level (yikes). The upper shingled part of the gable is 48 ft wide and 13 ft high, so it will take about 350 sq. ft of shingles (about 14 bundles). So, it looks like I might have miscalculated on my original shingle purchase, having bought 80 bundles but only needing about 70. No worries, the little tool shed that we'll build out back in a couple of years will have Hardiboard below and shingles above, so that will eat up 200 sq. ft of shingles (8 bundles). As you might recall, the singles were my first GOOD DEAL, having bought them directly from a mill in Forks, WA, about 100 miles west of us.
 Last Tuesday we made another foray into the big city (Seattle) in search of a slab of travertine for the 3 bathroom vanities. This should have been easy, but wasn't. I was keen on getting a banded travertine that had some character, but most slabs were looking like Melba toast to me. Went to Dal Tile, Michelangelo's (were we bought the kitchen slabs), Oregon Marble and Tile, Pental, and finally Meta Granite and Marble. By the time we arrive at Meta, we were pretty worn out and had decided that maybe we'd have to use another rock type. Then bingo, we found just what we wanted and it was the cheapest we'd priced all the day. Some times this stuff just works out, if you're persistent.
Our fabricator (Richerts) called in for sizes and prices and actually told me what the rock cost to them! The 2 cm thick (3/4 inch) slabs were $18/sq ft and the 3 cm (1 1/4 inch) slabs were $22/sq ft in polished form. That equates to about $980 for the 3-cm slab, plus the governors tariff (8.4%). The total bill for vanity tops will be about $2400, which breaks down to be $980 for rock, $750 for three sink cutouts, $475 for cutting and polishing 7 edges (21 linear ft), and about $195 in tax. Some where in this breakdown is overhead and a charge for picking up the rock in Seattle. Its a nearly 300 mile round trip that they typically make once a week to pick up a dozen slabs. In terms of fabrication costs, it works out to about $30/sq ft for the slab, whereas the rock is about $22/sq ft. Travertine and marble is soft and easy to work, so these costs may be relatively low compared to "granite" (all igneous and metamorphic rocks).
If you're looking for cheap granite counter tops, you can buy prefabricated ones (25" x 96") that are manufactured in China and India. Home Depot, Lowes, and others sell these, but then you still need to have someone do the cutouts and cut them to size. Nevertheless, this is how you get rectangular granite counter tops for $50/sq ft rather than at the more common installed prices of $100-$150/sq ft.
 So this week, I've been banging them up, post haste and she's started to dip a couple bundles to complete the bedroom area. Today I'll finish the S & E sides of the second story part of the house, and will just have the big kahuna gable section left (N side). This is the part of the house that rises 27' above ground level (yikes). The upper shingled part of the gable is 48 ft wide and 13 ft high, so it will take about 350 sq. ft of shingles (about 14 bundles). So, it looks like I might have miscalculated on my original shingle purchase, having bought 80 bundles but only needing about 70. No worries, the little tool shed that we'll build out back in a couple of years will have Hardiboard below and shingles above, so that will eat up 200 sq. ft of shingles (8 bundles). As you might recall, the singles were my first GOOD DEAL, having bought them directly from a mill in Forks, WA, about 100 miles west of us.
 Last Tuesday we made another foray into the big city (Seattle) in search of a slab of travertine for the 3 bathroom vanities. This should have been easy, but wasn't. I was keen on getting a banded travertine that had some character, but most slabs were looking like Melba toast to me. Went to Dal Tile, Michelangelo's (were we bought the kitchen slabs), Oregon Marble and Tile, Pental, and finally Meta Granite and Marble. By the time we arrive at Meta, we were pretty worn out and had decided that maybe we'd have to use another rock type. Then bingo, we found just what we wanted and it was the cheapest we'd priced all the day. Some times this stuff just works out, if you're persistent.
Our fabricator (Richerts) called in for sizes and prices and actually told me what the rock cost to them! The 2 cm thick (3/4 inch) slabs were $18/sq ft and the 3 cm (1 1/4 inch) slabs were $22/sq ft in polished form. That equates to about $980 for the 3-cm slab, plus the governors tariff (8.4%). The total bill for vanity tops will be about $2400, which breaks down to be $980 for rock, $750 for three sink cutouts, $475 for cutting and polishing 7 edges (21 linear ft), and about $195 in tax. Some where in this breakdown is overhead and a charge for picking up the rock in Seattle. Its a nearly 300 mile round trip that they typically make once a week to pick up a dozen slabs. In terms of fabrication costs, it works out to about $30/sq ft for the slab, whereas the rock is about $22/sq ft. Travertine and marble is soft and easy to work, so these costs may be relatively low compared to "granite" (all igneous and metamorphic rocks).
If you're looking for cheap granite counter tops, you can buy prefabricated ones (25" x 96") that are manufactured in China and India. Home Depot, Lowes, and others sell these, but then you still need to have someone do the cutouts and cut them to size. Nevertheless, this is how you get rectangular granite counter tops for $50/sq ft rather than at the more common installed prices of $100-$150/sq ft.
Sunday, September 20, 2009
Hanging Rock (Day 330)
Now I'm not talking about Picnic at Hanging Rock, the novel by Australian author Joan Lindsay and a 1975 movie directed by Peter Weir. The story is of a group of schoolgirls who mysteriously vanish after being drawn toward a mysterious rock formation in Australia in 1900. Geology Rules.
I'm talking about the process of getting drywall up and attached to our ceilings and walls. Nancy and I've done this before (in an amateur way) for our old house in Denver and one house was enough. Professionals that do this have special tools such as stilts, drywall jacks, and scaffolding that make it easier, but its still no picnic.
Evergreen Products of Sequim delivered 16,000 sq. ft of drywall (aka rock; roughly 320 sheets) to the house yesterday (Wed). Two scrawny guys and two big trucks. In 2 hours, they hand packed the rock to various rooms and stood it up according to usage. 5/8" on the ceilings and 1/2" on the walls, all in 12 ft long sheets. Since the walls are 9 ft tall, they supplied 54" wide drywall so you only have one seem along the middle of the walls (2 x 54"= 9'). Rock for the second story rooms (garage loft and second bedroom) were delivered back in June before we put the last windows in place (see blog Day 236). For those keeping track of our declining nickel jar, the drywall job was bid at about $17,500 or roughly $1/sq ft with $1500 of that going to application of light texture and priming all rock with a vapor barrier paint. An alternate way of calculating the square footage cost is that the house is about 2700 sq. ft, the garage and loft are about 1200 sq. ft, and the basement is about 750 sq. ft. This adds up to 4650 sq. ft of drywalled space, or about $3.50 per sq. ft.

 The rockers (not to be confused with Led Zeppelin) say it'll take 5 days to do the house, basement, garage, and loft. They start with the lids (ceilings), putting up the 5/8" rock first. These 4' x 12' sheets weigh about 75 pounds each, so they are tough to lift and position. This is where the drywall lift comes in. John, the big guy, says that this device alone has saved him a lot of back aches and allowed him to keep hanging drywall at 45 when he should have quit 10 years ago. Bob, the small guy, does most of the cutting on the ground, whereas John is the fastener. They tack the sheet in with a couple of drywall nails, then use a drywall gun (power screw driver with special bit) to secure the sheet it to the ceiling or wall. They told me they're getting $0.18 per sq. ft, which equates to about $9 per large sheet or about $3000 for the whole hanging job
 The finishers, which in a caste system would be several notches higher than the hangers, will take about the same time to make it all smooth. So for now, it looks like we should have a White House on the inside by about the first of Oct. The hardwood flooring should sit inside at ambient temperature and moisture for at least two weeks, preferably longer. Meanwhile, Fredricks Appliances wants to offload our stuff ASAP, which means after the garage drywall is finished and before the driveway gets poured.
We've reoccupied the garage for the shingle dipping ceremonies. Nancy hasn't dipped one in two weeks and is starting to act surely; surely a sign of her addition to dipping.
All of these issues makes moving in by Halloween more of a trick than a treat.
I'm talking about the process of getting drywall up and attached to our ceilings and walls. Nancy and I've done this before (in an amateur way) for our old house in Denver and one house was enough. Professionals that do this have special tools such as stilts, drywall jacks, and scaffolding that make it easier, but its still no picnic.
Evergreen Products of Sequim delivered 16,000 sq. ft of drywall (aka rock; roughly 320 sheets) to the house yesterday (Wed). Two scrawny guys and two big trucks. In 2 hours, they hand packed the rock to various rooms and stood it up according to usage. 5/8" on the ceilings and 1/2" on the walls, all in 12 ft long sheets. Since the walls are 9 ft tall, they supplied 54" wide drywall so you only have one seem along the middle of the walls (2 x 54"= 9'). Rock for the second story rooms (garage loft and second bedroom) were delivered back in June before we put the last windows in place (see blog Day 236). For those keeping track of our declining nickel jar, the drywall job was bid at about $17,500 or roughly $1/sq ft with $1500 of that going to application of light texture and priming all rock with a vapor barrier paint. An alternate way of calculating the square footage cost is that the house is about 2700 sq. ft, the garage and loft are about 1200 sq. ft, and the basement is about 750 sq. ft. This adds up to 4650 sq. ft of drywalled space, or about $3.50 per sq. ft.

 The rockers (not to be confused with Led Zeppelin) say it'll take 5 days to do the house, basement, garage, and loft. They start with the lids (ceilings), putting up the 5/8" rock first. These 4' x 12' sheets weigh about 75 pounds each, so they are tough to lift and position. This is where the drywall lift comes in. John, the big guy, says that this device alone has saved him a lot of back aches and allowed him to keep hanging drywall at 45 when he should have quit 10 years ago. Bob, the small guy, does most of the cutting on the ground, whereas John is the fastener. They tack the sheet in with a couple of drywall nails, then use a drywall gun (power screw driver with special bit) to secure the sheet it to the ceiling or wall. They told me they're getting $0.18 per sq. ft, which equates to about $9 per large sheet or about $3000 for the whole hanging job
 The finishers, which in a caste system would be several notches higher than the hangers, will take about the same time to make it all smooth. So for now, it looks like we should have a White House on the inside by about the first of Oct. The hardwood flooring should sit inside at ambient temperature and moisture for at least two weeks, preferably longer. Meanwhile, Fredricks Appliances wants to offload our stuff ASAP, which means after the garage drywall is finished and before the driveway gets poured.
We've reoccupied the garage for the shingle dipping ceremonies. Nancy hasn't dipped one in two weeks and is starting to act surely; surely a sign of her addition to dipping.
All of these issues makes moving in by Halloween more of a trick than a treat.
Tuesday, September 15, 2009
Airtight and insultated (Day 325)
The Wooden Boat Festival was great; Bill Hart and Steve Cooley should have been here. Steve, I know you have an affinity for plastic boats, but there were some pretty wooden ones here, especially some former racing boats that had been restored to Bristol conditions. However, I digress from the business at hand. We're airtight (not uptight) and insulated—hurray!
At the last minute I realized we hadn't plumbed in a water line to the refrigerator for ice making. However, with Pex tubing this is a cinch. I got an outlet box from my plumber, nailed and screwed it to the wall behind the refrigerator alcove, then cut the waterline in the crawl space, below. Put in a T fitting, ran 5 ft of 1/2" Pex through the joists and up through the sill plate. Used the Pex tool and voilà, we had water to the fridge. If city and county building codes (like Colorado) don't allow this type of water piping, someone is trying to protect plumbers and their unions.
Still putting major time in on the exterior of the house. Nancy has been painting the garage doors (two coats, two colors) on days its not too hot, and I'm up on the roof doing some final detailing. I bolted on the remaining Corbels gabled dormers on the upstairs) and have been painting them and the facia in preparation for gutters. The gutters are formed on site (rolled out through a form) from prepainted aluminium, and the downspouts come in 10 ft long sections. I have one estimate from Giraffe Gutters (good name) for $875. This is for 180 ft of gutter, 50 ft of downspouts and some offsets. This works out to about $5 a foot installed, which seems reasonable since I paid about the same in Colorado six years ago. I need another estimate to be sure, but two of the three companies I called haven't responded (people need work now, right?).
The drywall guys are next, so there won't be much to write about for a while. Franks Feltes daughter should be in the house on Wednesday putting paper on the floors to shield the Warmboard from drywall mud. When they finish hanging the rock the rooms next week, they'll finally have their final form, which should be interesting since we've been looking at the skeleton since March.
At the last minute I realized we hadn't plumbed in a water line to the refrigerator for ice making. However, with Pex tubing this is a cinch. I got an outlet box from my plumber, nailed and screwed it to the wall behind the refrigerator alcove, then cut the waterline in the crawl space, below. Put in a T fitting, ran 5 ft of 1/2" Pex through the joists and up through the sill plate. Used the Pex tool and voilà, we had water to the fridge. If city and county building codes (like Colorado) don't allow this type of water piping, someone is trying to protect plumbers and their unions.
Still putting major time in on the exterior of the house. Nancy has been painting the garage doors (two coats, two colors) on days its not too hot, and I'm up on the roof doing some final detailing. I bolted on the remaining Corbels gabled dormers on the upstairs) and have been painting them and the facia in preparation for gutters. The gutters are formed on site (rolled out through a form) from prepainted aluminium, and the downspouts come in 10 ft long sections. I have one estimate from Giraffe Gutters (good name) for $875. This is for 180 ft of gutter, 50 ft of downspouts and some offsets. This works out to about $5 a foot installed, which seems reasonable since I paid about the same in Colorado six years ago. I need another estimate to be sure, but two of the three companies I called haven't responded (people need work now, right?).
The drywall guys are next, so there won't be much to write about for a while. Franks Feltes daughter should be in the house on Wednesday putting paper on the floors to shield the Warmboard from drywall mud. When they finish hanging the rock the rooms next week, they'll finally have their final form, which should be interesting since we've been looking at the skeleton since March.
Saturday, September 12, 2009
Chimney going up, insulation going in (Day 322)
 So the weekend ended pretty well. Wayne the Mason (Franks former assistant, now the main rock layer) showed up at 7:30! with a helper and up they went to start the chimney facing. They loved the big platform we built, so they mixed up some mortar and put the scratch coat on the wire mesh. By noon they had about 1/4 of the chimney finished and broke for lunch. They worked til 3 pm, and promised to be back bright and early on Saturday (today). So far so good, with an expected completion either today or Monday.
Meanwhile Tracy's
 insulation guys (Floyd and Brian) showed up at 8 am (early) and off-loaded as much insulation as they could pack in their 16 ft van. They started up stairs with the bedroom and stuffed every little crook and nanny with fiberglass batts. They almost finished up there (except for some 3.5 in sound barrier insulation) and started on the downstairs. They couldn't work the weekend (a funeral, yeah sure) but will be back on Monday and finish it the job on Tuesday. If all goes well, we'll have the insulation inspection and Pex pressure test on that afternoon or Wednesday am, and start the big drywall job. This will take about 4 days to hang and 4 days to tape and finish, so for now the target for a white house is Sept. 28th. Meanwhile, Nancy and I are back to shingles, painting, and prepping the driveway for concrete (after drywall).
Thursday, September 10, 2009
Sometimes you have to be an asshole (Day 321)
With reference to our subcontractor problems (previous blog), sometimes you have to be an asshole to get results. So here is the headcount on these jerks:
The mason is a week late. Said he had a family emergency. Turns out he had to go to sin city (Vegas) to straighten out his sisters son who is a druggie and alcoholic. He's back in PT and says he'll start tomorrow. All is well, maybe.
The insulation guy went AWOL. But is was worse than that. I went down to the HS football field and side wiped him. Between coaching plays I approached him with "when are you going to get going on my insulation, blah, blah blah. He let me stew for about 20 minutes (football practice is too important to interrupt I guess), then fessed up that he'd gone out of business over the weekend. At least I got a straight answer. Seems like the bills piled up, and he owed the State money for something, so they revoked his license and his company was toast.
The septic guy got over the flu and showed up this morning on time. Finished off the job in a couple hours and hauled off his little blue backhoe, which should make the neighbors happy (it was actually a cute little machine). Invoice is pending.
The electrician came by, unexpected, and wired the exhaust fan for Nancy's 900 cfm (hair sucking) exhaust hood over the Wolf range top. Took an hour ($70) and he'd outta there for a while (cover plates, switches, etc are next, much of which I'll do).
There is good news however. I got two insulation estimates this morning. The old (bankrupt) one was for about $6700 for the entire house. So a guy from Bremerton came up (Richard Gifford contact) and walked through the house. Seemed ok, but found several places where things were complicated. He worked up the estimate and agreed that he could start in two days. $7700 ($1000 more than anticipated). The second insulation company (Tracy's) has done a bunch of Kala Point houses and was recommended by a local builder, Kelly Shields. Tracy (himself) showed up quick as a bunny (they are still hungry for jobs) and went through the same routine. However, his company is much bigger (2 vs 17 employees) and it was a routine job for him. Can start tomorrow (Friday), will take 3 days, and wanted $5950. Sold. We're good for drywall after an inspection on or about Wednesday. So, my guy goes AWOL, I lose a week of construction time, but I save about $750, which will be sucked up faster an a dust bunny in a Hoover, on some other unanticipated job. Cheers, I'm getting a beer.
The mason is a week late. Said he had a family emergency. Turns out he had to go to sin city (Vegas) to straighten out his sisters son who is a druggie and alcoholic. He's back in PT and says he'll start tomorrow. All is well, maybe.
The insulation guy went AWOL. But is was worse than that. I went down to the HS football field and side wiped him. Between coaching plays I approached him with "when are you going to get going on my insulation, blah, blah blah. He let me stew for about 20 minutes (football practice is too important to interrupt I guess), then fessed up that he'd gone out of business over the weekend. At least I got a straight answer. Seems like the bills piled up, and he owed the State money for something, so they revoked his license and his company was toast.
The septic guy got over the flu and showed up this morning on time. Finished off the job in a couple hours and hauled off his little blue backhoe, which should make the neighbors happy (it was actually a cute little machine). Invoice is pending.
The electrician came by, unexpected, and wired the exhaust fan for Nancy's 900 cfm (hair sucking) exhaust hood over the Wolf range top. Took an hour ($70) and he'd outta there for a while (cover plates, switches, etc are next, much of which I'll do).
There is good news however. I got two insulation estimates this morning. The old (bankrupt) one was for about $6700 for the entire house. So a guy from Bremerton came up (Richard Gifford contact) and walked through the house. Seemed ok, but found several places where things were complicated. He worked up the estimate and agreed that he could start in two days. $7700 ($1000 more than anticipated). The second insulation company (Tracy's) has done a bunch of Kala Point houses and was recommended by a local builder, Kelly Shields. Tracy (himself) showed up quick as a bunny (they are still hungry for jobs) and went through the same routine. However, his company is much bigger (2 vs 17 employees) and it was a routine job for him. Can start tomorrow (Friday), will take 3 days, and wanted $5950. Sold. We're good for drywall after an inspection on or about Wednesday. So, my guy goes AWOL, I lose a week of construction time, but I save about $750, which will be sucked up faster an a dust bunny in a Hoover, on some other unanticipated job. Cheers, I'm getting a beer.
Wednesday, September 9, 2009
The Sub-Contractor Blues (Day 320)
One of the most-heard remarks about being your own contractor is the problems you can have with subcontractors showing up or on time. So far this hasn't been a real issue because we were on a slow and flexible schedule. But when you need to make hay, do you think the sun would shine—NO.
We passed our inspection hurdles last week (Wed afternoon), so I called Dan (D&D insulation) and let him know we were ready to go on Thursday am. The key thing here is that we have to get the insulation inspected before the drywall goes on, so that starts to form a little chain of events. No inspections on Fridays.
Meanwhile, Frank the drywaller is hiring additional crew for our job (its been slow to date) and he'd also like to go shoot something to eat this fall (they call it hunting). He needs to schedule delivery of the drywall from Evergreen Products in Sequim. No big deal, but it can't be there when the insulators are working and you can't hang drywall if its not there.
To complicate matters a bit more, Richard Gifford the septic guy seems to have lost his phone. Last week he said he might be out on Sunday (Labor Day weekend) to finish the trench filling and regrading. Then someone might have mentioned the possibility of a long weekend, so that plan went up in smoke (no pun intended). Now its Thursday and two of my 3 current subs are AWOL, and the 3rd is chomping at the bit to get going.
On a positive note, the Ellis boys finished the soffit and are off the job with the exception of hanging the entry door between the garage and mudroom. I want to leave this off until all the big stuff is in the house, like appliances and furniture. I'm back up on the scaffolding hanging shingle nos. 4300-4500 this week on the gabled dormers. Having fun now.
The Wooden Boat Festival is this weekend, so I'm hoping for a little down time and boat gawking. I'll leave my checkbook at home.
We passed our inspection hurdles last week (Wed afternoon), so I called Dan (D&D insulation) and let him know we were ready to go on Thursday am. The key thing here is that we have to get the insulation inspected before the drywall goes on, so that starts to form a little chain of events. No inspections on Fridays.
Meanwhile, Frank the drywaller is hiring additional crew for our job (its been slow to date) and he'd also like to go shoot something to eat this fall (they call it hunting). He needs to schedule delivery of the drywall from Evergreen Products in Sequim. No big deal, but it can't be there when the insulators are working and you can't hang drywall if its not there.
To complicate matters a bit more, Richard Gifford the septic guy seems to have lost his phone. Last week he said he might be out on Sunday (Labor Day weekend) to finish the trench filling and regrading. Then someone might have mentioned the possibility of a long weekend, so that plan went up in smoke (no pun intended). Now its Thursday and two of my 3 current subs are AWOL, and the 3rd is chomping at the bit to get going.
On a positive note, the Ellis boys finished the soffit and are off the job with the exception of hanging the entry door between the garage and mudroom. I want to leave this off until all the big stuff is in the house, like appliances and furniture. I'm back up on the scaffolding hanging shingle nos. 4300-4500 this week on the gabled dormers. Having fun now.
The Wooden Boat Festival is this weekend, so I'm hoping for a little down time and boat gawking. I'll leave my checkbook at home.
Monday, September 7, 2009
Ellis boys to the rescue (Day 318)
 Troy and Gary Ellis came by as promised to help on the vexing soffit. I had installed about 100 ft of it, but had another 150 ft to go and it wasn't going to happen very fast. They showed up on Tuesday and worked most of the week, so the job should be finished next week (Tuesday). Gary cuts and Troy fits and nails. The soffit has two forms. 1) is the gable section, which consists of 2 ft tongue and groove cedar that butts directly into the house. This is pretty easy to lay up. The other form (2) runs parallel to the house and slopes upward. First you nail up a 3" wide board, then a 2" section of screen for air movement. This is followed by four tongue and groove boards, the last of which is a real bitch to fit into place. The gap has to be <1/4" wide or the shingles won't cover it. Then there are several places where the two soffit types collide at compound angles. Then add a half dozen corbels, one of which is 27 ft in the air and you have a recipe for disaster (on my part). I haven't seen the bill yet, but they worked 9 weeks on the house with a helper which netted out at about $5k per week. I suspect that's what it will take to finish the soffit, corbels, and a few other finish framing details.
 While all this was going on I busied myself with finishing the speaker layout, installing the hood fan (with Levi Ross), putting in the gutter drainage lines (4" pipe), adding blocking for toilet paper holders, wall mounted TVs, and hold bars in the showers. Oh yeah, I also spent 2 hours installing a fire stop in the chimney chase. If I had been about half my size and a contortionist it would have been a lot faster and easier, but I'm neither of those things.
This weekend and Labor Day will be spent cleaning out the house for the insulators and drywallers. The insulation should go in on Tues-Thursday and the drywall starting on Friday. I figure about 4-5 days to lay the drywall, and an equal amount of time to tape and mud it. Frank the Drywaller said we have 16,000 sq. ft of drywall, which equates to 333 sheets of 4'x12' drywall and about a mile (5,300 ft) of taping!
Monday, August 31, 2009
Inspector Clouseau (Day 311)
Tuesday is the grand inspection day. Inspector Clouseau and his colleagues will be here for two inspections. The first is for the low voltage systems in the house. This is done by the State out of Port Angeles. They will be looking at the central vacuum, digital TV (Direct TV-satellite), cable (TV, for future), phone, audio speakers, and internet wiring. I ran just under 1000 ft of 4 pair cable (cat 5e) for the internet and phone, about 500 ft of RG-2 for the TV systems, and about 200 ft of 2- and 4-strand CL2 wire for speakers. Also, Direct TV came by on Sunday (yes, this a a regular service day for them) and they installed the HD dish on the roof and attached 2 coils of double RG-2 cable, each 90 ft long. My job was to thread these four wires through the soffit, attic, down the crawl space, through the basement and into the media panel. Sounded like a daunting job (3x or worse), but I got that job done in about an hour (1 x; no I'm not looking for a job as an installer). Left to be done (today) is to staple up all the cable in the crawl space and attic. Nancy finished the basement and walls, but she draws the line at tall ladders and creepy spaces.
The second and bigger inspection is the final rough in, which is done by the County out of Port Townsend on Wednesday. They'll look at the framing, hold downs (42), fireplace and vents, air handling and vents, windows, exterior doors, and anything else that catches their eye. Left to be done is some fire blocking in the sauna walls, since I lowered the ceiling in this room to 7.5 ft rather than the standard 9 ft used throughout the house. Also, we need to drill a bunch of air holes in the rafters adjacent to skylights so that there is air flow from the skylights to the roof ridge crests.
This place ought to look like Grand Central Station by noon on Tuesday. Frank and Wayne (the masons) will be here working on the chimney chase. We have about 65 sq ft of rock to go up there, but they need to work off scaffolding rather than the inclined roof. So on Saturday, Darrell Olson (who helped me with the electrical conduit a couple weeks ago) and I built a platform on the roof for the masons. Its 4 ft x 12 ft, and about 2 ft above the roof next to the chimney. Darrell cut the sticks and I nailed them together on the roof, then we screwed a couple sheets of OSB to it. Its not a masterpiece, but it'll give the masons a stable platform to work from. Today I got a bunch of used carpet for the roof (traction issues) and stitched it together so it covers the tarp beneath the platform and around the top of the chimney. Then I put up the tar paper and stapled the wire mesh on the chase. It took most of the day, but there are other issues remaining for the inspection.
 Gary and Troy Ellis should be here on Tuesday also. They plan to put the soffit up on the higher areas that give me the willies. Plus they are fast and can do 5x as much as me. So if they get get the part of the soffit that runs parallel to the roof done, it'll save me a week and possible hospital visit. In addition, the insulation guys (D&D Insulation) will be here early on Tuesday to foam off all drill holes that go from one floor to another, which is a fire issue, an is an inspection issue.

And to add a bit of dust to the affair, Richard Gifford should be around with his purple backhoe filling some last holes and regrading the lot. Also he and is electrician need to finish pulling new cables for the septic pump, which they cut by accident last week after the mason ran over the clean out for the waste line. Don't even ask, this was the Pink Panther part of the job that thankfully was out of my hands (and wallet).
PS. Thursday. The big inspection went well. He said the framing job was really good and it was a very attractive house. He found four issues, all minor and we can deal with them today and get on with the insulating of the house. The masons never showed up (so my roof work was rushed for no good reason) due to a "family emergency", but the Ellis guys came over and dove into the soffit work. They are fast and good. Did as much on Wednesday as I could in a week! Richard, the septic guy, is missing in action. The first Chimacum High School football game is Friday and he is one of of the coaches--enough said.
The second and bigger inspection is the final rough in, which is done by the County out of Port Townsend on Wednesday. They'll look at the framing, hold downs (42), fireplace and vents, air handling and vents, windows, exterior doors, and anything else that catches their eye. Left to be done is some fire blocking in the sauna walls, since I lowered the ceiling in this room to 7.5 ft rather than the standard 9 ft used throughout the house. Also, we need to drill a bunch of air holes in the rafters adjacent to skylights so that there is air flow from the skylights to the roof ridge crests.
This place ought to look like Grand Central Station by noon on Tuesday. Frank and Wayne (the masons) will be here working on the chimney chase. We have about 65 sq ft of rock to go up there, but they need to work off scaffolding rather than the inclined roof. So on Saturday, Darrell Olson (who helped me with the electrical conduit a couple weeks ago) and I built a platform on the roof for the masons. Its 4 ft x 12 ft, and about 2 ft above the roof next to the chimney. Darrell cut the sticks and I nailed them together on the roof, then we screwed a couple sheets of OSB to it. Its not a masterpiece, but it'll give the masons a stable platform to work from. Today I got a bunch of used carpet for the roof (traction issues) and stitched it together so it covers the tarp beneath the platform and around the top of the chimney. Then I put up the tar paper and stapled the wire mesh on the chase. It took most of the day, but there are other issues remaining for the inspection.
 Gary and Troy Ellis should be here on Tuesday also. They plan to put the soffit up on the higher areas that give me the willies. Plus they are fast and can do 5x as much as me. So if they get get the part of the soffit that runs parallel to the roof done, it'll save me a week and possible hospital visit. In addition, the insulation guys (D&D Insulation) will be here early on Tuesday to foam off all drill holes that go from one floor to another, which is a fire issue, an is an inspection issue.
And to add a bit of dust to the affair, Richard Gifford should be around with his purple backhoe filling some last holes and regrading the lot. Also he and is electrician need to finish pulling new cables for the septic pump, which they cut by accident last week after the mason ran over the clean out for the waste line. Don't even ask, this was the Pink Panther part of the job that thankfully was out of my hands (and wallet).
PS. Thursday. The big inspection went well. He said the framing job was really good and it was a very attractive house. He found four issues, all minor and we can deal with them today and get on with the insulating of the house. The masons never showed up (so my roof work was rushed for no good reason) due to a "family emergency", but the Ellis guys came over and dove into the soffit work. They are fast and good. Did as much on Wednesday as I could in a week! Richard, the septic guy, is missing in action. The first Chimacum High School football game is Friday and he is one of of the coaches--enough said.
Friday, August 28, 2009
Passed 1st Electrical Inspection (Day 308)
On Thursday am, the electrical inspector (from Dept. of Labor and Industries, Port Angeles) was supposed to show up at noon. No worries, Gary Estes (electrician) and I had a half dozen things to complete while we waited for him. However, as we chatted about the remaining things to do, the inspector showed up 90 minutes early (I guess its not so busy anymore).
So off we went on the room to room inspection. He looked, asked questions, and found dozen things we'd missed. Gary fixed all his issues in a couple hours, but caught me on the low voltage part (speakers, cable, internet, etc). Apparently the speaker wire I purchased from Lowes was not rated for in the wall use, but luckily I hadn't gotten to this part of the low voltage wiring, which will be inspected next week just before insulation goes in. Also, Levi Ross had forgotten to pull a permit for the low voltage (thermostats) part of the radiant heating, so Levi will have to apply for this online over the weekend. Then we'll call for the low voltage inspection, probably on Tuesday next.
All in all, it went pretty well. Gary said that the things the inspector found were pretty typical, and if we'd had time to do our last little bit there would have only been a couple of issues. Nevertheless, the inspector put the magic "Approved" label on the meter box, and we're ready to have Puget Sound bring the voltage from the street to the house. I called them and they said it would take 3-5 working days to get the order executed (not the best use of terms, huh). So by Sept. 1, their installation subcontractor will be on site to pull a big nasty cable through the conduit that Darrell Olson and I laid a couple of weeks ago.
While all this was going on, Richard Gifford returned with his little backhoe and filled the trenches and regraded the front of the lot. Our environmental site plan for runoff indicated we'd need 3 dry wells for the roof runoff. Dry wells are pits filled with gravel and landscape fabric, the idea being that they will serve as points for recharge on the lot, rather than having the runoff go to the street and into a culvert or a local stream. This is exactly the opposite of Colorado, where they don't allow you to capture (and use) runoff. The bottom line is that western Washington has plenty of agua, and eastern Colorado doesn't.
But I digress. Richard suggested using an alternate technology for the dry wells. It seems that someone makes 10 ft long mesh bags that have a perforated pipe in the middle, and about 12" of foam peanuts around the pipe. The peanuts act like gravel and allow lots of porosity in the infiltration bag. I couldn't have been easier. Richard connected three bags (screw couplings) threw then in the water pipe trench, connected my drain pipe to this snake-like contraption and buried it all. I expected to see Elmo and the Sesame Street gang show up. No gravel or trucking involved (less $$), and all done in 30 minutes. The dry well in the back yard will have to wait until the power is pulled and this part of the trench is filled. So I'm back onto the low voltage and building some scaffolding on the roof for the masons to use on the chimney. That starts Monday, insulation starts Tuesday, and drywall show start a week from now±. The joint is jumping, for a change.
So off we went on the room to room inspection. He looked, asked questions, and found dozen things we'd missed. Gary fixed all his issues in a couple hours, but caught me on the low voltage part (speakers, cable, internet, etc). Apparently the speaker wire I purchased from Lowes was not rated for in the wall use, but luckily I hadn't gotten to this part of the low voltage wiring, which will be inspected next week just before insulation goes in. Also, Levi Ross had forgotten to pull a permit for the low voltage (thermostats) part of the radiant heating, so Levi will have to apply for this online over the weekend. Then we'll call for the low voltage inspection, probably on Tuesday next.
All in all, it went pretty well. Gary said that the things the inspector found were pretty typical, and if we'd had time to do our last little bit there would have only been a couple of issues. Nevertheless, the inspector put the magic "Approved" label on the meter box, and we're ready to have Puget Sound bring the voltage from the street to the house. I called them and they said it would take 3-5 working days to get the order executed (not the best use of terms, huh). So by Sept. 1, their installation subcontractor will be on site to pull a big nasty cable through the conduit that Darrell Olson and I laid a couple of weeks ago.
While all this was going on, Richard Gifford returned with his little backhoe and filled the trenches and regraded the front of the lot. Our environmental site plan for runoff indicated we'd need 3 dry wells for the roof runoff. Dry wells are pits filled with gravel and landscape fabric, the idea being that they will serve as points for recharge on the lot, rather than having the runoff go to the street and into a culvert or a local stream. This is exactly the opposite of Colorado, where they don't allow you to capture (and use) runoff. The bottom line is that western Washington has plenty of agua, and eastern Colorado doesn't.
But I digress. Richard suggested using an alternate technology for the dry wells. It seems that someone makes 10 ft long mesh bags that have a perforated pipe in the middle, and about 12" of foam peanuts around the pipe. The peanuts act like gravel and allow lots of porosity in the infiltration bag. I couldn't have been easier. Richard connected three bags (screw couplings) threw then in the water pipe trench, connected my drain pipe to this snake-like contraption and buried it all. I expected to see Elmo and the Sesame Street gang show up. No gravel or trucking involved (less $$), and all done in 30 minutes. The dry well in the back yard will have to wait until the power is pulled and this part of the trench is filled. So I'm back onto the low voltage and building some scaffolding on the roof for the masons to use on the chimney. That starts Monday, insulation starts Tuesday, and drywall show start a week from now±. The joint is jumping, for a change.
Tuesday, August 25, 2009
The Water Flowith (Day 305)
We've been working on getting H2O to the house this past two weeks. Called the Kala Point Water Company, which is a private entity, and arranged for Eric Thomas (the owner) to come out and install a meter and hookup. Nothing happened for a week, then he showed up and sized up the job. He wasn't prepared for 1 1/4" pipe (my end), which he recommended I use, so he didn't have the right size fittings. Off to Hadlock Building Supply. Then there was a couple day lapse, due to a summer cold. So on Sunday, up comes Eric (over the cold, mostly) to install the meter and hookup. All was well, except the old meter box had been deformed by the adjacent Alder tree, so he'd need to get a new one.
Eric is a very likable guy; owns 4 small water companies in the area, all targeted for subdivisions such as our own. I discussed the water business with him, and it appears to be quite lucrative if you buy the right companies. Watch out for steel or lead pipes (PVC is best), get good tanks, and install UV treatment for iron and manganese components. Anyway, he'd brought his family over from Sequim to the Kala Point Pool (kids and wife), so he only had a couple hours to finish off my job. So I have water, lots of it, at about 50-60 psi (new pump at tanks). Bob Brown came out on Wednesday and made the connection to the house, so we are all done, except for installing the valves for the three showers and tub, all of were shipped to Fergusons in Sequim on Monday and picked up by my lovely bride of 37 years.
Nail Plate Nancy, we'll call her. Her assignment these past few days has been to nail 1.5 x 3" steel plates over any shallow electrical or plumbing parts. The logic is that if its less then 1.5" from the surface, the drywall guys could penetrate something important with a nail or screw, hence the steel plate. Well, when we were done, I think we had about 150 nail plates on studs and joists—all cheap insurance for a potential problem, like I had on Sunday.
I needed to move a drain pipe the basement ceiling that conflicted with the soon to be installed dryer vent. You wouldn't believe all the competing systems in a house: fresh water, gray water, 120v electric, low voltage, central vacuum, and vents. So I chopped out a section of drain vent, put in some 45° bends, and made space for the vertical drop for the dryer vent. No worries, right. Then I needed to move the drain support (metal strap), so I unscrewed the screw and water erupted like Vesuvius. It came squirting down at 50 psi (the system was under pressure from testing) and about 10 gallons spilled out on the basement floor before I got all the valves turned off. It seems like the plumber (me) made a fundamental error and screwed the support strap to the subfloor (Warmboard) and managed to penetrate a Pex tube. All was well until I unscrewed the screw from the Pex and opened up the hole. Actually it was a good thing because 5 or 10 years down the road that screw would have rusted and allowed the Pex to drip, drip, drip into the hardwood and cork flooring, so of like a festering canker sore.
I sawed out the stud plate, exposed the punctured Pex, and chopped it out. In about an hour, I'd made the repair, replaced the plate, and all was well. So I learned a valuable lesson. Don't screw up (vertically) and you can't hit a Pex tube.
Our electrical rough in inspection is scheduled for Thursday (Aug. 27th), so if we pass we have the Go card for our big county inspection, which involved framing, hold downs, shear walls, etc. Once this is done (end of August), we're on to insulation and drywall, both of which will be hired out. This will be a major advance for the house. Once drywall is in, we are officially in the "Finishing Stages" of the house (paint, tile, wood floors, and cabinets). If you are handy at such things, the Hotel Machette is open for business.
Eric is a very likable guy; owns 4 small water companies in the area, all targeted for subdivisions such as our own. I discussed the water business with him, and it appears to be quite lucrative if you buy the right companies. Watch out for steel or lead pipes (PVC is best), get good tanks, and install UV treatment for iron and manganese components. Anyway, he'd brought his family over from Sequim to the Kala Point Pool (kids and wife), so he only had a couple hours to finish off my job. So I have water, lots of it, at about 50-60 psi (new pump at tanks). Bob Brown came out on Wednesday and made the connection to the house, so we are all done, except for installing the valves for the three showers and tub, all of were shipped to Fergusons in Sequim on Monday and picked up by my lovely bride of 37 years.
Nail Plate Nancy, we'll call her. Her assignment these past few days has been to nail 1.5 x 3" steel plates over any shallow electrical or plumbing parts. The logic is that if its less then 1.5" from the surface, the drywall guys could penetrate something important with a nail or screw, hence the steel plate. Well, when we were done, I think we had about 150 nail plates on studs and joists—all cheap insurance for a potential problem, like I had on Sunday.
I needed to move a drain pipe the basement ceiling that conflicted with the soon to be installed dryer vent. You wouldn't believe all the competing systems in a house: fresh water, gray water, 120v electric, low voltage, central vacuum, and vents. So I chopped out a section of drain vent, put in some 45° bends, and made space for the vertical drop for the dryer vent. No worries, right. Then I needed to move the drain support (metal strap), so I unscrewed the screw and water erupted like Vesuvius. It came squirting down at 50 psi (the system was under pressure from testing) and about 10 gallons spilled out on the basement floor before I got all the valves turned off. It seems like the plumber (me) made a fundamental error and screwed the support strap to the subfloor (Warmboard) and managed to penetrate a Pex tube. All was well until I unscrewed the screw from the Pex and opened up the hole. Actually it was a good thing because 5 or 10 years down the road that screw would have rusted and allowed the Pex to drip, drip, drip into the hardwood and cork flooring, so of like a festering canker sore.
I sawed out the stud plate, exposed the punctured Pex, and chopped it out. In about an hour, I'd made the repair, replaced the plate, and all was well. So I learned a valuable lesson. Don't screw up (vertically) and you can't hit a Pex tube.
Our electrical rough in inspection is scheduled for Thursday (Aug. 27th), so if we pass we have the Go card for our big county inspection, which involved framing, hold downs, shear walls, etc. Once this is done (end of August), we're on to insulation and drywall, both of which will be hired out. This will be a major advance for the house. Once drywall is in, we are officially in the "Finishing Stages" of the house (paint, tile, wood floors, and cabinets). If you are handy at such things, the Hotel Machette is open for business.
Thursday, August 20, 2009
Drill Baby, Drill (Day 301)
A couple of weeks ago the county denied our request for a variance on the water pipe location (see previous blog). So that meant a different route (OK), but no way to enter the house, as in a punch out in the foundation. The obvious remedy was to drill through the foundation. So for a geologist this is no big deal. We drill stuff all the time. Rock cores for strength testing, cores for paleomagnetism, sediment cores for paleoclimate, anon, anon. Just rent a drill and punch out a couple of holes.
Well its a 8" concrete foundation riddled with rebar, thanks to our old friend Mikael (structural engineer). You know I'd find a place to drill through rebar and I did, but not until the second hole. Yes, second hole, because the first hole was into the crawl space and the second hole was from the crawl space to basement, where the Pex piping was stubbed out by the plumber.
Hadlock (Just Ask) Rental had their drill out on long-term rental so I went to A+ Rental down the highway. Sort of a rag tag operation, but they had a real man's drill and bit. 1/2 HP drill and 2" diamond bit was the ticket. Hook up the garden house for water cooling, pull it in, and let her spin. Had visions of Sarah Pallin standing behind me encouraging me to Drill it Baby. So I did. Took about 15 minutes to punch through, not bad. Then I moved the hose and power to the crawl space and started no. 2. All went well until I met "Uncle Rebar". Drill overheated, blew the entire circuit breaker and called for a time out. Two minutes later, I was back at it. This happened 3 or 4 times, but in about a half hour I broke through to the basement. Mission accomplished, and now I can see Russia from the second floor, just like Ms Pallin.
Progress was made on other fronts today. The cable guy (hard-wire internet) came buy and dropped off 200 ft of RG11 coax cable, which goes underground (with the H2O) from a street side junction box to the main electrical circuit panel. Qwest also dropped phone cable in my trench. So all the buried services (electrical, water, cable, phone) are in the ground and we're ready to push dirt around again. A little rain would help, but I'm not getting greedy.
Well its a 8" concrete foundation riddled with rebar, thanks to our old friend Mikael (structural engineer). You know I'd find a place to drill through rebar and I did, but not until the second hole. Yes, second hole, because the first hole was into the crawl space and the second hole was from the crawl space to basement, where the Pex piping was stubbed out by the plumber.
Hadlock (Just Ask) Rental had their drill out on long-term rental so I went to A+ Rental down the highway. Sort of a rag tag operation, but they had a real man's drill and bit. 1/2 HP drill and 2" diamond bit was the ticket. Hook up the garden house for water cooling, pull it in, and let her spin. Had visions of Sarah Pallin standing behind me encouraging me to Drill it Baby. So I did. Took about 15 minutes to punch through, not bad. Then I moved the hose and power to the crawl space and started no. 2. All went well until I met "Uncle Rebar". Drill overheated, blew the entire circuit breaker and called for a time out. Two minutes later, I was back at it. This happened 3 or 4 times, but in about a half hour I broke through to the basement. Mission accomplished, and now I can see Russia from the second floor, just like Ms Pallin.
Progress was made on other fronts today. The cable guy (hard-wire internet) came buy and dropped off 200 ft of RG11 coax cable, which goes underground (with the H2O) from a street side junction box to the main electrical circuit panel. Qwest also dropped phone cable in my trench. So all the buried services (electrical, water, cable, phone) are in the ground and we're ready to push dirt around again. A little rain would help, but I'm not getting greedy.
Tuesday, August 18, 2009
Let there be Light (Day 299)
We've been lured into the recessed can game, which is OK in terms of dollar value but they create a bit of an institutional/sterile look. However, the alternative is beyond our fiscal grasp. Let me give you an example. We put five Juno 6" recessed cans in the ceiling of the living room. Three in front of the fireplace and two off to the side. Net cost was about $40, plus another $100 for the trim rings. They sort of have a computer printer deal going there. The all metal, hefty, complicated and electrified can (i.e., printer) is cheap and the little plastic fufu trim rings (i.e., printer cartridge) is expensive. Can't have the ring without the can or the printer without the cartridge. Oh yeah, did I mention that the recessed can for the sloping roofs (bedroom, sun room, and kitchen) go for $40 instead of $8. Seems that anything out of the ordinary goes for way more (5x). I'm definitively in the wrong business.
The alternative to cans is scary. Hanging light fixtures, good stylish ones, are in the $400 to $1000 (or more) range, and you'd need one per room if you didn't use cans. Also, you'd need sconces (not scones, which are way more palatable) for some halls, distant walls, or stairs. These puppies go for $50 (trashy) to $300. So to make life manageable we settled on about 60 recessed cans, 2 hanging fixtures (dining room and kitchen) and about 12 sconces (4 for stairs, 6 for bath vanities, a couple others), and a couple fans. Add to that exterior lights, which are similarly priced. We bought 1 hanging light for the main porch, 5 sconces for the other porches, and 2 sconces for the sides of the garage. When I made a list of all the fixtures to track them, we had 104 light fixtures.
I can see the Bonneville Power Administration smiling already. I think I'll get one of those neon light versions of READY WATT, the electric mascot, and put it on the front of the garage. Heck, if we just put colored bulbs in the lamps, we'll be ready for Christmas.
Now the real down side. I have to wire 104 light fixtures. The electrican that helped finish the wiring when I said "Uncle" suggested I do this manual labor and save $70/hr. Good Idea. I did 30 recessed cans today, and I''ll polish the remainder off tomorrow. The sconces and hanging fixtures get wired after drywall or exterior painting, so I may be able to finish the true electrical work tomorrow. Then its a couple days of planning, pulling and wiring the phone, speaker, TV, and computer networks, mostly with Cat5e wire, which is an fancy name for expensive, heavy duty 4 pair stranded wire. At that point Gary (electrican) comes back, gives us the once over and orders the electrical inspection by the Dept. of Labor and Industries, a WA state agency. This is the only inspection that the County doesn't conduct. I think this arrangement was made to protect the electrical labor unions, and to justify a state-wide electrical code, which is a good idea. Some counties barely have a building code, and electrical problems are the one issue that can be life threatening (i.e., FIRE).
The alternative to cans is scary. Hanging light fixtures, good stylish ones, are in the $400 to $1000 (or more) range, and you'd need one per room if you didn't use cans. Also, you'd need sconces (not scones, which are way more palatable) for some halls, distant walls, or stairs. These puppies go for $50 (trashy) to $300. So to make life manageable we settled on about 60 recessed cans, 2 hanging fixtures (dining room and kitchen) and about 12 sconces (4 for stairs, 6 for bath vanities, a couple others), and a couple fans. Add to that exterior lights, which are similarly priced. We bought 1 hanging light for the main porch, 5 sconces for the other porches, and 2 sconces for the sides of the garage. When I made a list of all the fixtures to track them, we had 104 light fixtures.
I can see the Bonneville Power Administration smiling already. I think I'll get one of those neon light versions of READY WATT, the electric mascot, and put it on the front of the garage. Heck, if we just put colored bulbs in the lamps, we'll be ready for Christmas.
Now the real down side. I have to wire 104 light fixtures. The electrican that helped finish the wiring when I said "Uncle" suggested I do this manual labor and save $70/hr. Good Idea. I did 30 recessed cans today, and I''ll polish the remainder off tomorrow. The sconces and hanging fixtures get wired after drywall or exterior painting, so I may be able to finish the true electrical work tomorrow. Then its a couple days of planning, pulling and wiring the phone, speaker, TV, and computer networks, mostly with Cat5e wire, which is an fancy name for expensive, heavy duty 4 pair stranded wire. At that point Gary (electrican) comes back, gives us the once over and orders the electrical inspection by the Dept. of Labor and Industries, a WA state agency. This is the only inspection that the County doesn't conduct. I think this arrangement was made to protect the electrical labor unions, and to justify a state-wide electrical code, which is a good idea. Some counties barely have a building code, and electrical problems are the one issue that can be life threatening (i.e., FIRE).
Saturday, August 15, 2009
All Decked Out (Day 296)
 As part of the exterior package, we have two small patio decks and two porches that needed to be finished off. Jim Quandt, a sailing/drinking/cooking friend, retired from Weyerhaeuser a couple years ago and moved up to Kala Point with his wife Char. We met them right off at TGIF and became friends quickly. Over the winter, Jim started a little carpentry/house repair business called Jim's Tool Time (think Tim Allen here) to keep him busy and fund his sailing/travel bug. He helped us previously by building 2 dozen corbels (braces) for the house, so when the deck issue surfaced, I gave him a call.
 When it comes to decking now days, you have lots of choices. However, unless you're made of money and have a landscaper/repairman, you need to use a composite wood product. Lots of them out there, but Trex is probably the best and most popular (http://www.trex.com/). Its weather proof, comes in several colors and textures, and will out last wood by leaps and bounds. Wood needs to be power washed and treated every several years, and good wood (like Brazilian hardwoods) is expensive. So we picked out some Trex decking (Winchester Gray Trex from Carl's), ordered it, and hired Jim to finish this part of the house off.
I was his assistant and had put all the support framing in place for the job. We started on Wednesday, and by Saturday morning, we had it all finished. We used 19 pieces of 20 ft Trex ($1026; 1.1" by 5.5") and 6 pieces of trim board ($275; 3/4" x 7.25"), and two boxes of square drive screws ($102).
 The cost of decking came out to be about $1400 for 150 square feet, which nets out at $9.33/sq. ft. This doesn't count the 2x6 and 4x4 pressure-treated lumber, hardware, and cement blocks I used for the framing and supports (probably a couple 100 bucks there). Labor is typically equal to materials, so if you hired it all out the cost would be $20/sq. ft or 3 big ones for the project. So we saved a bit by using Jim and my labor; the job looks professionally done (of course), and its one more thing off our list.
 He's off to the County fair and sailing, and we're off to a short vacation. I promised Nancy an overseas cruise to a foreign country (i.e., Victoria, BC). We'll spend some loonies, eat some good food, and see some fancy plants and trees at Buchart Gardens (research for our winter landscaping projects). Interestingly, I was drug through there by my parents 45 years ago (1964 Seattle Worlds Fair trip). Now we're going on our own and actually looking forward to it. Who ever said you become your parents was right.
Friday, August 14, 2009
TBTB (Day 295)
TBTB. Too busy to blog. Swear to god, I'm multitasking bigtime and feeling like I have ADHD. Electrical, decks, water pipe, electrical conduit, bathroom cabinet layout, flooring, light fixtures, backfilling by shovel, plus trying to supervise a couple paid workers. Decisions that have to be made today or pretty damn soon. Can't wait for a day when I only have one task and goal. More later, but less bitching I hope. Michael
Wednesday, August 12, 2009
37 years ago today (Day 293)
 August 12, 1972. Michael Ney Machette and Nancy Geraldine Hart were married in the Portola Valley Presbyterian Church. After a reception at the home of Mr. and Mrs. William Hart, the newlywed couple spent their wedding night at the Stanford Arms Hotel in San Francisco in route to a honeymoon at Lake Tahoe, California. On August 22, Michael and Nancy packed their VW bus (Minerva) with all their worldly goods and departed for Denver, Colorado, where Michael will attend graduate school in Geology at the University of Colorado and Nancy will start her career in merchandising (Denver Dry Goods).
 August 12, 2009. Michael and Nancy, married 37 years today, will celebrate the event in a low key manner. Nancy is researching bathroom fixtures and cabinets, whereas Michael is working on decks, electrical, water piping, and other chores at the new house. They plan to have dinner with neighbors (aka, Soup Night at the Poseys), and visit Victoria, BC, this weekend for a more formal celebration.
On August 17, 2009 they will have been in Port Townsend for exactly one year (oh yeah).
Sunday, August 9, 2009
Full Flush Mode (Day 290)
Last Friday we had a performance of the Bellagio fountains, as they call it. Didn't even have to go to Vegas. Susan Miller, the septic system designer, came over and set up the pump test for the septic system. Richard Gifford had finished the tanks and piping installation, I mounted the controller boxes at the rear of the house and ran conduit to the pump tank, and Gary Estes (electrician) wired the boxes for a temporary run (i.e., via extension cord). The control box has a Palm Pilot interface which allows the septic designer (or other certified technician) to set up pump times and intervals. So with a wave of the magic wand, Susan turned on the pump and we had 5 lines of fountains going about 10 ft into the air. While they are spurting, she turned the control valves on each line to balance the flow in the system, otherwise the short lines (30 ft) would have higher pressure (and fountains) than the long lines (50-60 ft). Once the balancing act was finished and the pump ran a few cycles, she shut the puppy down, approved the installation for the County, and now we're set to do the back filling.
The gravel beds that get injected with effluent (the 50 cent word for drain field water) are covered with a filter fabric (landscape fabric, I think) then covered with about 12" of fill. On top of this goes about 6" of top soil, something we'll have to have delivered from a local source. Most sand and gravel operators create "top soil" by mixing sand, compost and peat together, which is much better than the silty sand and gravel that comes from the subsurface, but not nearly as good as the 6-12 A horizon that was on the lot before we scraped it all away. Almost everything in Kala Point and the Quimper Peninsula is Vashion lodgement till (glacial deposits), which was deposited about 20,000 years ago as glaciers marched south towards Tacoma. The till was overridden by 3000 ft of ice and has become fairly compact, hence the poor percolation and necessity for a pressure system rather than a simple (and cheaper) gravity septic system.
By Monday afternoon Richard had the septic field covered and then dig new trenches for the combined electrical conduit and water line. We got a rude awaking last week when the county refused our request to have a crossing of the water and sewer lines. In their eyes this is a mortal sin. The logic goes as follows (please have a stiff drink to keep up here). During a big earthquake, ground settlement may allow crossing lines to break and mix waters, such that fresh water going to the house will be polluted with effluent. Sound pretty reasonable, right? Except, during a big earthquake 1) the Kala Point water tanks would have gone south, 2) there is no reason to have differential settlement at the proposed line crossing (remember we are underlain by hundreds of feet of compact till), and 3) the house would likely be on fire and polluted water is our last concern. Nevertheless, they disallowed our request for a waiver on the crossing and so how we need to dig a trench across the front of the lot, down the north edge, then enter the house in the crawl space. I need to rent a coring drill (2") and drill through the 8" foundation in two places, then have Bob Brown come back and tie the outside and inside water lines together. Pain in the ass.
The only good thing to come out of this is that we had a spare hole in the foundation that we ran a 3/4" Pex line out of. This will be a stub in for eventual watering control box to do drip or sprinklers. Need to think about the future and the Pacific Northwest as a semiarid landscape.
By code the electric supply line has to be in 3" PVC conduit. OK, its expensive, heavy and doesn't bend much. So on Tuesday I laid 16 10-ft sections of conduit in trench and one 45° bend, put a pull rope through them all, then glued it all together. Darell Olson, a Montana transplant who lives down the street, helped me and we got the conduit installed in 2 hours! Puget Sound Energy (PSE) wants the conduit to come to about 4 ft of the transformer and 4 ft from the service entry on the rear of the house, so we have dig a bit wider at the ends. I was surprised to have them not connect the conduit, but the logic is that in case they have to install new wiring to the house, they can dig down at the ends and uncover the unsheilded wire. Then they connect new wire to the old wire, and pull it through the conduit (i.e., raceway). Seems to make sense to me, and its less work than connecting the conduit at the ends.
After the electrical is completed, I'll lay the water supply pipe (i.e. main line) adjacent to but at least 18" away from the conduit. We'll use 1.25", 160 psi Poly Pipe for this, similar to what is used for sprinkler systems but heavier gauge (PolyPipe is a pressure-rated High Density polyethylene pipe). It comes in 100 ft and 300 ft rolls, so we're going for the long one so there are no buried connections. It was out of stock locally, but Hadlock Building Supply ordered it for delivery on Wednesday (8/12). The water pipe is just a roll out in the trench (>18" from electrical), with the Water Company connecting the upstream side, and Bob Brown (plumber) connecting the house side with a shut off valve. All is well in the tubing world.
The gravel beds that get injected with effluent (the 50 cent word for drain field water) are covered with a filter fabric (landscape fabric, I think) then covered with about 12" of fill. On top of this goes about 6" of top soil, something we'll have to have delivered from a local source. Most sand and gravel operators create "top soil" by mixing sand, compost and peat together, which is much better than the silty sand and gravel that comes from the subsurface, but not nearly as good as the 6-12 A horizon that was on the lot before we scraped it all away. Almost everything in Kala Point and the Quimper Peninsula is Vashion lodgement till (glacial deposits), which was deposited about 20,000 years ago as glaciers marched south towards Tacoma. The till was overridden by 3000 ft of ice and has become fairly compact, hence the poor percolation and necessity for a pressure system rather than a simple (and cheaper) gravity septic system.
By Monday afternoon Richard had the septic field covered and then dig new trenches for the combined electrical conduit and water line. We got a rude awaking last week when the county refused our request to have a crossing of the water and sewer lines. In their eyes this is a mortal sin. The logic goes as follows (please have a stiff drink to keep up here). During a big earthquake, ground settlement may allow crossing lines to break and mix waters, such that fresh water going to the house will be polluted with effluent. Sound pretty reasonable, right? Except, during a big earthquake 1) the Kala Point water tanks would have gone south, 2) there is no reason to have differential settlement at the proposed line crossing (remember we are underlain by hundreds of feet of compact till), and 3) the house would likely be on fire and polluted water is our last concern. Nevertheless, they disallowed our request for a waiver on the crossing and so how we need to dig a trench across the front of the lot, down the north edge, then enter the house in the crawl space. I need to rent a coring drill (2") and drill through the 8" foundation in two places, then have Bob Brown come back and tie the outside and inside water lines together. Pain in the ass.
The only good thing to come out of this is that we had a spare hole in the foundation that we ran a 3/4" Pex line out of. This will be a stub in for eventual watering control box to do drip or sprinklers. Need to think about the future and the Pacific Northwest as a semiarid landscape.
By code the electric supply line has to be in 3" PVC conduit. OK, its expensive, heavy and doesn't bend much. So on Tuesday I laid 16 10-ft sections of conduit in trench and one 45° bend, put a pull rope through them all, then glued it all together. Darell Olson, a Montana transplant who lives down the street, helped me and we got the conduit installed in 2 hours! Puget Sound Energy (PSE) wants the conduit to come to about 4 ft of the transformer and 4 ft from the service entry on the rear of the house, so we have dig a bit wider at the ends. I was surprised to have them not connect the conduit, but the logic is that in case they have to install new wiring to the house, they can dig down at the ends and uncover the unsheilded wire. Then they connect new wire to the old wire, and pull it through the conduit (i.e., raceway). Seems to make sense to me, and its less work than connecting the conduit at the ends.
After the electrical is completed, I'll lay the water supply pipe (i.e. main line) adjacent to but at least 18" away from the conduit. We'll use 1.25", 160 psi Poly Pipe for this, similar to what is used for sprinkler systems but heavier gauge (PolyPipe is a pressure-rated High Density polyethylene pipe). It comes in 100 ft and 300 ft rolls, so we're going for the long one so there are no buried connections. It was out of stock locally, but Hadlock Building Supply ordered it for delivery on Wednesday (8/12). The water pipe is just a roll out in the trench (>18" from electrical), with the Water Company connecting the upstream side, and Bob Brown (plumber) connecting the house side with a shut off valve. All is well in the tubing world.
Thursday, August 6, 2009
Get Out of Jail Free Card (Day 287)
It feels like we're playing Monopoly out here. We met with the Architectural (standards) Committee yesterday and presented our case for an extension to the completion date for the exterior of the house. I've harangued about this before, so no reason to replow that ground. All in all, it went smoothly. The one thing that made our case palatable to the committed was presenting a report card of what we'd done the past two months, what was left to do, how and who was going to do it, and when. The bottom line was it will take about 2 more months to finish all of the exterior (some things must wait for others, like the driveway after drywall trucks). We also submitted our landscape plan, which was finalized after we placed all the septic tanks, lines and propane tank.
Attached is the contents of our letter, if you care to see our strategy and logic. Now we have to deliver on our promises.
More later, The Completers.
To: Kala Point Architectural Committee
Ron Kubec, Chairman
David Harrah, Representative
From: Michael and Nancy Machette
Subject: Status of Building Project
120 Fairbreeze Drive, Kala Point
Since receiving notice from the Committee in early June, we have concentrated on completing the exterior of our house. The following items have been completed or are near final. As you can see, we should be able to complete the exterior by late September by hiring out the bulk of the remaining work.
Garage doors: Installed and operative. Primed, but need to be painted to match house. Anticipated finish, early Sept.
Septic system: Tanks and main line installed. Drain field gravel and piping installed. Pump and controller installed. Will do pump test this week, then awaiting County and L&I inspections.
Anticipated finish, August 13th.
Electric and water service: Service main (conduit) will be installed in trench, along with water service by mid August. Having trouble contacting Eric Thomas for water meter hookup, but will try to finalize ASAP.
Landscape grading. Will be completed after back filling septic lines. drain field, and electric/water lines. Hired out, anticipated finish, August 21.
Single siding: Installed on most of street side of house. About 50% complete. Anticipated finish, mid Sept. (This is a slow process owing to hand dipping a large number of shingles. Homeowner installation.)
Hardiboard siding: Completed on north and rear of house, needs trim detail. About 95% complete. Anticipated finish, mid August.
Soffit: Installed on most of street side of house. About 50% complete. Need help for high roof line, will hire out starting August 8th. Anticipated finish, early Sept.
Rock facing (belt line around house). Completed August 1. Will add rock facing to chimney, but mason can’t start until late August. (All cement mixing and prep will be done at rear of house. Anticipated finish, mid Sept.
Port-A-Potty: Will move inside garage as soon as drywall is hung. As an interim measure, we can move it to the rear of the house, of out sight from the road.
Decks: Need to build stair jacks, then install decking. Hired out, to start August 10th. Anticipated finish, late August.
Driveway : Received variance from County to use standard concrete, rather than a perivous surface (gravel, porous concrete or open pavers). Will not install until drywall is loaded into garage and house (excessive weight of trucks). Concrete needs 28 days to obtain full strength. Anticipated completion, late Sept. (earlier if possible).
Landscape plan: Prepared and to be submitted at Aug. 5th meeting.
Attached is the contents of our letter, if you care to see our strategy and logic. Now we have to deliver on our promises.
More later, The Completers.
August 5, 2009
To: Kala Point Architectural Committee
Ron Kubec, Chairman
David Harrah, Representative
From: Michael and Nancy Machette
Subject: Status of Building Project
120 Fairbreeze Drive, Kala Point
Since receiving notice from the Committee in early June, we have concentrated on completing the exterior of our house. The following items have been completed or are near final. As you can see, we should be able to complete the exterior by late September by hiring out the bulk of the remaining work.
Garage doors: Installed and operative. Primed, but need to be painted to match house. Anticipated finish, early Sept.
Septic system: Tanks and main line installed. Drain field gravel and piping installed. Pump and controller installed. Will do pump test this week, then awaiting County and L&I inspections.
Anticipated finish, August 13th.
Electric and water service: Service main (conduit) will be installed in trench, along with water service by mid August. Having trouble contacting Eric Thomas for water meter hookup, but will try to finalize ASAP.
Landscape grading. Will be completed after back filling septic lines. drain field, and electric/water lines. Hired out, anticipated finish, August 21.
Single siding: Installed on most of street side of house. About 50% complete. Anticipated finish, mid Sept. (This is a slow process owing to hand dipping a large number of shingles. Homeowner installation.)
Hardiboard siding: Completed on north and rear of house, needs trim detail. About 95% complete. Anticipated finish, mid August.
Soffit: Installed on most of street side of house. About 50% complete. Need help for high roof line, will hire out starting August 8th. Anticipated finish, early Sept.
Rock facing (belt line around house). Completed August 1. Will add rock facing to chimney, but mason can’t start until late August. (All cement mixing and prep will be done at rear of house. Anticipated finish, mid Sept.
Port-A-Potty: Will move inside garage as soon as drywall is hung. As an interim measure, we can move it to the rear of the house, of out sight from the road.
Decks: Need to build stair jacks, then install decking. Hired out, to start August 10th. Anticipated finish, late August.
Driveway : Received variance from County to use standard concrete, rather than a perivous surface (gravel, porous concrete or open pavers). Will not install until drywall is loaded into garage and house (excessive weight of trucks). Concrete needs 28 days to obtain full strength. Anticipated completion, late Sept. (earlier if possible).
Landscape plan: Prepared and to be submitted at Aug. 5th meeting.
Wednesday, August 5, 2009
Holding Pressure (Day 286)
Bob Brown, Dr. of Drips (aka our plumber), came over with his son Josh to check out my plumbing, fix a few things, build out the copper part of the system, and install the incoming water main. The water main will have to wait a bit, at least until KP Water installs our meter and Richard Gifford digs the service trench for the water and electricity (next week, hopefully).
The verdict was Michael got a B on the ABS (drains) and an A on the Pex water supply piping. For the ABS, I had forgot to glue 3 fittings and put a screw through a 4th. Conversely, they installed the washer control box and screwed up the drain line by not letting the glue dry long enough before testing. To test the ABS drain line, you put cookies (temporary plugs, not Oreos) in the open pipes and fill the entire piping with water. If nothing leaks, you're good to go (to the crapper). So we found a few leaks, drained and fixed them; refilled, found the last leak, drained fixed, and filled; and refilled for the final time. The inspector will come and check it out on Thursday. Takes about 50 gallons to fill all the drain pipes in the house, so we should be good to have some really big parties there.
For the Pex water supply lines, I only had one bad fitting. That was on the manifold that distributes hot water to the master bath room. It divides a 3/4 inch line into four 1/2 lines (shower, two sinks, and toilet). Didn't get the fittings up snug, so off it came and they rebuilt in in about 5 minutes (vs the 30 minutes for my original effort). To test the water supply, they attached my neighbor's (Jan and Carol Orme) hose to the washer supply line and filled it all up. Then they topped it off with 60 psi of air pressure. This morning it still had 60 psi, so the inspector will check this part out along with the ABS drains.
What I've come to realize is that professional plumbers (and others) operate at light speed compared to me and other home owner/builders. They know the codes (so don't have to redo mistakes), have a bag of tricks for making things easier, and they don't sweat the small stuff. Also, having all the tools and supplies on hand (usually in vans or trucks) means no trips back to the shop or plumbing stores.
This last go around with Dr. Brown cost me about 20 hours of time (2 guys at 10 hours). Going rate is about $70/hr, or $1400 and another $600 in supplies and tax (on labor too). So for $2000, they moved our stalled out plumbing project to completion (rough in) and removed another hurdle for getting to the last big inspection and drywall. After drywall, we are in the final stages of finish work. After this, we'll have about 60 days to get the house ready for our occupancy permit and move in.
The verdict was Michael got a B on the ABS (drains) and an A on the Pex water supply piping. For the ABS, I had forgot to glue 3 fittings and put a screw through a 4th. Conversely, they installed the washer control box and screwed up the drain line by not letting the glue dry long enough before testing. To test the ABS drain line, you put cookies (temporary plugs, not Oreos) in the open pipes and fill the entire piping with water. If nothing leaks, you're good to go (to the crapper). So we found a few leaks, drained and fixed them; refilled, found the last leak, drained fixed, and filled; and refilled for the final time. The inspector will come and check it out on Thursday. Takes about 50 gallons to fill all the drain pipes in the house, so we should be good to have some really big parties there.
For the Pex water supply lines, I only had one bad fitting. That was on the manifold that distributes hot water to the master bath room. It divides a 3/4 inch line into four 1/2 lines (shower, two sinks, and toilet). Didn't get the fittings up snug, so off it came and they rebuilt in in about 5 minutes (vs the 30 minutes for my original effort). To test the water supply, they attached my neighbor's (Jan and Carol Orme) hose to the washer supply line and filled it all up. Then they topped it off with 60 psi of air pressure. This morning it still had 60 psi, so the inspector will check this part out along with the ABS drains.
What I've come to realize is that professional plumbers (and others) operate at light speed compared to me and other home owner/builders. They know the codes (so don't have to redo mistakes), have a bag of tricks for making things easier, and they don't sweat the small stuff. Also, having all the tools and supplies on hand (usually in vans or trucks) means no trips back to the shop or plumbing stores.
This last go around with Dr. Brown cost me about 20 hours of time (2 guys at 10 hours). Going rate is about $70/hr, or $1400 and another $600 in supplies and tax (on labor too). So for $2000, they moved our stalled out plumbing project to completion (rough in) and removed another hurdle for getting to the last big inspection and drywall. After drywall, we are in the final stages of finish work. After this, we'll have about 60 days to get the house ready for our occupancy permit and move in.
Tuesday, August 4, 2009
Cabinets in hand (Day 285)
The kitchen cabinets arrived in late July. Shelley Little of Kitchen and Bath Design in Port Townsend had them shipped to our rental house, whose garage has become a large storage locker. The cabinets are Medallion Brand, Gold Series (semi custom), with plywood boxes, quarter-sawn oak, and a nice pattern on the glass door fronts and cabinet ends. They have a vineyard color stain, so they are rather dark. Conversely, the island cabinets are also quarter-sawn oak (parallel grain), but finished off in natural color (lacquer). They looked great in the show room and we don't think we'll be disappointed when they get installed this fall.
 The freight truck brought about 40 box all told. Some were really big (the refrigerator and double oven case), most were medium size (base cabinets), and the others were smaller (upper cabinets and parts of the island). Somehow we're supposed to screw them together and to the walls and end up with a large L-shaped kitchen that fits exactly into the space provided. The island is a little easier because it just have to go over the plumbing stubouts and electrical lines.
We have 30 days (until mid August) to check over all the cabinets for damage or flaws. Nancy and I have been going through them in the evenings, wine glasses in hand (they are Vineyard color, for gosh sakes). We opened about 30 of the 40 boxes and everything was fine. Well packed, with cardboard corners to protect them and tightly bound in the boxes. Not bag for having been shipped from Michigan.
Now we have to figure out how to get Bill Hart (Nancy's dad) up here to supervise the installation of all the cabinets. No looking for manual labor Bill, just sit back in a lawn chair and supervise the install. Couldn't be easier, and you'll get a chance to see Port Townsend, all the boats, and have some fine food and weather. I'm thinking we'll need you in mid to late October, since we need (want) to move in around Halloween. Trick or treat.
 The freight truck brought about 40 box all told. Some were really big (the refrigerator and double oven case), most were medium size (base cabinets), and the others were smaller (upper cabinets and parts of the island). Somehow we're supposed to screw them together and to the walls and end up with a large L-shaped kitchen that fits exactly into the space provided. The island is a little easier because it just have to go over the plumbing stubouts and electrical lines.
We have 30 days (until mid August) to check over all the cabinets for damage or flaws. Nancy and I have been going through them in the evenings, wine glasses in hand (they are Vineyard color, for gosh sakes). We opened about 30 of the 40 boxes and everything was fine. Well packed, with cardboard corners to protect them and tightly bound in the boxes. Not bag for having been shipped from Michigan.
Now we have to figure out how to get Bill Hart (Nancy's dad) up here to supervise the installation of all the cabinets. No looking for manual labor Bill, just sit back in a lawn chair and supervise the install. Couldn't be easier, and you'll get a chance to see Port Townsend, all the boats, and have some fine food and weather. I'm thinking we'll need you in mid to late October, since we need (want) to move in around Halloween. Trick or treat.
Sunday, August 2, 2009
Rock On (Day 283)
Frank Ward, the mason, is done with the Eldorado stone facing. Its been a lengthy process, mainly because he has a regular job so our's is a weekend affair. He'd been unemployed for 6 months but as soon as he took our job he got on with a firm in Bremerton that was doing some repair work on a multimillion dollar starter home (they used to call these Mac Mansions; now known as a Madoff Cottages).
Last Thursday and Friday, Frank had worked his way around to the front of the house, primarily on the garage-street side. This is the part most people will see, so we were anxious to get this done and done right. He's a careful guy; hasn't cut a single stone so far. This is important because when you slice through Eldorado stone you see regular concrete (with fine aggregate)—not pretty or expected. The little bit of cutting that will be done are on the absolute ends of the facing, where rock abuts vertical fir trim. This way any cuts will be completely concealed.
 I had had visions of doing all the rock work myself. OH how naive I still am at the tender age of 59. It would have taken me a year (owing to my type A personality and snails pace) and it would have looked like you know what. To do this right, you have to mix colors, sizes and shapes as you go, making sure not to make clusters (like thin stones or reddish stones). Plus we're using a dry stack technique (no mortar between stones ), which is even harder to make look good.
As I mentioned before, when you lay up this sort of stone you start and the corners and tops and work down and inward. The last stone you'll lay on a wall will be on the bottom and near the middle. That way no mortar is dripping down on stones, which makes clean up easy.
After you butter the stones up (with mortar), you push the stone on firmly and it stays in place. Nancy laid one the other day, which reminded me of the time I laid a paver at the Pope's Summer Palace at Gondolfo in Italy (that is another story). Within 5-10 minutes, you'll have to pry it off if you've made a boo boo. No boo boos so far, and nearly 350 square feet of rock in is place (3 ft x 100 ft). I looks like we'll have 4 boxes of stone left over (Frank is not a wasteful guy), a box of preformed corners, and 5 bags of mortar mix. We're thinking about having him do the chimney chase, which Richard Berg designed as stone faced, but we chickened out on (too expensive on the first go around). But since we have most of the material, then another chunk of change to lay the chimney up would be money well spent.
Last Thursday and Friday, Frank had worked his way around to the front of the house, primarily on the garage-street side. This is the part most people will see, so we were anxious to get this done and done right. He's a careful guy; hasn't cut a single stone so far. This is important because when you slice through Eldorado stone you see regular concrete (with fine aggregate)—not pretty or expected. The little bit of cutting that will be done are on the absolute ends of the facing, where rock abuts vertical fir trim. This way any cuts will be completely concealed.
 I had had visions of doing all the rock work myself. OH how naive I still am at the tender age of 59. It would have taken me a year (owing to my type A personality and snails pace) and it would have looked like you know what. To do this right, you have to mix colors, sizes and shapes as you go, making sure not to make clusters (like thin stones or reddish stones). Plus we're using a dry stack technique (no mortar between stones ), which is even harder to make look good.
As I mentioned before, when you lay up this sort of stone you start and the corners and tops and work down and inward. The last stone you'll lay on a wall will be on the bottom and near the middle. That way no mortar is dripping down on stones, which makes clean up easy.

After you butter the stones up (with mortar), you push the stone on firmly and it stays in place. Nancy laid one the other day, which reminded me of the time I laid a paver at the Pope's Summer Palace at Gondolfo in Italy (that is another story). Within 5-10 minutes, you'll have to pry it off if you've made a boo boo. No boo boos so far, and nearly 350 square feet of rock in is place (3 ft x 100 ft). I looks like we'll have 4 boxes of stone left over (Frank is not a wasteful guy), a box of preformed corners, and 5 bags of mortar mix. We're thinking about having him do the chimney chase, which Richard Berg designed as stone faced, but we chickened out on (too expensive on the first go around). But since we have most of the material, then another chunk of change to lay the chimney up would be money well spent.
Saturday, August 1, 2009
What's up with the weather (Day 281)
August 1, 2009
So last week, it was scorching hot and humid. People move to the Northwest for the pleasant summers and mild winters, but this year is a record setter. Probably no coincidence—we brought the uglies with us from Denver. This past winter was one of the coldest and snowiest in Port Townsend: the only ones not complaining about it was us (compared to Denver cold and snow) and the Snowbirds, who bugged out and missed it all.
 Now we have had two bouts of hot weather. One in late May was just way too early and too hot (90°), but it only lasted a couple of days. This last one (late July) was something else. Set an all time (as in 150 yr) record of 103°F in Seattle and 107° in Vancouver, WA (USGS'ers Willie Scott and C Dan Miller must have loved that). We made it to 95° in Port Townsend and it was about 90° for three days running. I've never sweated so much in my life, but then again I've never lived in Humidity Land (anywhere east of the Rockies).
Nevertheless, this morning we awoke to Pea Soup, the gray 100% vapor content type that comes and goes all year up here. Having grown up in Salinas (the Salad Bowl of the World—their actual words), I never thought I'd be happy to see fog, but I am (for now). That's it for today from the sunny Northwest. Still hanging shingles and messing with the septic system electronics.
Wednesday, July 29, 2009
We own some Serpentinite (Day 279)
After picking out our kitchen counter top material at Michelangelo in Seattle, we sealed the deal by writing a fabrication contract with Richert's Marble and Granite in Sequim, WA. There are hundreds of fabricators in the region, but we like these guys (locals) a lot. It started a couple of years ago when we stopped by to see their operation. Susie and John run this shop with 3-6 employees (I'm guessing, business is slow now days). Good display room, nice clean shop and very friendly. Then we noticed they have a Subaru (just like ours--more to talk about). An they are sailors (Caribbean bareboaters). Shoot, we could hardly get outta the place. So we asked about lunch, and Susie suggested the Old Mill Cafe in Carlsborg, about 2 blocks from there place. Great restaurant, the owner Larry is quite a character and waitress Jeanine and her husband (Brian Kawal) make high end custom furniture in Sequim (take a look at www.briankawal.net).
 Anyway, over the past few years we'd stop by and chat with Susie, who manages the front end of the shop. She does all the layout for the slabs, and John does the cutting and fabrication. On Monday we went over to see our 2 slabs of Verde Vermont Antique. John had selected two for us and brought them over to Sequim along with a dozen other slabs for current customers. They looked just as good as in Seattle, but my photos aren't great due to reflections from the polished surface of the rock.
The company that markets this material isn't doing themselves any favors by calling it Serpentine (or green) Marble. Marble, as you may know, is a low grade metamorphic rock almost always composed primarily of calcium carbonate (calcite). One of calcite's (and thus marble's) interesting traits is that it is soluble in acid. Now who would ever put acid on a counter top you say: Try vinegar, lemon, tomato, wine, coca cola, etc. All in the 2-4 pH range. Each will etch the surface and leave a visible ring, which cannot be removed.
So we literally did the acid test on the Verde Vermont Antique. White wine (pH 3) and a slice of lemon (pH 2.3) overnight on a sample we got from Michaelangelos. Sat overnight, then I wiped the mess up in the morning. Both left a slightly darker spot, but no etching of the polished surface. The dark spot disappeared as the rock dried, so that was a surface effect. In our minds, the rock passed the ACID TEST. So in reality, the Verde Vermont Antique should be marketed as Serpentinite, but that's not nearly as intriguing a name. Here is a little blurb on the geology of Verde Vermont Antique for my geology friends (from www.vtverde.com). The quarry is located about 2 miles north of Rochester, VT, on the eastern margin of the Green Mountains.
 Vermont Verde Antique while having the “look” of marble is a serpentine and classified as a hydrous magnesium silicate. With the hardness and durability of most granite and its low absorption rate and high flexural strength, it is an excellent choice for both interior and exterior uses. Vermont Verde Antique is the commercial name for the serpentine “marble” derived from highly sheared ultramafic rocks that have been rewelded and metasomatized by the process of serpentinization. Numerous lense-shaped serpentinite bodies of varying size occur along the spine of the Green Mountains, west of the Adirondacks. The ultramafic bodies, once thought to be of igneous intrusive origin, are now recognized as segments of ancient oceanic crust that became part of the eastern North American continent during the Taconian orogeny. This is considered to be middle Ordovician in age, around 450 million years ago. More deformation and metamorphism took place during the Acadian orogeny around 360 million years ago. This may have resulted in the polishable Vermont Verde Antique serpentine.
 Anyway, over the past few years we'd stop by and chat with Susie, who manages the front end of the shop. She does all the layout for the slabs, and John does the cutting and fabrication. On Monday we went over to see our 2 slabs of Verde Vermont Antique. John had selected two for us and brought them over to Sequim along with a dozen other slabs for current customers. They looked just as good as in Seattle, but my photos aren't great due to reflections from the polished surface of the rock.
The company that markets this material isn't doing themselves any favors by calling it Serpentine (or green) Marble. Marble, as you may know, is a low grade metamorphic rock almost always composed primarily of calcium carbonate (calcite). One of calcite's (and thus marble's) interesting traits is that it is soluble in acid. Now who would ever put acid on a counter top you say: Try vinegar, lemon, tomato, wine, coca cola, etc. All in the 2-4 pH range. Each will etch the surface and leave a visible ring, which cannot be removed.

So we literally did the acid test on the Verde Vermont Antique. White wine (pH 3) and a slice of lemon (pH 2.3) overnight on a sample we got from Michaelangelos. Sat overnight, then I wiped the mess up in the morning. Both left a slightly darker spot, but no etching of the polished surface. The dark spot disappeared as the rock dried, so that was a surface effect. In our minds, the rock passed the ACID TEST. So in reality, the Verde Vermont Antique should be marketed as Serpentinite, but that's not nearly as intriguing a name. Here is a little blurb on the geology of Verde Vermont Antique for my geology friends (from www.vtverde.com). The quarry is located about 2 miles north of Rochester, VT, on the eastern margin of the Green Mountains.
 Vermont Verde Antique while having the “look” of marble is a serpentine and classified as a hydrous magnesium silicate. With the hardness and durability of most granite and its low absorption rate and high flexural strength, it is an excellent choice for both interior and exterior uses. Vermont Verde Antique is the commercial name for the serpentine “marble” derived from highly sheared ultramafic rocks that have been rewelded and metasomatized by the process of serpentinization. Numerous lense-shaped serpentinite bodies of varying size occur along the spine of the Green Mountains, west of the Adirondacks. The ultramafic bodies, once thought to be of igneous intrusive origin, are now recognized as segments of ancient oceanic crust that became part of the eastern North American continent during the Taconian orogeny. This is considered to be middle Ordovician in age, around 450 million years ago. More deformation and metamorphism took place during the Acadian orogeny around 360 million years ago. This may have resulted in the polishable Vermont Verde Antique serpentine.
Subscribe to:
Posts (Atom)
About Me

- Kala Point Builder
- Professional geologist (USGS, 1972-2008), amateur home remodeler and now builder. Interested in sailing, all things involving salt water, woodworking, and food in general. Owner of Paleo Seis Surveys LLC, consulting in Quaternary geology and geological hazards.